NIST SPECIAL PUBLICATION 1800-6C
Domain Name System-Based Electronic Mail Security
Volume C:
How-To Guides
Scott Rose
Information Technology Laboratory
National Institute of Standards and Technology
William Barker
Dakota Consulting
Silver Spring, MD
Santos Jha
Chinedum Irrechukwu
The MITRE Corporation
McLean, VA
Karen Waltermire
National Cybersecurity Center of Excellence
National Institute of Standards and Technology
January 2018
This publication and its additional content is available free of charge from:
https://doi.org/10.6028/NIST.SP.1800-6

DISCLAIMER
Certain commercial entities, equipment, or materials may be identified in this document in order to describe an experimental procedure or concept adequately. Such identification is not intended to imply recommendation or endorsement by NIST or NCCoE, nor is it intended to imply that the entities, materials, or equipment are necessarily the best available for the purpose.
National Institute of Standards and Technology Special Publication 1800-6C, Natl. Inst. Stand. Technol. Spec. Publ. 1800-6C, 166 pages, (January 2018), CODEN: NSPUE2
All comments are subject to release under the Freedom of Information Act (FOIA).
NATIONAL CYBERSECURITY CENTER OF EXCELLENCE
The National Cybersecurity Center of Excellence (NCCoE), a part of the National Institute of Standards and Technology (NIST), is a collaborative hub where industry organizations, government agencies, and academic institutions work together to address businesses’ most pressing cybersecurity issues. This public-private partnership enables the creation of practical cybersecurity solutions for specific industries, as well as for broad, cross-sector technology challenges. Through consortia under Cooperative Research and Development Agreements (CRADAs), including technology partners—from Fortune 50 market leaders to smaller companies specializing in IT security—the NCCoE applies standards and best practices to develop modular, easily adaptable example cybersecurity solutions using commercially available technology. The NCCoE documents these example solutions in the NIST Special Publication 1800 series, which maps capabilities to the NIST Cyber Security Framework and details the steps needed for another entity to recreate the example solution. The NCCoE was established in 2012 by NIST in partnership with the State of Maryland and Montgomery County, Md.
To learn more about the NCCoE, visit https://nccoe.nist.gov. To learn more about NIST, visit https://www.nist.gov.
NIST CYBERSECURITY PRACTICE GUIDES
NIST Cybersecurity Practice Guides (Special Publication Series 1800) target specific cybersecurity challenges in the public and private sectors. They are practical, user-friendly guides that facilitate the adoption of standards-based approaches to cybersecurity. They show members of the information security community how to implement example solutions that help them align more easily with relevant standards and best practices and provide users with the materials lists, configuration files, and other information they need to implement a similar approach.
The documents in this series describe example implementations of cybersecurity practices that businesses and other organizations may voluntarily adopt. These documents do not describe regulations or mandatory practices, nor do they carry statutory authority.
ABSTRACT
This document proposes a reference guide on how to architect, install, and configure a security platform for trustworthy email exchanges across organizational boundaries. The project includes reliable authentication of mail servers, digitally signing and encrypting email, and binding cryptographic key certificates to sources and servers. The example solutions and architectures presented here are based upon standards-based and commercially available products. The example solutions presented here can be used by any organization implementing Domain Name System-based electronic mail security.
KEYWORDS
authentication; data integrity; digital signature; domain name system; electronic mail; encryption; internet addresses; internet protocols; named entities; privacy
ACKNOWLEDGMENTS
We are grateful to the following individuals for their generous contributions of expertise and time.
| Name | Organization |
|---|---|
| Bud Bruegger | Fraunhofer IAO |
| Victoria Risk | Internet Systems Consortium |
| Eddy Winstead | Internet Systems Consortium |
| Paul Fox | Microsoft Corporation |
| Janet Jones | Microsoft Corporation |
| Nate Lesser | National Cybersecurity Center of Excellence |
| Karen Waltermire | National Cybersecurity Center of Excellence |
| Doug Montgomery | NIST ITL Advanced Networks Technologies Division |
| Ralph Dolmans | NLnet Labs |
| Benno Overeinder | NLnet Labs |
| Joe Gersch | Secure64 |
| Saksham Manchanda | Secure64 |
The Technology Partners/Collaborators who participated in this build submitted their capabilities in response to a notice in the Federal Register. Respondents with relevant capabilities or product components were invited to sign a Cooperative Research and Development Agreement (CRADA) with NIST, allowing them to participate in a consortium to build this example solution. We worked with:
| Technology Partner/Collaborator | Build Involvement |
|---|---|
| Fraunhofer IAO | Configuration of DNS Services products and Mail Transfer Agent |
| Internet Systems Consortium | DNS Services software |
| Microsoft Corporation | Mail User Agent, Mail Transfer Agent, and DNS Services products |
| NLNet Laboratories | DNS Services products and configuration of Mail Transfer Agent |
| Secure64 | DNS Services and Mail User Agent products and configuration of Mail User Agent and Mail Transfer Agent |
List of Figures
Figure 1.1 DNS-Based Email Security Deployment Diagram
Figure 2.1 DNS-Based Email Security Test Set-up
Figure 2.2 S/MIME and SMIMEA Deployment Flowchart
Figure 2.3 TLS/TLSA Deployment Flowchart
Figure 2.4 Adding Network Users for Trustworthy Email
Figure 2.5 Removing Network Users for Trustworthy Email
Figure 2.6 Authentication Checks Workflow for Trustworthy Email
Figure 3.1 Example OpenSSL Configuration File
Figure C.1 Fraudulent DNS Address Spoofing Configurations
Figure C.2 Man-in-the-Middle Event Configurations
Figure C.3 Failed Delivery Logs
List of Tables
Table C.1 Transaction Results Based on Sender TLS/DANE Connection
1. Introduction
The following guide shows IT professionals and security engineers how we implemented example solutions to the challenge of employing Domain Name System Security Extensions (DNSSEC) [1], and protocol-based digital signature and encryption technologies to protect electronic mail (email). We cover all the products that we employed in our solution set. We do not recreate the product manufacturer’s documentation, which is presumed to be widely available. Rather, this guide shows how we incorporated the products together in our environment to provide composed security platforms.
Note: This is not a comprehensive tutorial. There are many possible service and security configurations for these products that are out of scope for this reference solution set.
1.1. Practice Guide Structure
This National Institute of Standards and Technology (NIST) Cybersecurity Practice Guide addresses the challenge of providing digital signature technologies to provide authentication and integrity protection for email on an end-to-end basis, and confidentiality protection for email in transit between organizations.
The NIST Special Publication 1800-6 series of documents contain:
- rationale for and descriptions of a Domain Name System-based (DNS-based) email security platform that permits trustworthy email exchanges across organizational boundaries
- a series of How-To Guides, including instructions for installation and configuration of the necessary services, that show system administrators and security engineers how to achieve similar outcomes
The solutions and architectures presented are built upon standards-based, commercially available products. These solutions can be used by any organization deploying email services that is willing to implement certificate-based cryptographic key management and DNSSEC. Interoperable solutions are provided that are available from different types of sources (e.g., both commercial and open source products) and function in different operating systems environments.
This summary section describes the challenge addressed by this Volume C (How-To Guide), the solution demonstrated to address the challenge, the components provided by project collaborators that have been used to compose the security platforms, an overview of how the components are configured to permit construction of platforms that cross product lines, and typographical conventions used in the Practice Guide. Section 2, How to Install and Configure DNS-Protected Email Security Components, provides mail and transport layer security composition and component-centric requirements and recommendations intended to permit using Mail User Agent (MUA), Mail Transfer Agent (MTA), and DNS services components with MUAs, MTAs, and DNS services from different vendors and open sources [2]. (MTA roles may vary depending on the situation. See Section 2, Definitions, at https://datatracker.ietf.org/doc/rfc3888.) It includes system requirements, installation instructions and advice and special settings requirements associated with each of the MUA, MTA, and DNS services components. In most cases where the components are commercial products, links are simply provided to vendor sites. More detailed instructions are provided for downloading, installing, and configuring open-source products. Section 3, Device Configuration and Operating Recommendations, provides some specific advice and tools to support secure and reliable integration and operation of the security platforms. Topics include certificate acquisition and management options, managing mail transfer agent operation where there are significant numbers of cases of non-delivery of messages due to invalid digital signatures, device setup recommendations, email setup recommendations, and management of exception conditions. Appendix A is a list of acronyms. Appendix B provides references. Appendix C describes test events and results from exercising different combinations of components into composed security platforms, including system responses to attempts to subvert DNSSEC protection mechanisms. Appendix D is a checklist for recommended secure domain name system deployment practices. Finally, for readers unfamiliar with any of the specific components employed by this project, Appendix E provides a set of high-level collaborator product descriptions for contributed components. Appendix F describes an example NCCoE installation and configuration of components provided by our NLnet Labs collaborator. Appendix G describes an example NCCoE installation and configuration of components provided by our Microsoft collaborator. Appendix H describes NCCoE installation and configuration of components provided by our Secure64 collaborator.
1.2. Build Overview
1.2.1. Usage Scenarios Supported
The scenarios supported include:
“ordinary” email where the email exchanges between two organizations’ email servers communicate over Transport Layer Security (TLS) [3] with a STARTTLS [4] extension, and relevant TLSA [5] records are published in the receiver’s DNS zone protected by DNSSEC (Scenario 1 in this document)
end-to-end signed email, where the email exchanges between users in different organizations are carried over a channel protected by TLS (using the STARTTLS extension), and relevant artifacts used for signing and channel protection are published in a DNS zone protected by DNSSEC (Scenario 2). Subsequently, these artifacts are used for Secure/Multipurpose Internet Mail Extensions (S/MIME) [6] and TLS validation.
In both scenarios, end-entity and personal certificates were generated from Certificate Authorities (CAs) [2]. Use of “well known” (i.e. installed as trust anchors in hosts), local enterprise CAs and self-signed certificates were demonstrated.
While the second scenario demonstrated signing of emails, it does not include an end-to-end encrypted email scenario. Signing addresses the main security concerns in enterprise environments, which are the target of the project, but may neglect concerns of individual users who may also want to reduce information disclosure to their email providers. The two scenarios that are included may, however, serve as enablers for end-to-end encryption. Participation by parties having a primarily end-to-end encryption focus may succeed in generating industry support for the building blocks needed to support end-to-end encryption.
In more detail, the project’s security platforms use the STARTTLS extension to include encryption of communications between two MTAs, as well as the signature of individual messages using S/MIME. The encryption and decryption with S/MIME on the end user’s client was excluded from the current platform demonstration.
1.2.2. Architectural Overview
The laboratory architecture for the project was designed to permit interconnection of Microsoft Outlook, Apple Mail, and Thunderbird MUAs with Microsoft Exchange and Postfix/Dovecot MTAs. It demonstrates the interconnection of either MTA with various DNS services contributed by collaborators. Two instantiations of each MTA type were established to demonstrate email exchanges between MTAs of the same type or different types. The various component combinations were demonstrated with three different TLSA RR [5] parameters: a self-signed certificate, use of local certificate authorities, and use of well-known certificate authorities.
Figure 1.1 is a deployment diagram of the architecture used for demonstrating DNS-based email security. The following subsections describe the architecture’s MUA, MTA, and DNS service components and Cybersecurity Framework Core categories supported by those components. Component descriptions are provided in Appendix E for those not familiar with some of the individual components.
Figure 1.1 DNS-Based Email Security Deployment Diagram
1.2.2.1. Client Systems and Mail User Agents (MUAs)
Client systems environments demonstrated were Microsoft Office, an open-source Linux-based Thunderbird application, and Thunderbird with a Secure64-provided Apple Key Chain utility. This set includes both commercial products and open-source software. MUA capabilities associated with the client systems are used to invoke S/MIME digital signature and signature verification for email, but user-to-user encryption is not demonstrated. Collaborators assisted in installation, integration tailoring as necessary, and testing of laboratory configurations.
1.2.2.2. Email Servers
Email servers include both Windows and Linux-based (Postfix/Dovecot) Mail Transfer Agents. Server-to-server encryption was demonstrated in Postfix environments. Authentication of domain and server identity was based on DNSSEC-signed DANE records. Use of these DANE records is only supported by Postfix at the time of this project. The servers were demonstrated in different DNS environments and different TLSA RR usage scenarios. In order to demonstrate representative TLSA parameters, the demonstrations used self-signed certificates, end-entity certificates generated by well-known CAs and end-entities generated by enterprise local CAs.
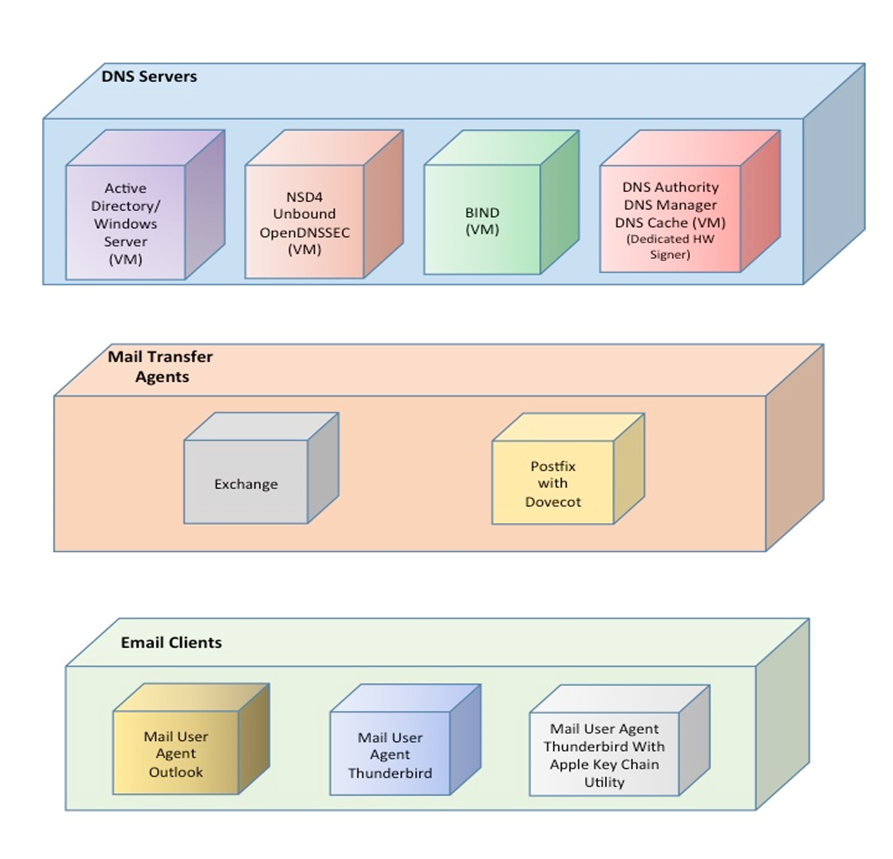
1.2.2.3. DNS Servers
Both Windows and Linux-based DNS server and support components were contributed. DNS services provided include DNSSEC validating DNS resolvers (stub and recursive) and authoritative DNS servers for DNSSEC signed zones [7]. Support for SMIMEA and TLSA records was demonstrated. DNS components included Microsoft’s Active Directory and DNS Server; Internet Systems Consortium’s (ISC’s) Berkeley Internet Name Domain (BIND); NLnet Labs’ NSD4, Unbound, and OpenDNSSEC; and Secure64’s DNS Signer, DNS Authority, DNS Cache, DNS Manager, and Apple Key Chain Utility.
1.3. Typographical Conventions
The following table presents typographic conventions used in this volume.
| Typeface/Symbol | Meaning | Example | |
|---|---|---|---|
| Italics | filenames and pathnames references to documents that are not hyperlinks, new terms, and placeholders |
For detailed definitions of terms, see the NCCoE Glossary. | |
| Bold | names of menus, options, command buttons and fields | Choose File > Edit. | |
Monospace
|
command-line input, on-screen computer output, sample code examples, status codes | mkdir
|
|
Monospace Bold
|
command-line user input contrasted with computer output | service sshd start
|
|
| blue text | link to other parts of the document, a web URL, or an email address | All publications from NIST’s National Cybersecurity Center of Excellence are available at https://nccoe.nist.gov. | |
2. How to Install and Configure DNS-Protected Email Security Components
This section explains set up for the component sets provided by project collaborators. Set-up is described for a virtual machine environment. The environment used for this project was the Centos 7 Linux distribution running on VMware. This section includes a description of the laboratory set-up for the capability demonstrations and flow charts for installation and configuration of mail security and DNS security components in an enterprise. This configuration overview is followed by some general instructions for installation and configuration of open source components, with links to source sites for more detailed instructions. Less general installation is provided for commercial components, but links are provided to the vendor sites. Specific installation and configuration instructions for the NCCoE environment are provided as appendices (Appendix F, Appendix G, and Appendix H).
2.1. Laboratory Set-up
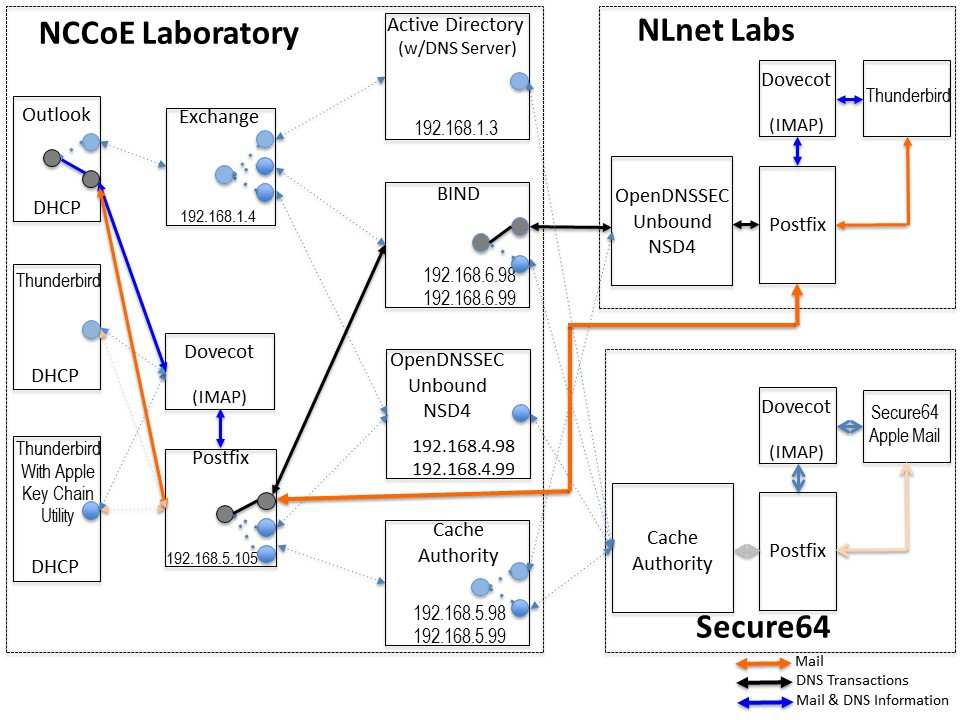
The design of the environment permits interconnection of components provided by different collaborators (see Figure 2.1).
The depiction shows that the project security platform test/demonstration activity was based on three different clients, two MTAs, and four DNS service configurations in the lab at the NCCoE exchanging messages with NLnet Labs and Secure64. All messages were signed (a mail client function). Messages sent via the MTAs were encrypted (server to server). The message exchanges, including DNS activity will be logged at each end (lab and remote correspondent).
The solid connectors in the depiction illustrate one case. The dotted lines depict the other cases we want to demonstrate. A switch convention is used to reflect configuration options, but the project team actually configures each component for each option.
The orange arrows between the mail clients and the Postfix MTA reflect the fact that clients submitted email directly to the SMTP server for relay, while using Dovecot only to get mail. (The depiction in Figure 2.1 reflects that IMAP is not used to submit mail, only retrieve it, so the MUA sent mail directly to the Postfix server, but received the reply through the Dovecot server.)
Figure 2.1 DNS-Based Email Security Test Set-up
The project team demonstrated 30 different events using various combinations of MUA, MTA, and DNS Server components divided among five test sequences. In each sequence, signed and encrypted messages were sent from a sender to a recipient. Postfix encrypted mail by default. Most of the exchanges employed either self-signed certificates or local CAs (see Appendix C). The BIND configuration was set up to obtain and validate certificates from the NIST Advanced Networks Technology Division’s (ANTD’s) DNS source (acting as a root CA).
2.1.1. Sequence 1 Set-up
Sequence 1 demonstrated use of well-known CA issued cryptographic certificates (CU=1), enterprise CA issued certificates (CU=2), and self-signed certificates (CU=3) with an Outlook/Exchange/Active Directory and Outlook/Exchange/BIND MUA/MTA/DNS Server stack. The integrity of cryptographic certificates is generally checked by verifying a digital signature generated for the certificate by its source. Certificates may be self-signed by an entity that both generates and uses it, signed by the parent enterprise that is responsible for generating and using the certificate, or be signed by some “well-known” third party certificate source that is trusted by organizations using the certificates for cryptographic protection processes. Certificate usage is designated “CU=1” for certificates issued by well-known CAs, “CU=2” for certificates is- sued by enterprise CAs (also known as Local CAs), and “CU=3” for certificates that are self-signed. CU=1 is generally considered most trustworthy, and CU=3 is considered least trustworthy.
Mail was exchanged between the NCCoE and two remote sites. The first site, Secure64 in Ft Collins, Colorado, used a Thunderbird MUA with a utility for MacBook that can fetch SMIMEA records and put them into a key store, a Postfix MTA, and Signer/Authority/Cache DNS servers. The NLnet site used an Intel-hosted Thunderbird MUA, a Postfix/Dovecot MTA, NSD4 and Unbound for processing received messages, and OpenDNSSEC for outbound messages. All messages were S/MIME signed (Scenario 2 only).
Table 2.1 Test Sequence 1
| Sequence 1 | NCCoE Lab | Remote Sites | Certificate on Receiver Side | ||
| Event | MUA | MTA | DNS Service | Secure64 and NLnet Labs | |
| 1 | Outlook | Exchange | Active Directory /DNS Server | Enterprise CA issued (CU=2) | Well-known CA issued (CU=1) |
| 2 | Outlook | Exchange | Active Directory /DNS Server | Same as 1 | Local CA issued (CU=2) |
| 3 | Outlook | Exchange | Active Directory /DNS Server | Same as 1 | Self-signed Cert (CU=3) |
| 4 | Outlook | Exchange | BIND | Same as 1 | Well-known CA issued (CU=1) |
| 5 | Outlook | Exchange | BIND | Same as 1 | Local CA issued (CU=2) |
| 6 | Outlook | Exchange | BIND | Same as 1 | Self-cert (CU=3) |
2.1.2. Sequence 2 Set-up
Sequence 2 demonstrated use of an Outlook/Postfix MUA/MTA configuration with a BIND DNS Server, and a Thunderbird/Postfix MUA/MTA configuration with both BIND and DNS Signer/Authority/Cache set-ups. All three certificate usage approaches were demonstrated. Mail was exchanged between the NCCoE and both Secure64 and NLnet Labs sites. As in Sequence 1, the secure64 site used a Thunderbird MUA, a Postfix MTA, and OpenDNSSEC/Unbound/NSD4 DNS servers; and the NLnet Labs site used a Thunderbird MUA, a Postfix/Dovecot MTA, NSD4 and Unbound for DNS processing received messages, and OpenDNSSEC for outbound messages. Email messages between MTAs were encrypted and successfully decrypted via TLS; an intermediate processor verified that encryption occurred; inspection of the received message verified that decryption was successful; encryption/decryption results were noted; and all messages were S/MIME signed (Scenarios 1 and 2).
Table 2.2 Test Sequence 2
| Sequence 2 | NCCoE Lab | Remote Sites | Certificate on Receiver Side | ||
| Event | MUA | MTA | DNS Service | Secure64 and NLnet Labs | |
| 7 | Outlook | Postfix/ Dovecot | BIND | Thunderbird, Postfix/ Dovecot, NSD4/Unbound/ OpenDNSSEC Self-Signed Cert (CU=3) |
Well-known CA issued (CU=1) |
| 8 | Thunderbird | Postfix/ Dovecot | BIND | Same as 7 | Local CA issued (CU=2) |
| 9 | Thunderbird | Postfix/ Dovecot | BIND | Same as 7 | Self-signed Cert (CU=3) |
| 10 | Thunderbird | Postfix/ Dovecot | DNS Authority/ Cache/Signer | Same as 7 | Well-known CA issued (CU=1) |
| 11 | Thunderbird | Postfix/ Dovecot | DNS Authority/ Cache/Signer | Same as 7 | Local CA issued (CU=2) |
| 12 | Thunderbird | Postfix/ Dovecot | DNS Authority/ Cache/Signer | Same as 7 | Self-cert (CU=3) |
2.1.3. Sequence 3 Set-up
Sequence 3 used an Outlook/Exchange/Active Directory stack to pose as the remote suite used in Sequence 1 and attempt to spoof an Outlook/Exchange Active Directory stack and a Thunderbird/Postfix configuration served by each of three DNS server types (OpenDNSSEC/NSD4/Unbound, DNS Signer/Authority/Cache, and BIND). All events were conducted using well-known CA and Enterprise CA-issued certificates for the impersonated sender. The email exchange between organizations was carried over TLS, and the email message was S/MIME signed on the fraudulent users’ client device.
Table 2.3 Test Sequence 3
| Sequence 3 | NCCoE Lab | Remote Sites | Certificate on Receiver Side | ||
| Event | MUA | MTA | DNS Service | Secure64 and NLnet Labs | |
| 13 | Outlook | Exchange | Active Directory | Thunderbird on MacBook, Postfix/ Dovecot, DNS Authority/ Cache/Signer Local CA issued (CU=2) |
Local CA (CU=1) |
| 14 | Thunderbird | Postfix/ Dovecot | NSD4/Unbound/ Open DNSSEC | Same as 13 | Local CA issued (CU=1) |
| 15 | Thunderbird on MacBook | Postfix/ Dovecot | DNS Authority/ Cache/Signer | Same as 13 | Local CA issued (CU=1) |
| 16 | Outlook | Exchange | Active Directory | Same as 13 | Self-signed Cert (CU=3) |
| 17 | Thunderbird | Postfix/ Dovecot | NSD4/Unbound/ Open DNSSEC | Same as 13 | Self-signed Cert (CU=3) |
| 18 | Thunderbird | Postfix/ Dovecot | BIND | Same as 13 | Self-cert (CU=3) |
2.1.4. Sequence 4 Set-up
Attempts were made to send a TLS protected email from Exchange and Postfix MTAs (in turn) to an external Postfix MTA using DNS Authority/Cache/Signer for DNS services. The NCCoE Exchange MTA used Active Directory DNS Services, and the Postfix/Dovecot MTA uses BIND, NSD4/Unbound/OpenDNSSEC, and DNS Signer/Authority/Cache DNS services. An S/MIME signed email was sent to an external Postfix MTA. Events were conducted using Well-Known CA issued certificates, events using Enterprise CA issued certificates (TLSA/SMIMEA RR parameter of CU=2) for TLS and S/MIME on the receiver side, and three using self-signed certificates (TLSA/SMIMEA RR parameter of CU=3) for TLS and S/MIME on the receiver side. An Outlook/Exchange/Active Directory stack acted as a man-in-the-middle and attempted to impersonate the legitimate receiver.
Table 2.4 Test Sequence 4
| Sequence 4 | NCCoE Lab | Remote Sites | Certificate on Receiver Side | ||
| Event | MUA | MTA | DNS Service | Secure64 and NLnet Labs | |
| 19 | Outlook | Exchange | Active Directory | Secure64 | Well-known CA (CU=1) |
| 20 | Thunderbird | Exchange | BIND | Secure64 | Well-known CA (CU=1) |
| 21 | Thunderbird | Postfix | NSD4/Unbound/ Open DNSSEC | Secure64 | Well-known CA (CU=1) |
| 22 | Thunderbird on MacBook | Postfix/ Dovecot | DNS Authority/ Cache/Signer | Secure64 | Well-known CA (CU=1) |
| 23 | Outlook | Exchange | Active Directory | Secure64 | Local CA (CU=2) |
| 24 | Thunderbird | Postfix/ Dovecot | BIND | Secure64 | Local CA (CU=2) |
| 25 | Thunderbird on MacBook | Postfix/ Dovecot | NSD4/Unbound/ Open DNSSEC | Secure64 | Local CA (CU=2) |
| 26 | Thunderbird on MacBook | Postfix/ Dovecot | DNS Authority/ Cache/Signer | Secure64 | Local CA (CU=2) |
| 27 | Thunderbird | Postfix/ Dovecot | Active Directory | Secure64 | Self-cert (CU=3) |
| 28 | Thunderbird | Exchange | BIND | Secure64 | Self-cert (CU=3) |
| 29 | Thunderbird on MacBook | Postfix/ Dovecot | NSD4/Unbound/ Open DNSSEC | Secure64 | Self-cert (CU=3) |
2.1.5. Sequence 5 Set-up
This sequence used an Authoritative DNS Server, a DANE-aware Postfix server, and four Exchange MTAs (each set up differently). One ran without TLSA, one had good TLSA and a self-signed certificate (CU=3), one had bad PKIX and a certificate from a well-known CA (CU=1), and one had a bad TLSA with a self-signed certificate (CU=3). A script running on the Postfix server generates a message stream. Logs of failed DNS events were examined.
2.1.6. How to Deploy SMIMEA and TLSA Software for Trustworthy Email
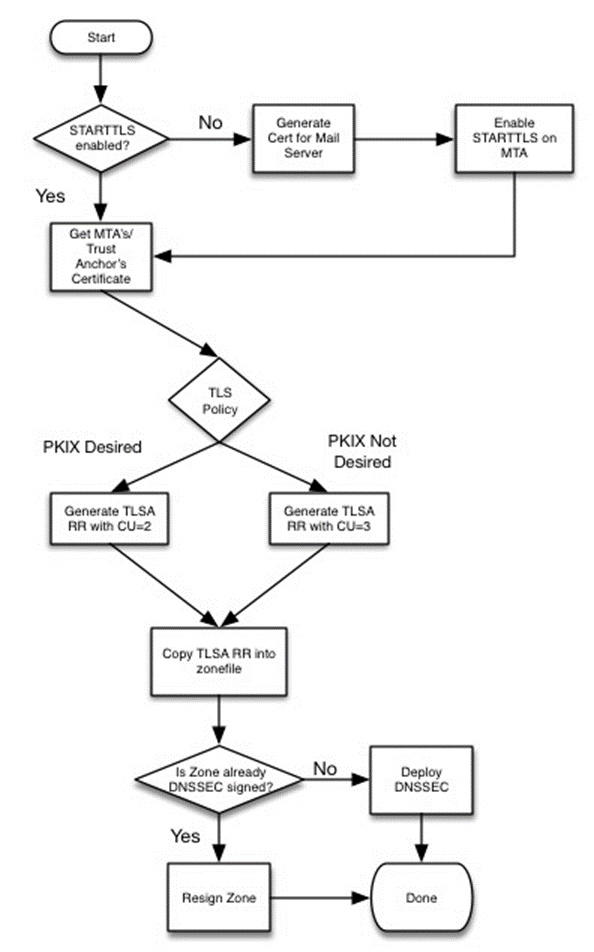
Set-up for the test sequences required deploying SMIMEA and TLSA, and adding certificates and records for users. Figures 2.2 and 2.3 are flowcharts depicting the steps required for installation and configuration of MUAs, MTAs, and DNS servers necessary to trustworthy email. Figure 2.2 depicts the process for setting up secure/multipurpose Internet mail extensions (S/MIME and SMIMEA). Figure 2.3 depicts the process for setting up transport layer security (i.e., TLS and TLSA). The figures assume that the enterprise has deployed DNSSEC, including DANE-aware components. The figures include questions regarding the installation and configuration status of components, and provides recommendations based on the answers to those questions. Together with the Secure Domain Name System (DNS) Deployment Checklist provided as Appendix D, these flowcharts are intended to facilitate establishment of a trustworthy email capability in a wide range of environments.
Figure 2.2 S/MIME and SMIMEA Deployment Flowchart
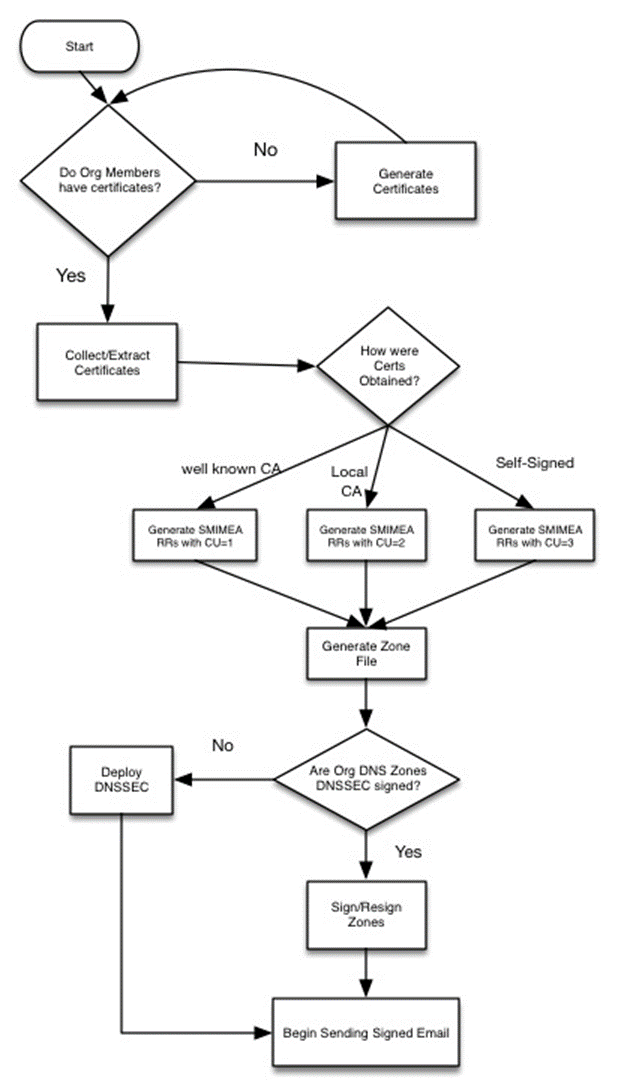
Figure 2.3 TLS/TLSA Deployment Flowchart
2.1.7. Adding and Removing Network Users
Adding users to networks with trustworthy email enabled involves identity management administrative, DNS administrative, and end user support activities. Figure 2.4 depicts the process for generating user network identities, new S/MIME Certificates for users, and SMIMEA resource records; publishing the records in the DNS, and configuring users’ MUAs to use S/MIME keys.
Figure 2.4 Adding Network Users for Trustworthy Email

When a user leaves an organization or access to network resources is revoked for other reasons, it is necessary to revoke the credentials that associate the user with the organization, and it may be in the best interest of the organization to do so as soon as possible, after the user is separated from the organization. This action requires the network or system administrator to disable the user’s network ID, revoke the user’s S/MIME certificates, and archive the certificates and associated keys; and requires the DNS administrator to remove the user’s SMIMEA resource records (RRs). Figure 2.5 depicts the flow for this process.
Figure 2.5 Removing Network Users for Trustworthy Email

There is a wide collection of security checks to email that have been added to the protocol. These checks are done to address a specific security risk: spoofing, spam, man-in-the-middle attacks, passive monitoring, etc. The order of the checks is not necessarily important, but for efficiency and to reduce the burden on receivers (who perform most of the checks) some checks can be performed before others. A basic flow can be seen in Figure 2.6.
Figure 2.6 Authentication Checks Workflow for Trustworthy Email
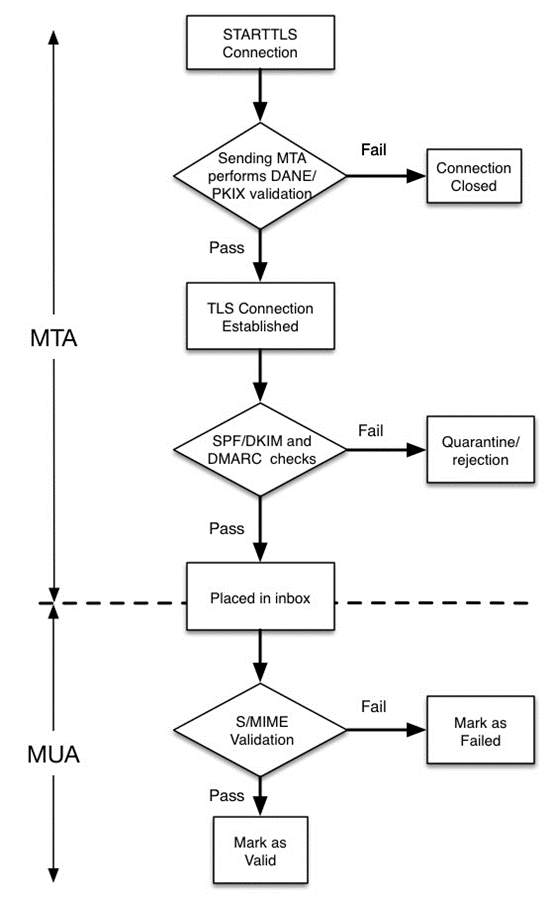
Figure 2.6 shows the process of authentication checks as seen by a mail receiver. One check is outside of the receiver’s control: the validation of the receiver’s MTA TLS certificate. The receiver does not know what trust anchors (if any) are installed on the sending MTA and what local policy the sending MTA has for accepting peer certificates. The receiver can use DANE to provide extra information or to scope validation, depending on how the receiver is deploying DANE RRs.
Once the TLS connection has been established and the mail is transferred, the receiver can perform other domain based anti-spoofing checks (e.g., SPF, DKIM and DMARC). This would also be the time when the receiving MTA would also perform any spam, malware or other content filtering. The ideal order of these checks is beyond the scope of this document. NIST SP 800-177 goes into more detail about the nature of these checks and gives an example “pipeline” for authentication checks.
Once the email message has passed all the MTA-based checks, the email is placed in a user’s inbox, where the user then accesses and/or downloads the message using their local MUA client. This is where the S/MIME signature (if present) is validated. The receiving MTA should not perform any S/MIME validation because it may not have all the necessary trusted keys. The client MUA should be responsible for having all necessary trust anchors, or using DANE to obtain the necessary authentication artifacts.
2.2. How to Install and Configure Microsoft Server-Based DNS-Protected Email Security Components
Outlook, Exchange, Active Directory, and DNS Server are commercial products that can be accessed from Microsoft’s web (e.g., https://www.microsoft.com/en-us/). Outlook is generally bundled in Microsoft Office (e.g., Office365 for Windows 10), and DNS Server is bundled in Microsoft Server systems (e.g., Server 2016). Active Directory tools and applications are not installed in Windows 10 by default, but instructions regarding how to get them can be found at http://www.technipages.com/windows-install-active-directory-users-and-computers. DNS Server is bundled with Server 2016. Please note that IP addresses, domain names, and mail addresses are, in many cases, specific to the NCCoE laboratory configuration and must not be used in actual implementations.
2.2.1. Installation Basics and System Requirements
System requirements are product-specific, and installation instructions are highly dependent of version, intended configuration, and tools set employed. The installation process, tools employed, and configuration process followed in setting up the NCCoE Microsoft components are provided as Appendix G to this Practice Guide. Manual pages are provided for individual applications of products and tools (e.g., https://technet.microsoft.com/en-us/library/bb245702(v=exchg.80).aspx and https://technet.microsoft.com/en-us/library/bb123543(v=exchg.141).aspx for Exchange, and https://technet.microsoft.com/en-us/library/dn626158(v=exchg.150).aspx for Outlook), and https://technet.microsoft.com/en-us/library/cc732284(v=ws.11).aspx for configuring a DNS server for use with Active Directory domain services; and from a wide variety of third party sources.
2.2.2. Installation of Active Directory, Server, and Exchange in the NCCoE Configuration
Appendix G describes installation and configuration of Active Directory, Server, and Exchange at the NCCoE.
2.3. How to Install and Configure BIND
The current guide for getting started with BIND and instruction on how to build and run named with a basic recursive configuration can be found at https://kb.isc.org/article/AA-00768/46/Getting-started-with-BIND-how-to-build-and-run-named-with-a-basic-recursive-configuration.html. The current BIND 9 Reference Manual can be found at https://www.isc.org/downloads/bind/doc/. An overview of installation and configuration basics follow. Please note that IP addresses, domain names, and mail addresses are, in many cases, specific to the NCCoE laboratory configuration and must not be used in actual implementations.
2.3.1. Installation Basics and System Requirements
BIND is distributed as source code, with executables provided for Windows. You download the code from ISC’s website (https://www.isc.org/downloads/), unpack the archive, and build it for whatever system you plan to run it on. You will need a UNIX system with an ANSI C compiler, basic POSIX support, and a 64-bit integer type. BIND runs and is supported on a very wide variety of new and old operating systems, including most UNIX and LINUX variants, and some Windows platforms.
Most users run BIND on CentOS, Red Hat Enterprise Linux, Debian, Fedora, FreeBSD, Solaris, Ubuntu or Windows. Windows users may find the explanation of the versions available for Windows (https://www.isc.org/downloads/bind/doc/) useful. The most up-to-date versions of BIND are always available from ISC on our web site and ftp server. Most operating systems also offer BIND packages for their users. These may be built with a different set of defaults than the standard BIND distribution and some of them add a version number of their own that does not map exactly to the BIND version.
The NCCoE BIND installation was based on CentOS 7, using BIND version 9.10.4. BIND 9.10.4 was the first version that included the support for SMIMEA resource records. BIND 9.11.0 and later versions (released after this NCCoE test) include a feature that automatically returns any TLSA records (if they exist) as additional data in answering queries for MX (email) records.
For configuration assistance, and overall understanding of how to use BIND, the BIND Administrative Reference Manual (ARM) (https://www.isc.org/downloads/bind/doc/) is the primary tool. Resolver users may find Getting started for Recursive Resolvers (https://kb.isc.org/article/AA-00768/46/Getting-started-with-BIND-how-to-build-and-run-named-with-a-basic-recursive-configuration.html) to be useful. Authoritative users may benefit from the BIND DNSSEC Quick Reference Guide (includes simple authoritative configuration with DNSSEC) https://kb.isc.org/article/AA-01311. A more comprehensive BIND DNSSEC Guide is at https://ftp.isc.org/isc/dnssec-guide/dnssec-guide.pdf.
2.3.2. BIND Installation and Configuration
ISC’s recommended link for BIND starter information is:
https://kb.isc.org/article/AA-00768/46/Getting-started-with-BIND-how-to-build-and-run-named-with-a-basic-recursive-configuration.html. For authoritative configuration, refer to the BIND9 ARM (https://www.isc.org/downloads/bind/doc/bind-9-10/).
To build, just enter:
./configure
make
Do not use a parallel “make”.
2.3.2.1. Environmental Variables
Several BIND environment variables that can be set before running configure will affect compilation:
CC
The C compiler to use. configure tries to figure out the right one for supported systems.
CFLAGS
C compiler flags. Defaults to include -g and/or -O2 as supported by the compiler. Please include ‘-g’ if you need to set CFLAGS.
STD_CINCLUDES
System header file directories. Can be used to specify where add-on thread or IPv6 support is, for example. STD_CINCLUDES defaults to empty string.
STD_CDEFINES
Any additional preprocessor symbols you want defined. STD_CDEFINES defaults to empty string.
Possible settings:
Change the default syslog facility of named/lwresd.
-DISC\_FACILITY=LOG\_LOCAL0Enable DNSSEC signature chasing support in dig.
-DDIG\_SIGCHASE=1 (sets -DDIG\_SIGCHASE\_TD=1 and -DDIG\_SIGCHASE\_BU=1)Disable dropping queries from particular well-known ports.
-DNS\_CLIENT\_DROPPORT=0Sibling glue checking in named-checkzone is enabled by default.
To disable the default check, set
-DCHECK\_SIBLING=0.Named-checkzone checks out-of-zone addresses by default. To disable this default set -DCHECK_LOCAL=0.
To create the default pid files in
${localstatedir}/runrather than${localstatedir}/run/{named,lwresd}/ set -DNS\_RUN\_PID\_DIR=0Enable workaround for Solaris kernel bug about /dev/poll
-DISC\_SOCKET\_USE\_POLLWATCH=1The watch timeout is also configurable, e.g.,
-DISC\_SOCKET\_POLLWATCH\_TIMEOUT=20LDFLAGS
Linker flags. Defaults to empty string.
2.3.2.2. Cross Compiling
The following need to be set when cross compiling:
BUILD_CC
The native C compiler.
BUILD_CFLAGS (optional)
BUILD_CPPFLAGS (optional) Possible Settings:
-DNEED\_OPTARG=1(optarg is not declared in <unistd.h>).BUILD_LDFLAGS (optional)
BUILD_LIBS (optional)
2.3.2.3. Multithreading Support
On most platforms, BIND 9 is built with multithreading support, allowing
it to take advantage of multiple CPUs. You can configure this by
specifying --enable-threads or --disable-threads on the configure
command line. The default is to enable threads, except on some older
operating systems on which threads are known to have had problems in the
past.
Note: Prior to BIND 9.10, the default was to disable threads on Linux systems; this has been reversed. On Linux systems, the threaded build is known to change BIND’s behavior with respect to file permissions; it may be necessary to specify a user with the -u option when running named.
2.3.2.5. Large Servers
Certain BIND compiled-in constants and default settings can be increased
to values better suited to large servers with abundant memory resources
(e.g., 64-bit servers with 12G or more of memory) by specifying
--with-tuning=large on the configure command line. This can improve
performance on big servers, but will consume more memory and may degrade
performance on smaller systems.
2.3.2.6. DNSSEC Support
For the BIND server to support DNSSEC, you need to build it with crypto
support. You must have OpenSSL 0.9.5a or newer installed and specify
--with-openssl on the configure command line. If OpenSSL is installed
under a nonstandard prefix, you can tell configure where to look for it
using --with-openssl=/prefix.
2.3.2.7. HTTP Statistics Channel Support
To support the HTTP statistics channel, the BIND server must be linked
with at least one of the following: libxml2 (http://xmlsoft.org) or
json-c (https://github.com/json-c). If these are installed at a
nonstandard prefix, use --with-libxml2=/prefix or
--with-libjson=/prefix.
To support compression on the HTTP statistics channel, the server must
be linked against libzlib (--with-zlib=/prefix).
2.3.2.8. Python Support
Python requires argparse and ply to be available. argparse is a standard module as of Python 2.7 and Python 3.2.
2.3.2.9. Files Larger than 2GB
On some platforms it is necessary to explicitly request large file
support to handle files bigger than 2GB. This can be done by
--enable-largefile on the BIND configure command line.
2.3.2.10. Fixed rrset-order Option
Support for the fixed rrset-order option can be enabled or disabled by
specifying --enable-fixed-rrset or --disable-fixed-rrset on the BIND
configure command line. The default is disabled, to reduce memory
footprint.
2.3.2.11. IPv6 Support
If your operating system has integrated support for IPv6, it will be
used automatically. If you have installed KAME IPv6 separately, use
--with-kame[=PATH] to specify its location.
2.3.2.12. Installing named and BIND9 Libraries
The make install tool will install named and the various BIND 9 libraries. By default, installation is into /usr/local, but this can be changed with the –prefix option when running configure.
2.3.2.13. Directory Setting Options
You may specify the option --sysconfdir to set the directory where
configuration files like named.conf go by default, and --localstatedir
to set the default parent directory of run/named.pid. For backwards
compatibility with BIND 8, --sysconfdir defaults to /etc and
--localstatedir defaults to /var if no --prefix option is given. If
there is a --prefix option, sysconfdir defaults to $prefix/etc and
localstatedir defaults to $prefix/var.
2.3.2.14. Other Configure Options
To see additional configure options, run configure --help. Note that the
help message does not reflect the BIND 8 compatibility defaults for
sysconfdir and localstatedir. If you’re planning on making changes to
the BIND 9 source, you should also make depend. If you’re using Emacs,
you might find make tags helpful.
2.3.2.15. Re-running Configure
If you need to re-run configure, please run make distclean first. This
will ensure that all the option changes take.
2.3.2.16. Building with gcc
Building with gcc is not supported, unless gcc is the vendor’s usual compiler (e.g. the various BSD systems, Linux).
2.3.2.17. Known Compiler and OS Issues
Known compiler issues include the following:
- gcc-3.2.1 and gcc-3.1.1 is known to cause problems with solaris-x86.
- gcc prior to gcc-3.2.3 ultrasparc generates incorrect code at -02.
- gcc-3.3.5 powerpc generates incorrect code at -02.
- Irix, MipsPRO 7.4.1m is known to cause problems.
- SunOS 4 requires printf to be installed to make the shared libraries.
- sh-utils-1.16 provides a printf which compiles on SunOS 4.
- Linux requires kernel
2.3.3. Testing
A limited BIND test suite can be run with make test. Many of the tests require you to configure a set of virtual IP addresses on your system, and some require Perl. (See bin/tests/system/README for details).
2.3.4. BIND Documentation
The BIND 9 Administrator Reference Manual is included with the source distribution in DocBook XML and HTML format, in the doc/arm directory. All of the recent versions are also on the web at https://www.isc.org/downloads/bind/doc/. A BIND DNSSEC Guide, written for BIND 9.10 is at https://ftp.isc.org/isc/dnssec-guide/dnssec-guide.pdf.
Some of the programs in the BIND 9 distribution have man pages in their directories. In particular, the command line options of named are documented in /bin/named/named.8.
2.3.5. BIND Support
BIND is open source software and ISC, the maintainer and publisher of BIND, is a non-profit corporation. ISC offers professional software support and advance notification of BIND security vulnerabilities. For more information, see https://www.isc.org/bind-subscription-2/.
2.4. NSD4 Requirements, Installation, Setup, and Configuration Components
The links for NSD4.1.13 tar files, manual pages, and SVN repository can be found at https://www.nlnetlabs.nl/projects/nsd/. This repository provides for downloading of the latest NSD 4 version. NSD 4 can be installed on Unix-based systems (e.g., FreeBSD, OpenBSD, NetBSD, Mac OS X, and Solaris), including Linux systems such as Red Hat Enterprise, Centos, Debian, Ubuntu, and Gentoo. Please note that IP addresses, domain names, and mail addresses are, in many cases, specific to the NCCoE laboratory configuration and must not be used in actual implementations.
2.4.1. NSD4 Installation Basics
NSD4 is available in distribution repositories such that a package manager can install it with a single command:
For Red Hat Enterprise and Centos (Centos 7 was used in the NCCoE example):
yum install nsd
For Debian and Ubuntu:
sudo apt-get install nsd
For Gentoo:
emerge nsd
2.4.2. NSD4 Configuration (nsd.conf)
Different paths exist for NSD4 (nsd.conf). Their paths depend on your distribution:
Centos - Red Hat Enterprise: /etc/nsd/nsd.conf
Debian - Ubuntu: /etc/nsd/nsd.conf
2.4.2.1. Master Configuration
The following is a master configuration for NSD4 for a Centos system. This example shows nsd4 serving the domain dnslabs.dnsops.gov on the IP address 129.6.45.38. The log file for the actual NCCoE installation and configuration of NSD4 with Unbound and OpenDNSSEC for the project is provided as Appendix F.
#
# nsd.conf -- the NSD(8) configuration file, nsd.conf(5).
#
# Copyright (c) 2001-2011, NLnet Labs. All rights reserved.
#
# See LICENSE for the license.
#

# This is a configuration file commented out, you just need to change the IP and the zone file to customize it.

# options for the nsd server server:
# uncomment to specify specific interfaces to bind (default wildcard interface).
# ip-address: localhost ip-address: 129.6.45.38

# don't answer VERSION.BIND and VERSION.SERVER CHAOS class queries
# Keep yes for security reasons. hide-version: yes

# enable debug mode, does not fork daemon process into the background.
# debug-mode: no

# do-ip4 default: yes

# do-ip6 default: yes

# Enable IPv6 as advice.

# the database to use, this is the standard path.
# disable database mode. Explicitly set database: ""
# database: ""
# identify the server (CH TXT ID.SERVER entry). identity: ""

# NSID identity (hex string). default disabled.
# nsid: "aabbccdd"

# log messages to file. Default to stderr and syslog (with facility LOG_DAEMON).
# logfile: "/var/log/nsd.log"

# Number of NSD servers to fork, keep 1 for low memory VPS
server-count: 1

# Maximum number of concurrent TCP connections per server.
# This option should have a value below 1000, 10 is good for a low memory VPS
tcp-count: 10

# Maximum number of queries served on a single TCP connection.
# By default 0, which means no maximum.
# tcp-query-count: 0

# Override the default (120 seconds) TCP timeout.
# tcp-timeout: 120

# Preferred EDNS buffer size for IPv4.
# ipv4-edns-size: 4096

# Preferred EDNS buffer size for IPv6.
# ipv6-edns-size: 4096

# File to store pid for nsd in.
# pidfile: "/var/run/nsd/nsd.pid"

# port to answer queries on. default is 53.
# port: 53

# statistics are produced every number of seconds.
# statistics: 3600
# if per zone statistics is enabled, file to store statistics.
# zone-stats-file: "/var/log/nsd.stats"

# The directory for zonefile: files. zonesdir: "/etc/nsd/zones"

#This is the definition of the first zone, you must have 1 for every domain.
zone:
name: dnslabs.dnsops.gov
#file in the zonesdir that contains the domain information.
zonefile: dnslabs.dnsops.gov.conf

# See https://www.nlnetlabs.nl/projects/nsd/nsd-control.8.html for nsd-control config
2.4.2.2. NSD Zone File
The next step is setting up zone files. The following instructions set up a simple zone file that just defines the SOA, the NS, MX and some address for the domain:
;## NSD authoritative only DNS

$ORIGIN dnslabs.dnsops.gov. ; default zone domain
$TTL 86400 ; default time to live

@ IN SOA nev1 admin@dnslabs.dnsops.gov ( 2012082703 ; serial number
28800 ; Refresh
14400 ; Retry
864000 ; Expire 86400 ; Min TTL
)

NS nev1.dnslabs.dnsops.gov . NS nev2.dnslabs.dnsops.gov .
MX 10 mail.dnslabs.dnsops.gov .

mail                IN A 129.6.45.38 www    IN A 129.6.45.38 nev1 IN A 129.6.45.38 nev2 IN A 129.6.45.38

* IN A 129.6.45.38
@ IN A 129.6.45.38

;## NSD authoritative only DNS
For NSD it is a requisite to set your NS name server hostname (nev1.dnslabs.dnsops.gov to 129.6.45.38 in this example) to the same IP address NSD is listening on, the one we have set in the nsd.conf file. This is so important because a resolving DNS server, like BIND, will ask NSD what the current authoritative name server IP address is. NSD will say the name server for dnslabs.dnsops.gov is nev1.dnslabs.dnsops.gov and its IP is 129.6.45.38. And so 129.6.45.38 is the address that another service like BIND will use to connect.
* IN A 129.6.45.38
includes the names in the domain .dnslabs.dnsops.gov.
2.4.2.3. Compile the NSD Database and Start Daemon
Note: NLnet Labs advises against running NSD4 in the database mode unless there is a compelling local reason.
General
Nsd-control stop/startRestart Command: If a message is received that there are errors in the zone file, correct them; otherwise restart as follows:
- For Red Hat or Centos Server:
/etc/init.d/nsd restart- For Debian or Ubuntu server:
/etc/init.d/nsd4 restart
Note: A restart is not needed to reload zonefile. Use reload or reconfig.
2.4.2.4. Testing NSD4
The easiest way to test the NSD4 configuration is to run a dig from the resolver querying the NSD server for the domain you just defined, such as:
dig @129.6.45.38 dnslabs.dnsops.gov
The output should look something like the following:
; <<>> ; DIG 9.3.6-20.P1.e15_8.2 ; <<>> @129.6.45.38 dnslabs.dnsops.gov
; 1(1 server found)
;; global options: printcmd
;; Got answer:
;; ->>HEADER<
In this output you should see in the answer section the correct association between your DNS name and IP, and in the AUTHORITY section the correct association between your NS and the configured IP.
2.4.2.5. NSD4 Support
Although NSD4 is open source software, support is available from NLnet Labs via its subsidiary Open Netlabs (http://www.opennetlabs.com).
2.5. How to Install and Configure OpenDNSSEC
The log file for an actual NCCoE installation and configuration of OpenDNSSEC with Unbound and NSD4 for the project is provided as Appendix F. For cryptographic operations, OpenDNSSEC uses the PKCS#11 interface supported by hardware security modules (HSMs). As an alternative to real HSMs, the OpenDNSSEC project developed SoftHSM, a drop-in replacement that uses the Botan or OpenSSL cryptographic library. SQLite or MySQL can be used as database back-ends. It is used on the .se, .dk, .nl, .ca, and .uk top-level domains and more. OpenDNSSEC can be downloaded from:
- https://dist.opendnssec.org/source/opendnssec-2.0.1.tar.gz
- https://dist.opendnssec.org/source/opendnssec-2.0.1.tar.gz.sig
- Checksum SHA256: bf874bbb346699a5b539699f90a54e0c15fff0574df7a3c118abb30938b7b346
Please note that IP addresses, domain names, and mail addresses are, in many cases, specific to the NCCoE laboratory configuration and must not be used in actual implementations.
2.5.1. OpenDNSSEC Installation Basics and System Requirements
OpenDNSSEC will run on most Linux, BSD and Solaris operating systems. The community provides binary packages for several platforms to assist installation. This Practice Guide, however, assumes those packages are not available. If you have found an appropriate system to run OpenDNSSEC on, it is time to install its dependencies. OpenDNSSEC relies on a database backend and currently supports MySQL and SQLite. MySQL is recommended because SQLite doesn’t scale well and has some known locking issues. Furthermore, OpenDNSSEC depends on:
- ldns, version 1.6.12 and up with the exceptions of 1.6.14 and 1.6.15
- libxml2, libxml2-dev, libxml2
As indicated above, OpenDNSSEC generally assumes use of a cryptographic Hardware Security Module (HSM) via the PKCS#11 interface. An alternative is use of SoftHSM, a software-only implementation of an HSM. SoftHSM depends on Botan (a cryptographic library) version 1.8.5 or greater, or OpenSSL (for SoftHSM 2.0 and higher), and SQLite version 3.3.9 or greater. Install SoftHSM (https://www.opendnssec.org/2016/03/softhsm-2-1-0/) with:
$ tar -xzf softhsm-X.Y.Z.tar.gz
$ cd softhsm-X.Y.Z $ ./configure
$ make
$ sudo make install
By default, the binary will be installed in /usr/local/bin/ and the configuration is expected to be at /etc/softhsm.conf. Open the file and specify a slot for OpenDNSSEC. For example:
# SoftHSM slots 0:/var/lib/softhsm/slot0.db
The token database does not exist at this stage. It is necessary to initialize it with:
$ softhsm --init-token --slot 0 --label "OpenDNSSEC"
When prompted, fill in a SO (Security Officer) PIN and user PIN. Remember it, you will need to configure it for OpenDNSSEC. The SO PIN can be used to reinitialize the token. The user PIN is handed out to OpenDNSSEC. If your company does not have a SO, just pick the same PIN for both roles.
Make sure OpenDNSSEC has permission to access the token database.
$ chown opendnssec /var/lib/softhsm/slot0.db
$ chgrp opendnssec /var/lib/softhsm/slot0.db
2.5.2. OpenDNSSEC Installation
While the log file for an actual installation and configuration of OpenDNSSEC with Unbound and NSD4 for the project is provided as Appendix F, some more general information regarding OpenDNSSEC installation follows:
Run these commands to install OpenDNSSEC:
$ tar -xzf opendnssec-X.Y.Z.tar.gz
$ cd OpenDNSSEC-X.Y.Z $ ./configure
$ make
$ make install
By default, the binaries will be installed in /usr/local/bin/ and /usr/local/sbin/. The configuration files are located in the /etc/opendnssec/ directory. The working directories are under /var/opendnssec/.
2.5.3. OpenDNSSEC Configuration Requirements
The default configuration installs default values for entities that just wants to sign their domains with DNSSEC. There are four configuration files for the basic OpenDNSSEC installation:
- conf.xml which is the overall configuration of the system
- kasp.xml which contains the policy of signing
- zonelist.xml where you list all the zones that you are going to sign
- addns.xml (per zone, optional) for zone transfers
For now, it is necessary to edit conf.xml only because we need to configure the cryptographic security module (e.g., an HSM or software module such as SoftHSM or SoftHSM 2.x). Make the Repository part look like:
<Repository name="SoftHSM">
<Module>/usr/local/lib/libsofthsm.so</Module>
<TokenLabel>OpenDNSSEC</TokenLabel>
<PIN>XXXX</PIN>
<SkipPublicKey/>
</Repository>
Here, XXXX is the user PIN entered in Section 2.4.1 above.
OpenDNSSECs Key and Signing Policy (KASP) provides standard values for signing any zone. However, if an organization chooses to change any value, it is possible to add a new policy, or change values in an existing policy. For example, if a zone uses the YYYYMMDDXX format for SOA SERIAL values, change the Serial parameter in kasp.xml from unixtime to datecounter:
<Zone>
<PropagationDelay>PT9999S</PropagationDelay>
<SOA>
<TTL>PT3600S</TTL>
<Minimum>PT3600S</Minimum>
<Serial>datecounter</Serial>
</SOA>
</Zone>
For full descriptions about all the KASP parameters, see the OpenDNSSEC Wiki.
2.5.4. Running OpenDNSSEC
When starting OpenDNSSEC for the first time, it is first necessary to setup the database. There is a control script that starts up two daemons: ods-enforcerd that takes care of the key management, and ods-signerd that is the actual signer.
Run:
$ ods-enforcer-db-setup
*WARNING* This will erase all data in the database; are you sure? [y/n] y
$ ods-control start
At this point, OpenDNSSEC is running. Logs are going to syslog. The setup has imported the two default Key and Signing Policies (KASP), default and lab. However, no zones are imported yet.
2.5.5. Adding Zones
Until the zone list zonelist.xml is edited, OpenDNSSEC starts with no zones to sign. It is necessary to add zones (and remove zones as necessary). One way to add a zone is to enter the following command:
$ ods-enforcer zone add -z example.com
This adds the zone example.com to OpenDNSSEC with the default KASP. Also by default, the signing is file based. Note that the enforcer doesn’t read this file without being told explicitly to do so. Also, the file will not be written when adding new zones via commandline.
The signer expects the unsigned file to be at /var/opendnssec/unsigned/example.com and puts the signed file at /var/opendnssec/signed/example.com. Different paths can be used with -i (input) and -o (output). You can use a different policy with -p (policy).
If a user or administrator wants to use DNS zone transfers for input and output, the type of adapter can be set to DNS, -j for input and -q for output. It is necessary to set the input and output files to the zone transfer configuration file addns.xml, like this:
$ ods-ksmutil zone add -z example.com -j DNS -q DNS \
-i /etc/opendnssec/addns.xml -o /etc/opendnssec/addns.xml
Instructions on how to edit addns.xml for zone transfers is described in Section 2.5.5.1 below.
The signed zone is then written in the /var/opendnssec/signed/ directory. It is necessary to notify your name server of the new zonefile in order for the zone to also become visible in the DNS. It is possible to configure a notify command in conf.xml to automatically notify the name server of new zones. For example:
<Configuration>
...
<Signer>
...
<NotifyCommand>nameserver_control_program reload
%zone</NotifyCommand>
</Signer>
</Configuration>
Here, %zone will be replaced with the name of the zone that has been updated, and %zonefile (not used in example) will be replaced with the name of the signed zonefile.
2.5.5.1. OpenDNSSEC as a Bump-in-the-Wire
If a zone has been added with DNS adapters rather than working on files, instead of pointing the input and output to the filenames of the unsigned and signed zones, it is necessary to put in the zone transfer configuration file addns.xml. Here, primary name server addresses, ports and TSIG keys (Inbound), and ports and TSIG keys for the secondary name servers (Outbound) are set up. Replace the example values in addns.xml.sample installed in /etc/opendnssec/ with the desired servers and keys and rename it to addns.xml. Also conf.xml needs a socket that listens to DNS traffic:
<Configuration>
<Signer>
...
<Listener>
<Interface><Address>127.0.0.1</Address><Port>53</Port></Interface>
<Interface><Address>::1</Address><Port>53</Port></Interface>
<Listener>
</Signer>
</Configuration>
The above values are also the defaults. OpenDNSSEC can now sign incoming zone transfers (full and incremental) and also reply to SOA, AXFR and IXFR requests.
2.5.5.2. Activating Key Signing Keys (KSK)
At this stage, an attempt to list OpenDNSSEC keys will reveal that the key signing key (KSK) is not yet active:
$ ods-enforcer key list -a
Zone: Keytype: State: Date of next transition:
example.com. KSK publish 2016-09-01 00:00:01 example.com. ZSK active 2016-08-31 10:00:01
This is because the DS must still be submitted to the parent. The DS is a record that is derived from the KSK and is published in the parent zone. This is used to build a secure chain of trust from the root zone to the user’s zone. In the example above, OpenDNSSEC expects this to happen at one second past midnight on the first of September 2016. This is 14 hours after initial signing. This is because the default policy has a very conservative propagation delay for the name servers: 12 hours. In this example, it takes an additional hour for the TTL and one more for the publish safety parameter - totaling 14 hours Enduring the long propagation delay is necessary because, in order to make sure a zone remains valid, it is necessary to respect a publish safety duration and the TTL (in this case derived from the SOA MINIMUM). If OpenDNSSEC is ready, the date of next transition be displayed as waiting for ds-seen. The DS can then be submitted to the parent. How that is accomplished depends on your organization’s registrar. Usually this can be done via email or through a web interface. Retrieve the DNSKEY or DS with:
$ ods-enforcer key export
;ready KSK DNSKEY record: example.com. 3600 IN DNSKEY 257 3 8 Aw...
$ ods-enforcer key export -d
;ready KSK DS record (SHA1): example.com.. 3600 IN DS 42112 8 1 8aea...
;ready KSK DS record (SHA256): example.com. 3600 IN DS 42112 8 2 a674...
If the DS shows up in the parent zone at all parent name servers, it is safe to run the key ds-seen command. This command requires the keytag of the key in question. You can see from the DNSKEY and DS records this is 42112 in this example:
$ ods-enforcer key ds-seen -z example.com -x 42112
The KSK is now also active, and the chain-of-trust is set up.
2.6. Unbound
The log file for an actual NCCoE installation and configuration of Unbound with NSD4 and OpenDNSSEC for the project is provided as Appendix F. The latest version of unbound (currently 1.5.10) can always be downloaded from http://www.unbound.net/downloads/unbound-latest.tar.gz. Unbound documentation can be found at https://unbound.net/documentation/index.html. Some general installation and configuration information for Unbound is provided in the following subsections. Please note that IP addresses, domain names, and mail addresses are, in many cases, specific to the NCCoE laboratory configuration and must not be used in actual implementations.
2.6.1. Unbound Installation Basics and System Requirements
If your distribution package manager includes a package for Unbound
install the package with the package manager. If not, in order to
compile the software, it is necessary to have openssl and its
include files (from a package often called openssl-devel). In
openssl, run ./configure [options]; make; and make install. For cases in
which the libldns library is not installed, a version is included
with the Unbound source tarball and is automatically used. Unbound
always uses sldns (the included ldns). With respect to options
for configure, the default config locations for various files and
directories can be customized, as well as the install location for the
program with --prefix=/usr/local. You can specify --with-libevent=dir or
--with-ssl=dir to link with the library at that location. In general, no
options are needed for ./configure.
On some BSD systems it is necessary to use gmake instead of make.
It is possible to install with make install and to uninstall with make uninstall. The uninstall does not remove the config file. In the contrib directory in the unbound source are sample rc.d scripts for unbound (for BSD and Linux type systems).
2.6.2. Unbound Setup and Installation
The config file is copied into /usr/local/etc/unbound/unbound.conf but some distributions may put it in /etc/unbound/unbound.conf or /etc/unbound.conf. The config file is fully annotated; you can go through it and select the options you like. Or you can use the below, a quick set of common options to serve the local subnet. A common setup for DNS service for an IPv4 subnet and IPv6 localhost is below. You can change the IPv4 subnet to match the subnet that you use, and add your IPv6 subnet if you have one.
# unbound.conf for a local subnet. server:
interface: 0.0.0.0
interface: ::0
access-control: 192.168.0.0/16 allow access-control: ::1 allow
verbosity: 1
By default, the software comes with chroot enabled. This provides an
extra layer of defense against remote exploits. Enter file paths as full
pathnames starting at the root of the filesystem (‘/’). If chroot
gives you trouble, you can disable it with chroot: “” in the config.
Also, the server assumes the username unbound to drop privileges.
You can add this user with your favorite account management tool
(useradd(8)), or disable the feature (do not run as root) with
username: “” in the config.
Start the server using the script (if you or the package manager installed one) as
/etc/rc.d/init.d/unbound start. or unbound -c <config> as root.
It is possible to setup remote control using unbound-control. First run
unbound-control-setup to generate the necessary TLS key files (they are
put in the default install directory). If you use a username of
unbound to run the daemon from use sudo -u unbound unbound-control-setup to generate the keys, so that the server is
allowed to read the keys. Then add the following at the end of the
config file:
# enable remote-control
remote-control:
control-enable: yes
You can now use unbound-control to send commands to the daemon. It needs
to read the key files, so you may need to sudo unbound-control. Only
connections from localhost are allowed by default.
2.6.3. Unbound Configuration for DNSSEC
DNSSEC is a mechanism to protect DNS data. It uses digital signatures. To use DNSSEC with Unbound, the public keys for digital signature must be configured. Note that specific distributions, operating systems, or device vendors may have already provided the anchor, securing it with its own vendor-specific update mechanism. In that case, the mechanisms provided from those sources should be used.
2.6.3.1. Trust Anchor
The first step in configuring Unbound for DNSSEC is to obtain an initial
trust anchor [8]. The unbound-anchor tool provides
an initial anchor from built-in values, but for real trust this should
be checked thoroughly. The root key is stored in a file,
/usr/local/etc/unbound/root.key. Unbound must be able to read and
write it, to keep it up to date with the latest key(s). It must
therefore reside within the chroot of Unbound (if that is used).
Access rights are world-readable, user Unbound write only. Use sudo -u unbound to start unbound-anchor so that the file owner is set to the
unbound user (same username as daemon uses). It can optionally be put
somewhere else, accessible to the unbound daemon, such as
/var/unbound or /etc. You need to pass this value to
unbound-anchor (option -a file) and to unbound
(auto-trust-anchor-file: “file” in unbound.conf). The
unbound-anchor tool creates this file for the administrator if it
does not exist. But the administrator must check this file so that it
can be trusted. The unbound-anchor tool also has a built-in
certificate (from the ICANN Certificate Authority) that it will use to
update the root key if it becomes out of date, this should be checked
too (-l option to show it), or provide some other certificate that
unbound-anchor is to use.
There are trusted community representatives that have sworn and signed attestations, and there may be publications (i.e. in printed form). Please notice that NLnet Labs’ unbound-anchor tool provides an initial value for convenience, systems administrators must perform the specified checks to obtain trust. The trust anchor can be downloaded via https from IANA: root-anchors.xml (click link and then check the lock icon and the urlbar and the hash displayed against the hash you can put as initial value into the root.key file, see below for an example of the syntax of how to input the initial value).
Here is the 2010-2011 trust anchor for the root zone. This is the syntax that you can use to provide an initial value for the root.key file:
. IN DS 19036 8 2 49AAC11D7B6F6446702E54A1607371607A1A41855200FD2CE1CDDE32F24E8FB5
2.6.3.2. Update Mechanism Setup
Set the unbound-anchor tool to run at system startup, it is part of
the Unbound package. A good way is to run it from the init scripts,
with sudo -u unbound so that the file permissions work out.
Before unbound-anchor is run inside the init scripts, you must run NTP (in secure mode), so that the time and date have been set properly. Unbound uses RFC5011 updates to keep the anchor updated if it is changed while the computer is in operation, but the unbound-anchor tool is used if it is changed while the computer is not in operation.
In the unbound.conf config file, include the root anchor file with the automatic updated anchor statement, like this:
server:
# ... other stuff
# root key file, automatically updated
auto-trust-anchor-file: "/usr/local/etc/unbound/root.key"
After you change the config, restart unbound. Unbound will then overwrite the key file with status information (such as the last time the key was seen).
2.6.3.3. Testing Unbound Configurations for DNSSEC
Entering dig com. SOA +dnssec should result in display of the AD flag
there. If this is unsuccessful, the Unbound option val-log-level: 2
should log explanations regarding why the DNSSEC validation fails (one
line per failed query). Also, http://dnssec-or-not.org/ (fun test)
or https://internet.nl/ (sober test) and http://www.kaminskybug.se/
(look for a happy bug icon) are useful test tools.
2.6.4. Unbound Support
Although it is open source software, support for Unbound is available from a number of sources, including NLnet Labs.
2.7. How to Install and Configure a DNS Signer Platform
DNS Signer is a commercial product, the installation and configuration instructions can be obtained from the company website, http://www.secure64.com/.
2.7.1. DNS Signer Installation Basics and System Requirements
Secure64 DNS Signer runs on HP Integrity servers with the following minimum configuration:
- 1 dual core Itanium microprocessor
- 4 GB RAM
- 36 GB disk drive
- DVD ROM drive
DNS Signer is a commercial product. Information regarding obtaining the product can be found at http://www.secure64.com/contact.
2.7.2. DNS Signer Installation and Configuration
DNS Signer can be configured to work with an authoritative DNS resolver, (e.g., DNS Authority) or a caching/recursive resolver (e.g., DNS Cache). The process followed for installation of DNS Signer at the NCCoE is included in Appendix H.
2.8. How to Install and Configure a DNS Authority Platform
DNS Authority is a commercial product, the installation and configuration instructions can be obtained from the company website, http://www.secure64.com/. Information regarding obtaining the product can be found at http://www.secure64.com/contact. DNS Authority can be configured to work with a caching/recursive resolver (e.g., DNS Cache) and a DNS Signer. The process followed for installation of DNS Authority at the NCCoE is included in Appendix H.
2.9. How to Install and Configure a DNS Cache
DNS Cache is a commercial product, installation and configuration instructions can be obtained from the company website, http://www.secure64.com/. Information regarding obtaining the product can be found at http://www.secure64.com/contact.
2.10. How to Install and Configure a Dovecot/Postfix Mail Transfer Agent
2.10.1. Dovecot Installation Basics and System Requirements
Dovecot can be downloaded from sources identified at the Dovecot Secure IMAP Server site (http://www.dovecot.org/download.html).
2.10.1.1. Compiling Dovecot from Source Code
To compile Dovecot from source code, provide the following commands:
./configure

make

sudo make install
That installs Dovecot under the /usr/local directory. The configuration file is in /usr/local/etc/dovecot.conf. Logging goes to syslog’s mail facility by default, which typically goes to /var/log/mail.log or something similar. If you are in a hurry, you can then jump to QuickConfiguration. If you have installed some libraries into locations which require special include or library paths, you can pass them in the CPPFLAGS and LDFLAGS environment variables. For example:
CPPFLAGS="-I/opt/openssl/include" LDFLAGS="-L/opt/openssl/lib"
./configure
It is necessary to create two users for Dovecot’s internal use:
- dovenull: Used by untrusted imap-login and pop3-login processes (default_login_user setting).
- dovecot: Used by slightly more trusted Dovecot processes (default_internal_user setting).
Each of them should also have its own dovenull and dovecot groups. See http://wiki2.dovecot.org/UserIds for more information.
2.10.1.2. Compiling Dovecot from Git
Dovecot is available from Git, for example with:
git clone https://github.com/dovecot/core.git dovecot
To compile Dovecot from Git, it is first necessary to run ./autogen.sh to generate the configure script and some other files. This requires that the following software/packages be installed:
- autoconf
- automake
- libtool
- pkg-config
- gettext
- GNU make
It is advisable to add –enable-maintainer-mode to the configure script:
./autogen.sh
./configure --enable-maintainer-mode
make
sudo make install
For later updates, the commands are:
git pull
make
sudo make install
2.10.1.3. Compiling Dovecot with rpmbuild (Mandriva, RedHat, etc.)
Fetch the source rpm from ftp://ftp.surfnet.nl/ or any other mirror.
Currently, dovecot-10.rc26.src.rpm can be found in the cooker
subtree. If the current release is newer, unpack the source rpm with rpm -ivh dovecot-10.rc26.src.rpm to a build environment (/usr/src/rpm...)
Copy the newer tarball from the dovecot site to the SOURCES
directory of the build environment. Change the dovecot.spec file in
the SPECS directory to reflect the new release and the new name of
the tarball. The maintainer works with a bz2 tarball; a tar.gz tarball makes no difference. Issue a rpmbuild -ba dovecot.spec. The resulting rpm will be placed in RPMS/i586. Install with rpm or
urpmi:
rpm -ivh dovecot-1.0.rc26.src.rpm cd /usr/src/rpm
mv ~/downloads/dovecot-1.0.rc28.tar.gz ./SOURCES cd SPECS
vi dovecot.spec
...edit release and tarball name. Change default options if needed... rpmbuild -ba dovecot.spec
cd ../RPMS/i586
urpmi ./dovecot-1.0.rc28-1mdv2007.0.i586.rpm
During this process missing prerequisites may be detected. Install them and rerun the build process. The spec file also need updating for the new add-ons (idxview and logview).
2.10.1.4. SSL/TLS Support
Dovecot was initially built to support both OpenSSL and GNUTLS, but OpenSSL is currently used by default, and it should be automatically detected. If it is not, some header files or libraries are missing, or they are in a non-standard path. The openssl-dev or a similar package needs to be installed, and if it is not in the standard location, set CPPFLAGS and LDFLAGS as shown above. By default, the SSL certificate is read from /etc/ssl/certs/dovecot.pem, and the private key from /etc/ssl/private/dovecot.pem. The /etc/ssl directory can be changed using the``–with-ssldir=DIR`` configure option. Both can of course be overridden from the configuration file.
For Linux installations, note that current inotify is in the Linux kernel since version 2.6.13 and it is preferred over dnotify. If your distribution does not have the required inotify header file, it can be obtained from the inotify maintainer (the following example requires cURL):
mkdir -p /usr/local/include/sys cd /usr/local/include/sys
curl ftp://ftp.kernel.org/pub/linux/kernel/people/rml/inotify/headers/inoti fy.h -O
curl ftp://ftp.kernel.org/pub/linux/kernel/people/rml/inotify/headers/inoti fy-syscalls.h >> inotify.h
/usr/local/include isn’t in standard include lookup path, so that needs
to be specified to configure:
CPPFLAGS=-I/usr/local/include ./configure --with-notify=inotify
2.10.1.5. Dovecot Configuration Options
helpgives a full list of available options
--help=shortjust lists the options added by the particular package (= Dovecot)
Options are usually listed as --with-something or --enable-something. If
you want to disable them, do it as --without-something or
--disable-something. There are many default options that come from
autoconf, automake or libtool. The list of options that Dovecot adds
follows:
--enable-devel-checksEnables some extra sanity checks. This is mainly useful for developers. It does quite a lot of unnecessary work but should catch some programming mistakes more quickly.
--enable-assertsEnable assertion checks, enabled by default. Disabling them may slightly save some CPU, but if there are bugs they can cause more problems since they are not detected as early.
--without-shared-libsLink Dovecot binaries with static libraries instead of dynamic libraries.
--disable-largefileSpecifies if we use 32bit or 64bit file offsets in 32bit CPUs. 64bit is the default if the system supports it (Linux and Solaris do). Dropping this to 32bit may save some memory, but it prevents accessing any file larger than 2 GB.
--with-mem-align=BYTESSpecifies memory alignment used for memory allocations. It is needed with many non-x86 systems and it should speed up x86 systems too. Default is 8, to make sure 64bit memory accessing works.
--with-ioloop=IOLOOPSpecifies what I/O loop method to use. Possibilities are select, poll, epoll and kqueue. The default is to use the best method available on your system.
--with-notify=NOTIFYSpecifies what file system notification method to use. Possibilities are dnotify, inotify (both on Linux), kqueue (FreeBSD) and none. The default is to use the best method available on your system. See Notify method above for more information.
--with-storages=FORMATSSpecifies what mailbox formats to support. Note: Independent of this option, the formats raw and shared will be always built.
--with-solrBuild with Solr full text search support
--with-zlibBuild with zlib compression support (default if detected)
--with-bzlib
Build with bzip2 compression support (default if detected)
2.10.1.5.1. SQL Driver Options
SQL drivers are typically used only for authentication, but they may be used as a lib-dict backend too, which can be used by plugins for different purposes.
--with-sql-driversBuild with specified SQL drivers. Defaults to all that were found with autodetection.
--with-pgsqlBuild with PostgreSQL support (requires pgsql-devel, libpq-dev or similar package)
--with-mysqlBuild with MySQL support (requires mysql-devel, libmysqlclient15-dev or similar package)
--with-sqliteBuild with SQLite3 driver support (requires sqlite-devel, libsqlite3-dev or similar package)
2.10.1.5.2. Authentication Backend Options
The basic backends are built if the system is detected to support them:
--with-shadowBuild with shadow password support
--with-pamBuild with PAM support
--with-nssBuild with NSS support
-with-siaBuild with Tru64 SIA support
--with-bsdauthBuild with BSD authentication support (if supported by your OS)
Some backends require extra libraries and are not necessarily wanted, so they are built only if specifically enabled:
--with-sqlBuild with generic SQL support (drivers are enabled separately)
--with-ldapBuild with LDAP support (requires openldap-devel, libldap2-dev or similar package)
--with-gssapiBuild with GSSAPI authentication support (requires krb5-devel, libkrb5-dev or similar package)
--with-vpopmailBuild with vpopmail support (requires vpopmail sources or a development package) It’s also possible to build these as plugins by giving e.g.
--with-sql=plugin.
2.10.1.6. Dovecot Support
Although Dovecot is open source software, support is available from dovecot.org and commercial sources. See http://www.dovecot.org/support.html.
2.10.2. Postfix Installation and Configuration
Postfix was released under the IBM Public License, and source code can be downloaded from http://cdn.postfix.johnriley.me/mirrors/postfix-release/index.html. All Postfix source code is signed with Wietse’s PGP key. See ftp://ftp.porcupine.org/mirrors/project-history/postfix/ for a more extensive archive of tarballs. Instructions for installing Postfix from source code can be found at http://www.postfix.org/INSTALL.html. Postfix manual pages can be found at http://www.postfix.org/postfix-manuals.html.
2.10.2.1. Installation and System Requirements
If you are using a pre-compiled version of Postfix, you should start with BASIC_CONFIGURATION_README and the general documentation referenced by it. INSTALL is only a bootstrap document to get Postfix up and running from scratch with the minimal number of steps; it is not considered part of the general documentation. The INSTALL document describes how to build, install and configure a Postfix system so that it can do one of the following:
- Send mail only, without changing an existing Sendmail installation.
- Send and receive mail via a virtual host interface, still without any change to an existing Sendmail installation.
- Run Postfix instead of Sendmail.
According to INSTALL, Postfix development is conducted on FreeBSD and MacOS X, with regular tests on Linux (Fedora, Ubuntu) and Solaris. Support for other systems relies on feedback from their users, and may not always be up-to-date. OpenBSD is partially supported. The libc resolver does not implement the documented “internal resolver options which are [...] set by changing fields in the _res structure” (documented in the OpenBSD 5.6 resolver(3) manpage). This results in too many DNS queries, and false positives for queries that should fail.
2.10.2.2. Compiler Specifics
If you need to build Postfix for multiple architectures from a single source-code tree, use the lndir command to build a shadow tree with symbolic links to the source files. If at any time in the build process you get messages like: make: don’t know how to ... you should be able to recover by running the following command from the Postfix top-level directory:
$ make -f Makefile.init makefiles
If you copied the Postfix source code after building it on another machine, it is a good idea to cd into the top-level directory and first do this:
$ make tidy
This will get rid of any system dependencies left over from compiling the software elsewhere.
To build with GCC, or with the native compiler if people told me that is better for your system, just cd into the top-level Postfix directory of the source tree and type:
$ make
To build with a non-default compiler, you need to specify the name of the compiler, for example:
$ make makefiles CC=/opt/SUNWspro/bin/cc (Solaris)
$ make
$ make makefiles CC="/opt/ansic/bin/cc -Ae (HP-UX)
$ make
$ make makefiles CC="purify cc"
$ make
In some cases, optimization will be turned off automatically.
2.10.2.3. Building with Position-Independent Executables
On some systems, Postfix can be built with Position-Independent Executables. PIE is used by the ASLR exploit mitigation technique (ASLR = Address-Space Layout Randomization).
$ make makefiles pie=yes ...other arguments...
(Specify make makefiles pie=no to explicitly disable Postfix position-independent executable support). Postfix PIE support appears to work on Fedora Core 20, Ubuntu 14.04, FreeBSD 9 and 10, and NetBSD 6 (all with the default system compilers). Whether the pie=yes above has any effect depends on the compiler. Some compilers always produce PIE executables, and some may even complain that the Postfix build option is redundant.
2.10.2.4. Dynamically Linked Libraries
Postfix dynamically-linked library and database plugin support exists for recent versions of Linux, FreeBSD and MacOS X. Note that dynamically-linked library builds may become the default at some point in the future.
2.10.2.5. Default Settings and Optional Features
By default, Postfix builds as a mail system with relatively few bells and whistles. Support for third-party databases etc. must be configured when Postfix is compiled. The following documents describe how to build Postfix with support for optional features:
| Optional Feature | Document | Availability |
|---|---|---|
| Berkeley DB database | DB_README | Postfix 1.0 |
| LMDB database | LMDB_README | Postfix 2.11 |
| LDAP database | LDAP_README | Postfix 1.0 |
| MySQL database | MYSQL_README | Postfix 1.0 |
| Perl compatible regular expression | PCRE_README | Postfix 1.0 |
| PostgreSQL database | PGSQL_README | Postfix 2.0 |
| SASL authentication | SASL_README | Postfix 1.0 |
| SQLite database | SQLITE_README | Postfix 2.8 |
| STARTTLS session encryption | TLS_README | Postfix 2.2 |
Note: IP version 6 support is compiled into Postfix on operating systems that have IPv6 support. See the IPV6_README file for details.
2.10.2.6. Installing after Compiling
Save existing Sendmail binaries
Some systems implement a mail switch mechanism where different MTAs (Postfix, Sendmail, etc.) can be installed at the same time, while only one of them is actually being used. Examples of such switching mechanisms are the FreeBSD mailwrapper(8) or the Linux mail switch. In this case you should try to “flip” the switch to “Postfix” before installing Postfix. If your system has no mail switch mechanism, execute the following commands (your sendmail, newaliases and mailq programs may be in a different place):
?# mv /usr/sbin/sendmail /usr/sbin/sendmail.OFF
# mv /usr/bin/newaliases /usr/bin/newaliases.OFF
# mv /usr/bin/mailq /usr/bin/mailq.OFF
# chmod 755 /usr/sbin/sendmail.OFF/usr/bin/newaliases.OFF\
/usr/bin/mailq.OFF
Create account and groups
Before you install Postfix for the first time you need to create an account and a group:
Create a user account postfix with a user id and group id that are not used by any other user account. Preferably, this is an account that no-one can log into. The account does not need an executable login shell, and needs no existing home directory. Sample password and group file entries follow:
/etc/passwd:
postfix:*:12345:12345:postfix:/no/where:/no/shell
/etc/group:
postfix:*:12345:
Note: there should be no whitespace before postfix:.
Create a group postdrop with a group id that is not used by any other user account. Not even by the postfix user account. An example of a group file entry follows:
/etc/group: postdrop:\*:54321:Note: there should be no whitespace before postdrop:.
Install Postfix
To install or upgrade Postfix from compiled source code, run one of the following commands as the super-user:
# make install (interactive version, first time install)
# make upgrade (non-interactive version, for upgrades)
The interactive version (
make install) asks for pathnames for Postfix data and program files, and stores your preferences in the main.cf file. If you don’t want Postfix to overwrite non-Postfix sendmail, mailq and newaliases files, specify pathnames that end in .postfix.The non-interactive version (
make upgrade) needs the /etc/postfix/main.cf file from a previous installation. If the file does not exist, use interactive installation (make install) instead.If you specify name=value arguments on the
make installormake upgradecommand line, then these will take precedence over compiled-in default settings or main.cf settings. The commandmake install/upgrade name=value... will replace the stringMAIL_VERSIONat the end of a configuration parameter value with the Postfix release version. Do not try to specify something like $mail_version on this command line. This produces inconsistent results with different versions of the make(1) command.
2.10.2.7. Configure Postfix
See http://www.postfix.org/postconf.5.html for Postfix configuration parameters.
Note: The material covered in this section from INSTALL Section 10 is covered in more detail in the BASIC_CONFIGURATION_README document. The information presented below is targeted at experienced system administrators.
Postfix configuration files:
By default, Postfix configuration files are in /etc/postfix. The two most important files are main.cf and master.cf; these files must be owned by root. Giving someone else write permission to main.cf or master.cf (or to their parent directories) means giving root privileges to that person. In /etc/postfix/main.cf, you will have to set up a minimal number of configuration parameters. Postfix configuration parameters resemble shell variables, with two important differences: the first one is that Postfix does not know about quotes like the UNIX shell does. You specify a configuration parameter as:
/etc/postfix/main.cf:parameter = valueand you use it by putting a “$” character in front of its name:
/etc/postfix/main.cf:other\_parameter = $parameterYou can use $parameter before it is given a value (that is the second main difference with UNIX shell variables). The Postfix configuration language uses lazy evaluation, and does not look at a parameter value until it is needed at runtime. Whenever you make a change to the main.cf or master.cf file, execute the following command in order to refresh a running mail system:
# postfix reloadDefault domain for unqualified addresses:
First of all, you must specify what domain will be appended to an unqualified address (i.e. an address without @domain.tld). The myorigin parameter defaults to the local hostname, but that is intended only for very small sites.
Some examples (use only one):
/etc/postfix/main.cf:
myorigin = $myhostname (send mail as "user@$myhostname")
myorigin = $mydomain (send mail as "user@$mydomain")
Specification of what domains to receive locally:
Next you need to specify what mail addresses Postfix should deliver locally. Some examples (use only one):
/etc/postfix/main.cf:
mydestination = $myhostname, localhost.$mydomain, localhost
mydestination = $myhostname, localhost.$mydomain, localhost,$mydomain
mydestination = $myhostname
The first example is appropriate for a workstation, the second is appropriate for the mail server for an entire domain. The third example should be used when running on a virtual host interface.
Proxy/NAT interface addresses:
The proxy_interfaces parameter specifies all network addresses that Postfix receives mail on by way of a proxy or network address translation unit. You may specify symbolic hostnames instead of network addresses.
IMPORTANT: You must specify your proxy/NAT external addresses when your system is a backup MX host for other domains, otherwise mail delivery loops will happen when the primary MX host is down.
Example: host behind NAT box running a backup MX host.
/etc/postfix/main.cf:
proxy_interfaces = 1.2.3.4 (the proxy/NAT external network address)
Specification of What local clients to relay mail from:
If your machine is on an open network, then you must specify what client IP addresses are authorized to relay their mail through your machine into the Internet. The default setting includes all subnetworks that the machine is attached to. This may give relay permission to too many clients. For example:
/etc/postfix/main.cf:
mynetworks = 168.100.189.0/28, 127.0.0.0/8
Specification of what relay destinations to accept from strangers:
If your machine is on an open network, then you must also specify whether Postfix will forward mail from strangers. The default setting will forward mail to all domains (and subdomains of) what is listed in $mydestination. This may give relay permission for too many destinations. Recommended settings (use only one):
/etc/postfix/main.cf:
relay_domains = (do not forward mail from strangers) relay_domains = $mydomain (my domain and subdomains) relay_domains = $mydomain, other.domain.tld, ...
Optional: configure a smart host for remote delivery
If you’re behind a firewall, you should set up a relayhost. If you can, specify the organizational domain name so that Postfix can use DNS lookups, and so that it can fall back to a secondary MX host when the primary MX host is down. Otherwise just specify a hard-coded hostname. Some examples follow (use only one):
/etc/postfix/main.cf:
relayhost = $mydomain
relayhost = [mail.$mydomain]
The form enclosed with [ ] eliminates DNS MX lookups. By default, the SMTP client will do DNS lookups even when you specify a relay host. If your machine has no access to a DNS server, turn off SMTP client DNS lookups like this:
/etc/postfix/main.cf:
disable_dns_lookups = yes
The STANDARD_CONFIGURATION_README file has more hints and tips for firewalled and/or dial-up networks.
Create the aliases database
Postfix uses a Sendmail-compatible aliases(5) table to redirect mail for local(8) recipients. Typically, this information is kept in two files: in a text file /etc/aliases and in an indexed file /etc/aliases.db. The command postconf alias_maps will tell you the exact location of the text file. First, be sure to update the text file with aliases for root, postmaster and postfix that forward mail to a real person. Postfix has a sample aliases file /etc/postfix/aliases that you can adapt to local conditions.
/etc/aliases:
root: you
postmaster: root
postfix: root
bin: root
etcetera...
Note: there should be no whitespace before the “:”.
Finally, build the indexed aliases file with one of the following commands:
# newaliases
# sendmail -bi
Setting up chroot
Postfix daemon processes can be configured (via master.cf) to run in a chroot jail. The processes run at a fixed low privilege and with access only to the Postfix queue directories (/var/spool/postfix). This provides a significant barrier against intrusion. Note that this barrier is not impenetrable, but every little bit helps. With the exception of Postfix daemons that deliver mail locally and/or that execute non-Postfix commands, every Postfix daemon can run chrooted.
Sites with high security requirements should consider to chroot all daemons that talk to the network: the smtp(8) and smtpd(8) processes, and perhaps also the lmtp(8) client. The default /etc/postfix/master.cf file specifies that no Postfix daemon runs chrooted. In order to enable chroot operation, edit the file /etc/postfix/master.cf. Instructions are in the file.
Note also that a chrooted daemon resolves all filenames relative to the Postfix queue directory (/var/spool/postfix). For successful use of a chroot jail, most UNIX systems require you to bring in some files or device nodes. The examples/chroot-setup directory in the source code distribution has a collection of scripts that help you set up Postfix chroot environments on different operating systems.
Additionally, you need to configure syslogd so that it listens on a socket inside the Postfix queue directory. Examples for specific systems:
FreeBSD:
# mkdir -p /var/spool/postfix/var/run
# syslogd -l /var/spool/postfix/var/run/log
Linux, OpenBSD:
# mkdir -p /var/spool/postfix/dev
# syslogd -a /var/spool/postfix/dev/log
2.10.3. Postfix Installation and Configuration for use with Dovecot
The following elements are necessary for setting up Postfix for Dovecot [9]:
- a domain such as mydomain.com
- a hostname for your mail server such as mail.mydomain.com
- an SSL certificate that is valid for mail.mydomain.com
2.10.3.1. Setting up SSL Certificate
For SSL, you need a certificate and a private key saved in a location such as /etc/ssl/certs/mailcert.pem and the key is saved (e.g., in /etc/ssl/private/mail.key). Make sure the key is only readable by the root user. How to set up SSL certificates for your website and email depends on your website structure and the CA you use (self-signed, organizational (sub)-ca, or commercial ca for example). Creating a self-signed test certificate (do not use this certificate in your system) is as easy as executing
sudo openssl req -x509 -nodes -days 365 -newkey rsa:2048 -keyout
/etc/ssl/private/mail.key -out /etc/ssl/certs/mailcert.pem
and leaving the default values in by just hitting enter on all questions asked.
Most CAs will require you to submit a certificate signing request. (CSR) You can generate one like this:
sudo openssl req -nodes -days 365 -newkey rsa:2048 -keyout
/etc/ssl/private/mail.key -out mailcert.csr
Fill in the information queried properly, like in this transcript: (Check with the CA you intend to use on what information needs to be in the CSR). Specific instructions for acquisition of certificates from CAs can be obtained from the CA. An example is provided at: https://www.digitalocean.com/community/tutorials/how-to-set-up-a-postfix-e-mail-server-with-dovecot.
2.10.3.2. Setting up DNS
You still have to set up the DNS with a record that points to your mail server IP and an MX record that points to the mail server’s hostname. Instructions for the standard configuration for Postfix can be found at http://www.postfix.org/STANDARD_CONFIGURATION_README.html.
2.11. How to Install and Configure a Thunderbird Mail Client
The starting point for installing Thunderbird can be found at https://support.mozilla.org/en-US/kb/installing-thunderbird, and the initial step is to click on the icon designating the operating system on which Thunderbird is being installed (Windows, Mac, or Linux).
2.11.1. Thunderbird Installation Basics and System Requirements
System requirements for installing Thunderbird 45.2.0 on Windows, Mac, and Linux operating systems can be found at https://www.mozilla.org/en-US/thunderbird/45.2.0/system-requirements/.
2.11.2. Thunderbird Installation and Configuration on Windows
Instructions for installing Thunderbird in Windows environments can be found at https://support.mozilla.org/en-US/kb/installing-thunderbird-windows. Selecting Download will download Thunderbird on the disk image Setup 10.0.2.exe. After starting the process by clicking Run, the Mozilla Thunderbird Setup Wizard will be started. Closing all other applications before starting Setup will make it possible to update relevant system files without having to reboot the computer. After installation, double-clicking on the Thunderbird icon runs the program.
2.11.3. Thunderbird Installation and Configuration on Linux
Instructions for installing Thunderbird on Linux can be found at https://support.mozilla.org/en-US/kb/installing-thunderbird-linux. To install Thunderbird using the package manager, it is necessary to refer to the documentation of the Linux distribution you’re using. Complete instructions for installing Thunderbird outside of package management may be available at a distribution support website (e.g., Installing Thunderbird on Ubuntu).
2.11.4. Thunderbird Installation and Configuration on Mac
Instructions for installing Thunderbird on Mac machines can be found at https://support.mozilla.org/en-US/kb/installing-thunderbird-on-mac. The Thunderbird download page automatically detects the platform and language on the computer accessing it. To download Thunderbird in a language other than the one suggested, click on Other Systems & Languages for the list of available editions. Click on the OS X installation of your choice to continue. Once the download is completed, the disk image may open by itself and mount a new volume which contains the Thunderbird application. If you do not see the new volume, double-click the Thunderbird dmg icon to open it. A Finder window appears, containing the Thunderbird application. Drag the Thunderbird icon to the Applications folder. At this point you can eject the disk image by selecting it in a Finder window and pressing the command+E keys or by using the Finder’s File menu, and selecting Eject. Open the Applications folder and double-click on the Thunderbird icon to start it. You may get a security warning that Thunderbird has been downloaded from the Internet. Because you downloaded Thunderbird from the official site, you can click Open to continue. The first time you start Thunderbird you will be alerted that it is not your default email application. (The default email application is the program that opens, for example, when you click a link on a web page to an email address.) If you want Thunderbird to be the default email application, click Yes to set it as your default mailer. If not (for example if you are just trying out Thunderbird) click No.
2.11.5. Thunderbird Configuration for use with Microsoft Exchange
Thunderbird can be used to access Microsoft Exchange servers that support IMAP or POP3. The normal way to use Thunderbird with a Microsoft Exchange Server requires the system administrator to enable the POP/IMAP/SMTP mail servers that are bundled with that server. Otherwise, since Exchange uses a proprietary MAPI protocol, accessing Exchange from Thunderbird can require a plugin or gateway (several links to free and commercial gateway and add-on products can be found by using a search engine with the argument “how to configure Microsoft Exchange server in Thunderbird”) that provides standard, compliant protocols in front of proprietary Exchange (e.g., DavMail, ExQuilla).
In setting up Thunderbird:
- Open Thunderbird and click the Tools menu option. Click Account Settings. Click Account Settings again to start the process for the Exchange connection.
- Enter the full name at the first window. This name is what email recipients see in their inbox. In the following text box, enter your email address. Click the Next button.
- Select IMAP Mail Server from the drop-down window. Enter the Exchange server name in the IMAP Server Name text box. In the Outgoing Server text box, enter the Exchange server name again. Click the Next button.
- Check the box labeled Username and password. Enter your current username used to log into the machine. Remove the check mark in the box labeled Use secure connection. Click Finish. The Thunderbird application is ready to send and receive email from the Exchange server.
2.11.6. Thunderbird Configuration for use with Dovecot/Postfix
General step-by-step instructions for setting up Thunderbird can be found at https://products.secureserver.net/email/email_thunderbird.htm (Setting Up Your POP or IMAP Email Address with Mozilla Thunderbird).
Instructions for automatic account configuration can be found at https://support.mozilla.org/en-US/kb/automatic-account-configuration. Manual account configuration requires the following information:
- incoming mail server and port (for example, pop.example.com and port 110 or imap.example.com and port 143)
- outgoing mail server and port (for example, smtp.example.com and port 25)
- security setting for the connection with the server (for example, STARTTLS or SSL/TLS and whether or not to use secure authentication)
Instructions can be found at https://support.mozilla.org/en-US/kb/manual-account-configuration.
2.11.7. Thunderbird Support
Although it is open source software, Thunderbird support is available from Mozilla and other sources.
3. Device Configuration and Operating Recommendations
This section provides additional information regarding for installing, configuring and operating Email and DNS security applications. Section 3.1 provides specific recommendations regarding certificate generation. Section 3.2 describes cryptographic operation and management by users on Outlook and Thunderbird. Section 3.3 describes setting up Exchange and Postfix MTAs to provide server-to-server encryption of email. Section 3.4 provides links to some tools and utilities that are useful in installing, configuring, provisioning, and maintaining DNS-based email security software.
It is recommended that the installation, configuration, and operation of DNS servers be conducted in conformance to NIST SP 800-81-2, the Secure Domain Name System (DNS) Deployment Guide. Appendix D provides a checklist for management of secure DNSs.
Installation, configuration, and operation of email applications should follow the recommendations of SP 800-177, Trustworthy Email.
3.1. Using SSL for Cryptographic Certificate Generation
OpenSSL is a widely used open-source implementation of TLS/SSL and supporting cryptographic libraries for various version of Linux, but can also be used with Mac OS. OpenSSL also contains user utilities for generating cryptographic keys, certificate requests, and X.509 certificates. There is a FIPS-140 approved version of relevant OpenSSL cryptographic modules available for use by federal agencies.
3.1.1. OpenSSL Installation Basics and System Requirements
OpenSSL components and libraries are often standard components in base Linux installs, or can be installed using the built-in repository management system used with the version of Linux in use (e.g. apt-get, yum, rpm, etc.). Administrators may wish to install the developer repositories (*-devel or *-src) to make sure that all necessary header files are installed to support server implementations that rely on OpenSSL for cryptographic support. The latest version of OpenSSL, as well as FIPS approved versions may not be available in repositories and may need to be built from source from the OpensSSL project homepage.
In addition to having a base supported operating system, OpenSSL requires Perl 5 and a C compiler and development environment (with tools like make) to be successfully compiled and installed.
3.1.1.1. OpenSSL FIPS Approved Installation
Federal agencies or other organizations that are required to use FIPS-140 approved cryptographic modules can use OpenSSL FIPS approved version. These necessary modules are not always available via OS-specific repositories, but must be manually downloaded and compiled. The newly compiled libraries then replace any older, or pre-installed versions. Server daemons (e.g. BIND named, postfix, etc.) that rely on OpenSSL for cryptographic support will then use the FIPS-140 approved version of the libraries.
3.1.1.2. OpenSSL Installation on Mac OS
Normally, there is no need to install a separate set of cryptographic libraries for Mac OS. OpenSSL, if installed in the standard Mac OS distribution, provides the same functionality. However, if there is a desire to upgrade the standard installation, an alternative repository tool (e.g. homebrew) may be necessary, or certain files need to be changed in order to build OpenSSL on an Apple system.
3.1.2. OpenSSL Configuration
3.1.2.1. Configuration of OpenSSL to act as a Local Certificate Authority (CA)
OpenSSL can be used to generate certificates and act as a local enterprise Certificate Authority (CA). This is not always advisable as it is very basic set of tools. Enterprises using OpenSSL as their CA must take great care to ensure that the root certificate (i.e. the CA certificate that signs all the end-entity certificates) is adequately protected. Compromise of the root certificate private key would allow an attacker to generate arbitrary certificates for spoofed hosts and services. How this root certificate private key is protected is beyond the scope of this document but should include adequate physical, access, and logical controls.
OpenSSL can be used via the openssl command line tool to generate key pairs, and certificates for those key pairs. This certificate generation can be done by adding the certificate data on the command line, or using a configuration file for (organizational) default values. For example, if the organizational policy is for all certificates to have a lifetime of one year (365 days), that value can be set in a configuration file and does not need to be set using command line options unless there is a need to override the default for a specially generated certificate.
The general order in setting up OpenSSL to operate an enterprise local CA (or to generate self-signed certificates) is to: Generate and set up configuration files, generate the root certificate, and finally, generate and sign end entity certificates.
3.1.2.2. The OpenSSL CA Configuration File
Once OpenSSL is installed on the system, the CA admin needs to find and edit the opnessl.cnf configuration file. Where this file is located depends on how OpenSSL was installed on the system. Many repository installations will put the file at /etc/ssl/openssl.cnf but it may also be found at /usr/ssl or /usr/openssl or some other directory.
The configuration file is broken down into blocks around openssl commands. Most of these blocks can be left in their default values unless there is a specific policy reason for changing them. The two blocks that enterprise CA admins will likely need to change is [ CA_default ] and [ req ], which contain the default values for cryptographic and hash algorithms, default sizes and lifetimes, and Distinguished Name (country, organizational name, Common Name, etc.) respectively. An example snippet of the configuration file openssl.cnf is given in Figure 3.1 below.
The values in the [ CA_defaults ] block deal with the components of the CA itself: the directories used, the serial number file, etc. These are used to manage the CA itself, not directly involved with the cryptographic operation of generating key pairs and certificates. CA administrators can set these values to the appropriate directories for their enterprise CA. OpenSSL does not generate some of the necessary directories and files (such as serial, which keeps track of the serial numbers of issues certificates). These will need to be created by the admin using a text editor or standard Linux commands.
The values in the [ req ] block deal with the identification data and characteristics of X.509 certificates generated by the CA. These values will most likely need to be edited by enterprise CA administrators. If the enterprise certificate policy dictates that some values must be constant across the organization, it makes sense to make them the default values in the configuration file. For example, the enterprise always wants its HQ location used as the country, state, and locality in every certificate it generates.
Figure 3.1 Example OpenSSL Configuration File
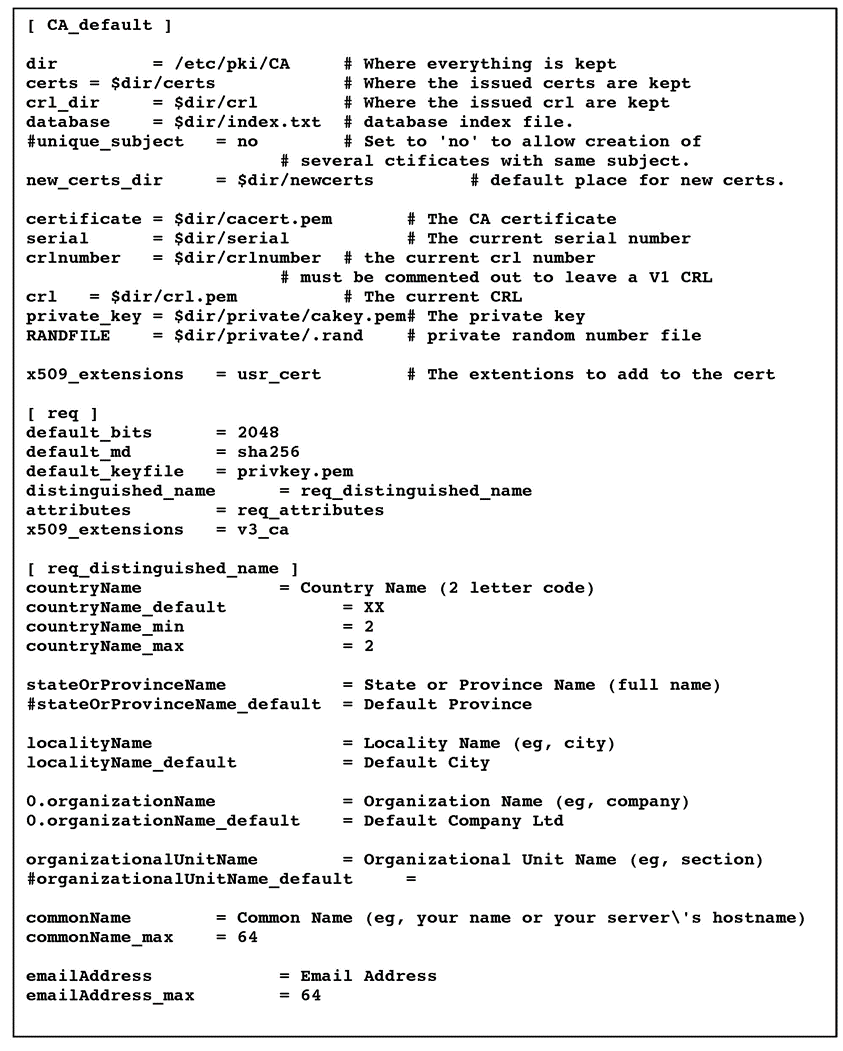
The enterprise CA admin can then put these entries in the appropriate line in the configuration file. For example:
[ req_distinguished_name ]
countryName = Country Name (2 letter code)
countryName_default = US
countryName_min     = 2
countryName_max     = 2

stateOrProvinceName = State or Province Name (full name) stateOrProvinceName_default        = District of Columbia

localityName        = Locality Name (eg, city)
localityName_default        = Washington

0.organizationName  = Organization Name (eg, company)
0.organizationName_default  = Department of Examples
Once the default values are in place, the configuration file will be used unless overridden in the openssl command line. If the configuration file has been moved to a new directory, the command line option -config should be included in the openssl command to point to the location of the new configuration file location.
3.1.2.3. Using Linux Environment Variables to Dynamically Set Common Name and SubjectAltName
Not all of the values can be set via the command line override. The most important value that an enterprise CA admin may want to change is the subjectAltName of a certificate. The subjectAltName is used to provide alternative hostnames for a server that can be checked during PKIX validation. This allows one server to have multiple names and still use the same key pair for TLS. The subjectAltName default can be set in the configuration file, but cannot be set at the command line.
On Linux systems, the following can be used in the configuration file to use environment variables for CommonName (called COMNAME) and SubjectAltName (called SAN). See below:
commonName  = Common Name (eg, your name or your commonName_default = ${ENV::COMNAME}
commonName_max      = 64

subjectAltName      = ${ENV::SAN}
After the changes have been made to the configuration file, the CommonName and SubjAltName can be set dynamically (either via command line or appropriate system call in scripts, programs, etc.) to set the entries before generating a certificate.
3.1.3. Certificate Generation
3.1.3.1. Generate the Root Certificate
Once the configuration file is edited, the enterprise CA administrator must first generate a root certificate. This can be done using the openssl command line tool, or an included support script CA.pl. The following examples use the command line, as it is flexible and can be used via scripted system calls (that set environment variables, etc.). The basic command to generate a root certificate is:
>openssl req -config <config file> \
-key private/ca.key.pem \
-new -x509 -days 7300 -sha256 -extensions v3_ca \
-out certs/ca.cert.pem
Here the -config option is used to list the location of the configuration file in use. The use of the -days option is to increase the lifetime of the root cert over any default value in the configuration file. The root certificate is not like end-entity issued certificates and often requires more configuration or possible manual installation in enterprise systems. So, it should be longer lived for administration purposes (and highly protected). Enterprise CA administrators should consult NIST SP 800-152, A Profile for U. S. Federal Cryptographic Key Management Systems for recommendations on how to set up a key management system.
3.1.3.2. Generating Intermediate and End-Entity Certificates
Once the CA infrastructure is set up and the root certificate is generated, the enterprise CA can start generating end-entity and (if desired) intermediate certificates. Intermediate certificates are just that: certificates that are extra “links” in the PKIX validation chain to the root certificate. They are not usually installed as trust anchors, but can be used to sign other (often end-entity) certificates.
The advantage of using intermediate certificates is that they can be used to compartmentalize end-entity certificates, so a compromise of an intermediate cert means that only that certificate (and those it signed) are compromised, and not the entire CA. Intermediate certificates also allow CA administrators to keep the root certificate safely stored offline. Once the root key is used to sign the intermediate certificates, it can be stored offline until new intermediate certificates are needed.
The disadvantages of using intermediate certificates is that they are needed by all clients wishing to do PKIX validation. If a client cannot find (or have stored) all necessary intermediate certificates, it cannot validate all end-entity certificates. Protocols like TLS account for this by having certificate chains available (end-entity and necessary intermediate certificates), but not all protocols do this. DANE is an option for publishing intermediate certificates in the DNS as intermediate certs, or as short-circuited trust anchors, depending on which Certificate Usage (CU) parameter is used [RFC6698].
The general command to generate a new client key pair and certificate is:
>openssl req -new -nodes -config <config file> -keyout <key filename>
-out \
<CSR filename>
The above command will generate a key pair and a Certificate Signing Request (CSR) for the new certificate. The -nodes option disables the setting of a password for decrypting the private portion of the key pair. This is important to set for server certificates where there is no end user to enter a password (and the private key is needed to set up a TLS connection). For intermediate certificates, this should not be set, as that private key should be protected.
Once the CSR is generated, it is made into a certificate:
>openssl ca -config <config file> -out -infiles <CSR filename> -out
<cert name>
Then the administrator follows the prompt. Administrators using intermediate keys may also use the -key <private key> option to have openssl use the desired intermediate key. Alternatively, the administrator could configure which signing key to use in the openssl configuration file. Indeed, several separate configuration files could be used if multiple intermediate keys are used for the enterprise CA.
Once the new certificate and key pair have been generated, they must be protected from unauthorized disclosure. They must be security communicated to server administrators so the administrators can configure them for use. Once the key has outlived its lifetime, it must be security retired and removed. These operations should be documented as part of the enterprise key management system.
3.2. Cryptographic Operations (User Actions)
This section provides information regarding user actions necessary for users to invoke digital signature, encryption, and cryptographic certificate management features of Outlook and Thunderbird. The user’s experience varies from relatively minimal additional impact in enterprise environments with established system administration and support to a significant impact in the case of individual self-supported users. Where the enterprise offers systems administration and support services, the user’s experience with respect to DNS services is essentially unchanged. One exception is that, where DNS authentication fails, email messages sent to or by a user will not be delivered. This should be an uncommon experience for correspondents but it is up to the enterprise DNS administrator to prevent this happening. Similarly, for server-to-server encryption, the security protection features should be essentially transparent to the user.
3.2.1. Outlook
To use digital signatures and encryption, both the sender and recipient must have a mail application that supports the S/MIME standard. Outlook supports the S/MIME standard.
Instructions for user-driven cryptographic functions vary from version to version and platform to platform. Accessing digital signature on an Outlook Help page usually provides the necessary operator instructions. The example instructions provided here are for Outlook 2016 for Windows 10 and Outlook for Mac 2011.
3.2.1.1. Outlook 2016 for Windows 10
When a user has been issued an S/MIME certificate they can import it into the Outlook 2016’s Trust Center to be used for digital signature and encryption based upon the key usages of the certificate. When a smart card containing a secure email digital signature certificate is inserted into the Windows operating system, the OS will import the certificate into the user’s personal certificate store. This will occur when the user inspects the smart card with the certutil.exe -scinfo command or if the following group policy is enabled:
Computer Configuration -> Administrative Templates -> Windows Components -> Smart Card: Turn on certificate propagation from smart card
To view the certificates in the user’s certificate store, type certmgr.msc.
Configure Outlook 2016 S/MIME Settings:
- Open Outlook 2016.
- Click on File, and then Options.
- In the left-hand menu, click on Trust Center.
- Click on the Trust Center Settings box.
- Click Email Security in the left-hand menu.
- Click the Settings button within the Encrypted Email section.
- Enter a name within the Security Settings Name field.
- Select the Signing Certificate by clicking on the Choose button for the signing certificate, and select the Hash Algorithm.
- If you have an S/MIME encryption certificate, select the Choose button for the encryption certificate, and select the Encryption Algorithm.
- Select the radio button Send to send these certificates with signed messages.
The user can choose to always digitally sign a message by selecting Add digital signature to outgoing messages within the Trust Center -> Email Security -> Encrypted Email menu. This will digitally sign every outgoing email. To individually sign an email, within the draft message itself go to Options, and within the Permissions menu select the Sign icon.
3.2.1.2. Outlook for Mac 2011 Certificate Management
If the user has a person’s certificate in Outlook, he or she can validate a digitally signed message. This also enables the user to send that person an encrypted message (user to user).
Importing a Certificate
- At the bottom of the navigation pane, click Contacts
 .
. - Open the desired contact, and then click the Certificates tab.
- Click
 , locate the certificate, and then click Open.
Note: To set the default certificate for a contact, select the certificate, click
 , and then click Set as Default.
- At the bottom of the navigation pane, click Contacts
Exporting a Certificate
Certificates can be exported in three formats: DER encoded X.509, PEM (Base-64 encoded X.509), and PKCS #7. The DER encoded X.509 format is the most common, but the user might want to ask what format his or her recipient requires.
- At the bottom of the navigation pane, click Contacts .
- Open the desired contact, and then click the Certificates tab.
- Select the certificate, click , and then click Export.
To set the format of the certificate, make a selection on the
Format menu.
- Deleting a Certificate
- At the bottom of the navigation pane, click Contacts
.
- Open the desired contact, and then click the Certificates tab.
- Select the certificate, and then click
 .
.
- At the bottom of the navigation pane, click Contacts
3.2.1.3. Digital Signature
To use digital signatures (or encryption), both the sender and recipient must have a mail application that supports the S/MIME standard. Outlook supports the S/MIME standard.
Note: Before a user starts this procedure, he or she must first have a certificate added to the keychain on his or her computer. For information about how to request a digital certificate from a certification authority, see Mac Help.
On the Tools menu, click Accounts.
The user clicks the account from which he or she wants to send a digitally signed message, clicks Advanced, and then clicks the Security tab.
Under Digital signing, on the Certificate pop-up menu, the user clicks the certificate that he or she wants to use.
Note: The Certificate pop-up menu only displays certificates that are valid for digital (signing or encryption) that the user has already added to the keychain for his or her Mac OS X user account. To learn more about how to add certificates to a keychain, see Mac OS Help.
To make sure that the user’s digitally signed messages can be opened by all recipients, even if they do not have an S/MIME mail application and cannot verify the certificate, select the Send digitally signed messages as clear text check box.
Click OK, and then close the Accounts dialog box.
In an email message, on the Options tab, click Security, and then click Digitally Sign Message.
Finish composing the message, and then click Send.
3.2.2. Thunderbird
For purposes of illustration, the description of the user experience with Thunderbird also included certificate management requirements. The example here shows both S/MIME and PGP examples of certificate management. The S/MIME approach is recommended. Note that when using OpenPGP, a FIPS 140-conformant version should always be used.
3.2.2.1. S/MIME Certificate Management
S/MIME certificates are used for digitally signed and encrypted email messages. For information about getting or creating S/MIME certificates, see: http://kb.mozillazine.org/Getting_an_SMIME_certificate.
Installing an S/MIME certificate
Important: Before a user can create or import his or her own certificate and private key, he or she must first set a master password if this has not already been done. The master password is needed so that imported certificates are stored securely. See http://kb.mozillazine.org/Master_password for instructions for setting a master password.
The user may have his or her own personal certificate and private key in a .p12 or .pfx file, and may wish to import it into Thunderbird. Once a Master Password has been set, the user can import/install a personal S/MIME certificate from a .p12 or .pfx file by doing the following steps.
- Open the Certificate Manager by going to Tools -> Options... -> Advanced -> Certificates -> Manage Certificates....
- Go to the tab named Your Certificates.
- Click on Import.
- Select the PCKS12 certificate file (.pfx or .p12).
- It will ask the user for the master password for the software security device. The user enters his or her master password and clicks OK.
- Next, it will ask the user for the password protecting his or her personal certificate. If the user’s .p12 or .pfx file has a password, the user enters it here, otherwise leave this field empty. The user then clicks OK.
The S/MIME certificate should now have been imported. If the certificate was not trusted, consult the instructions at http://kb.mozillazine.org/Thunderbird_:_FAQs_:_Import_CA_Certificate.
Configuring Thunderbird for using the certificate to sign email:
Go to Tools -> Account Settings... in ThunderBird. Then find the account with the email address that matches the email address in the certificate that has just been installed. The user chooses Security under that account and selects the certificate that has just been installed. The rest of the options should be self-explanatory. When the user selects a certificate in Account Settings, that selection only applies to the account’s default identity or identities. There is no user interface for specifying certificates for an account’s other identities. If desired, this can be worked around by editing the settings manually, copying the settings from an account’s default identity to some other identity. The settings have names ending in: signing_cert_name, sign_mail, encryption_cert_name, and encryptionpolicy.
User Installation of a Self-Signed S/MIME Certificate:
If the SMIME certificate in a user’s .p12 or .pfx file is a self-signed certificate for the user’s own identity, then before that file can be installed into the tab named Your Certificates, the user must first install that certificate as a certificate authority in the Authorities tab. The PKCS12 certificate file will not install into the Authorities tab. The user will need a copy of a self-signed certificate that does not contain the user’s private key. This is usually in the form of a .cer file. One way to obtain the .cer form of a certificate from the .p12 file is to use the Firefox Add-on Key Manager to extract the .cer certificate from the .p12 file. With that add-on installed in Thunderbird, the user goes to Tools -> Key Manager Toolbox -> Key Manager -> Your Keys, selects his or her key, selects Export and chooses X.509 as file format.
- Go to Tools -> Options... -> Advanced -> Certificates -> Manage Certificates....
- Go to the Authorities tab.
- Click on Import.
- Select the .cer file.
- It will ask the user for what purposes he or she wants to trust the certificate. The user selects Trust this CA to identify email users.
- Click OK to complete the import.
Note: Thunderbird automatically adds other people’s S/MIME certificates to the **Other People’s* tab of a user’s Certificate Manager when he or she receives from them a digitally signed message with a valid signature and with an S/MIME certificate issued by a recognized and trusted Certificate Authority (CA). CA certificates that appear in Thunderbird’s Authorities tab are recognized, and may also be trusted. CA certificates that do not appear in that tab are considered unrecognized. An S/MIME certificate that was issued by an unrecognized CA will not be automatically added to the Other People’s tab of the user’s Certificate Manager. If the user attempts to manually import an S/MIME certificate that was issued by an unrecognized CA, nothing will happen–literally. Thunderbird will not even display an error dialog. It will just not import the S/MIME certificate. This is generally not a problem when receiving an S/MIME certificate that was issued by a trusted Certificate Authority (CA), but could be a problem for a certificate that was issued by an unrecognized or untrusted CA, or for a certificate that is self-signed (i.e. it has no CA other than itself). So, before a user can import an S/MIME certificate that is issued by an unrecognized CA or is self-signed, he or she must first acquire and import the certificate for the issuing CA. In the case of a self-signed certificate, a .cer file needs to be acquired from the individual whose certificate the user wishes to add.*
3.2.2.2. PGP Example of Sending and Receiving Public Keys
Sending a public key via email
To send signed messages to other people that the recipients can validate, the user must first send them the public key:
- Compose the message.
- Select OpenPGP from the Thunderbird menu bar and select Attach My Public Key.

- Send the email as usual.
Receiving a public key via email
To verify signed messages from other people, the public key must be received and stored:
- Open the message that contains the public key.
- At the bottom of the window, double click on the attachment that ends in .asc. (This file contains the public key.)
- Thunderbird automatically recognizes that this is a PGP key. A dialog box appears, prompting the Import or View of the key. Click Import to import the key.
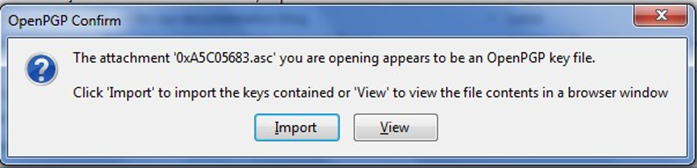
- A confirmation that the key has been successfully imported will be shown. Click OK to complete the process.
Revoking a key
If the private key may have been “compromised” (that is, someone else has had access to the file that contains the private key), revoke the current set of keys as soon as possible and create a new pair. To revoke the current set of keys:
- On the Thunderbird menu, click OpenPGP and select Key Management.

- A dialog box appears. Check Display All Keys by Default to show all the keys.
- Right-click on the key to be revoked and select Revoke Key.
- A dialog box appears asking the user if he or she really want to revoke the key. Click Revoke Key to proceed.
- Another dialog box appears asking for the entry of a secret passphrase. Enter the passphrase and click OK to revoke the key.
The user sends the revocation certificate to the people with whom he or she corresponds so that they know that the user’s current key is no longer valid. This ensures that if someone tries to use the current key to impersonate the user, the recipients will know that the key pair is not valid.
3.2.2.3. Sending a Digitally Signed Email
Compose the message as usual.
To digitally sign a message, select OpenPGP from the Thunderbird menu and enable the Sign Message option.
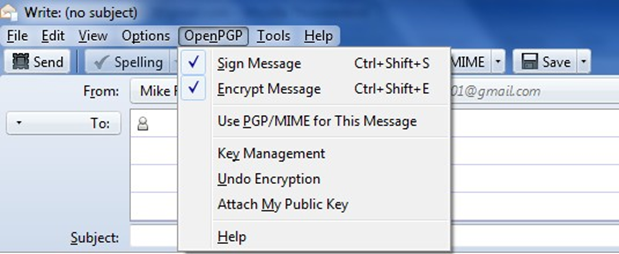
If the email address is associated with a cryptographic certificate, the message will be signed with the key contained in that certificate. If the email address is not associated with a cryptographic certificate, a certificate must be selected from a list.
Send the message as usual.
3.2.2.4. Reading a Digitally Signed Email
When a signed message is received, and If Thunderbird recognizes the signature, a green bar (as shown below) appears above the message.
To determine whether or not the incoming message has been signed, look at the information bar above the message body. If the message is also encrypted on a user to user basis, Thunderbird will also ask for the entry of a secret passphrase to decrypt the message.

If the message has been signed, the green bar also displays the text, “Signed message”.
A message that has not been signed could be from someone trying to impersonate someone else.
3.3. Server-to-Server Encryption Activation and Use
3.3.1. Office 365 Exchange
Server-to-server encryption (Scenario 1) is available on Exchange for Office 365. Office 365 encrypts users’ data while it’s on Microsoft servers and while it’s being transmitted between the user and Microsoft. Office 365 provides controls for end users and administrators to fine tune what kind of encryption is desired to protect files and email communications. Some technical library links for specific topics are as follows:
- Information on encryption using Office 365 Exchange can be found at https://technet.microsoft.com/en-us/library/dn569286.aspx.
- Information regarding the different types of email encryption options in Office 365 including Office Message Encryption (OME), S/MIME, Information Rights Management (IRM) can be found at https://technet.microsoft.com/en-us/library/dn948533.aspx.
- Information regarding definition of rules regarding email message encryption and decryption can be found at https://technet.microsoft.com/en-us/library/dn569289.aspx.
- Information regarding sending, viewing, and replying to encrypted messages can be found at https://technet.microsoft.com/en-us/library/dn569287.aspx.
- Service information for message encryption can be found at https://technet.microsoft.com/en-us/library/dn569286.aspx.
3.3.2. Postfix
Postfix TLS support is described at http://www.postfix.org/TLS_README.html. Postfix can be set to encrypt all traffic when talking to other mail servers [10].
3.4. Utilities and Useful Tools
This section provides links to some tools and utilities that are useful in installing, configuring, provisioning, and maintaining DNS-based email security software.
3.4.1. DANE Tools
3.4.1.1. SMIMEA Retriever Tool
The SMIMEA retriever tool, developed by Santos Jha as part of this project, retrieves SMIMEA records from a DNS for a given email address and stores the certificates in PKCS12 format. This PKCS12 store can subsequently be imported into an MUA such as Thunderbird or Outlook. Since this software is used for offline provisioning of certificates, the developer focused on selector=0 and matching type=0. It is written using Java 8.
3.4.1.2. TLSA Generator
Shumon Huque’s online TLSA generator generates TLSA resource records from a certificate and parameters for which prompts are included. The link to the tool is https://www.huque.com/bin/gen_tlsa.
3.4.1.3. High Assurance Domain Toolbox
NIST’s High Assurance Domain Toolbox is a collection of perl scripts used to generate and format SMIMEA and TLSA RR’s for use with the High Assurance Testbed. Each of these scripts are used independently and not all required to be used if other solutions work better. The tool can be found at https://github.com/scottr-nist/HAD-tlsa-toolbox.
3.4.1.4. Swede
Swede is a tool for use in creating and verifying DANE records. The tool can be found at https://github.com/pieterlexis/swede.
3.4.1.5. Hash-slinger
Hash-slinger is a package of tools created by Paul Wouters of RedHat to make it easy to create records for the DANE protocol that will allow you to secure your SSL/TLS certificates using DNSSEC. The package is available for Linux at: http://people.redhat.com/pwouters/hash-slinger/.
3.4.2. DANE Validation Sites and Testers
3.4.2.1. NIST DANE Testers
NIST’s DANE-testers for RFC 6698 conformance can be found at http://dane-test.had.dnsops.gov/.
3.4.2.2. SMIMEA Test Tool
Grier Forensics’ SMIMEA Test tool can be found at https://dst.grierforensics.com
3.4.2.3. DANE Validator Online Test Tool
The DANE validator online test tool found at https://check.sidnlabs.nl/dane/ attempts to perform validation of a TLSA/PKI pair according to the DANE Internet standard. Note that the tool automatically selects Port 443 and TCP. Server Name Indication (SNI) support is included. The tool set uses the ldns-dane example from LDNS from NLnet Labs.
3.4.2.4. DANE SMTP Validator
The DANE SMTP Validator, an SMTP DANE test tool, can be found at https://dane.sys4.de/.
3.4.3. Other Test Tools
DNSViz is a tool for visualizing the status of a DNS zone. It was designed as a resource for understanding and troubleshooting deployment of the DNS Security Extensions (DNSSEC). It provides a visual analysis of the DNSSEC authentication chain for a domain name and its resolution path in the DNS namespace, and it lists configuration errors detected by the tool. This DNSSEC test tool is not DANE specific, but helpful. It can be found at http://dnsviz.net/.
Appendix A List of Acronyms
ASN Abstract Syntax Notation
AXFR DNS Full Zone Transfer Query Type
BIND Berkeley Internet Name Domain
BSD Berkeley Software Distribution
CA Certificate Authority
CRL Certificate Revocation List
CSR Certificate Signing Request
CU Certificate Usage Type
DANE DNS-Based Authentication of Named Entities
DNS Domain Name System
DNSSEC DNS Security Extensions
Email Electronic Mail
FIPS Federal Information Processing Standard
GAL Global Address List
HTTP Hypertext Transfer Protocol
IETF Internet Engineering Task Force
IMAP Internet Message Access Protocol
IP Internet Protocol
ITL Information Technology Laboratory
LDAP Lightweight Directory Access Protocol
MIME Multipurpose Internet Mail Extension
MTA Mail Transfer Agent
MUA Mail User Agent
MX Mail Exchange (Resource Record)
NCCoE National Cybersecurity Center of Excellence
NIST National Institute of Standards and Technology
NSD Network Server Daemon
OS Operating System
PKI Public Key Infrastructure
PKIX Public Key Infrastructure X.509
POP Post Office Protocol
RFC Request for Comments
RMF Risk Management Framework
RR Resource Record
S/MIME Secure/Multipurpose Internet Mail Extensions
SMIMEA S/MIME Certificate Association (Resource Record)
SMTP Simple Mail Transfer Protocol
SNI Server Name Indication
SP Special Publication
SQL Structured Query Language
TLS Transport Layer Security
TLSA TLS Certificate Association (Resource Record)
UA User Agent
VLAN Virtual Local Area Network
VM Virtual Machine
Appendix B References
| [1] | DNS Security Introduction and Requirements; RFC 4033; Arends, Austein, Larson, Massey, and Rose; March 2005. https://datatracker.ietf.org/doc/rfc4033 |
| [2] | (1, 2) Trustworthy Email; NIST Special Publication 800-177; Chandramouli, Garfinkel, Nightingale and Rose; September 2016. https://doi.org/10.6028/NIST.SP.800-177 |
| [3] | The Transport Layer Security (TLS) Protocol Version 1.2, RFC 5246, Dierks and Rescorla, August, 2008. https://datatracker.ietf.org/doc/rfc5246 |
| [4] | SMTP Service Extension - Secure SMTP over TLS, RFC 3207, Hoffman, February 2002. https://datatracker.ietf.org/doc/rfc3207 |
| [5] | (1, 2, 3) The DNS-Based Authentication of Named Entities (DANE) Transport Layer Security Protocol: TLSA, Proposed Standard, RFC 6698, Hoffman and Schlyter, August 2012. https://datatracker.ietf.org/doc/rfc6698 |
| [6] | S/MIME Version 3 Message Specification, IETF RFC 2633, Ramsdell, Ed., June 1999. https://datatracker.ietf.org/doc/rfc2633 |
| [7] | Domain Names - Concepts And Facilities, RFC 1034, Mockapetris, November 1987. https://datatracker.ietf.org/doc/rfc1034 |
| [8] | Unbound: How to enable DNSSEC, W.C.A. Wijngaards, NLnet Labs, April 2011. https://www.unbound.net/documentation/howto_anchor.html |
| [9] | How to Set Up a Postfix E-Mail Server with Dovecot, DigitalOcean, November 14, 2013. https://www.digitalocean.com/community/tutorials/how-to-set-up-a-postfix-e-mail-server-with-dovecot |
| [10] | “Setting Postfix to encrypt all traffic when talking to other mailservers,” Snapdragon Tech Blog, August 9, 2013. http://blog.snapdragon.cc/2013/07/07/setting-postfix-to-encrypt-all-traffic-when-talking-to-other-mailservers/ |
Security Requirements for Cryptographic Modules, Federal Information Processing Standard (FIPS) 140-2, May 2001 (including change notices as of 12-03-2002). https://doi.org/10.6028/NIST.FIPS.140-2
Guidelines on Electronic Mail Security; NIST Special Publication 800-45 Ver. 2; Tracy, Jansen, Scarfone, Butterfield; February 2007. https://doi.org/10.6028/NIST.SP.800-45ver2
Federal S/MIME V3 Client Profile, NIST Special Publication 800-49, Chernick, November 2002. https://doi.org/10.6028/NIST.SP.800-49
Guidelines for the Selection, Configuration, and Use of Transport Layer Security (TLS) Implementations, NIST Special Publication 800-52 Rev. 1; Polk, McKay, Chokhani; April 2014. https://doi.org/10.6028/NIST.SP.800-52r1
Security and Privacy Controls for Federal Information Systems and Organizations, NIST Special Publication 800-53 Rev. 4, Joint Task Force Transformation Initiative, April 2013. https://doi.org/10.6028/NIST.SP.800-53r4
Recommendation for Key Management: Part 1 - General, NIST Special Publication 800-57 Part 1 Rev.4, Barker, January 2016. https://doi.org/10.6028/NIST.SP.800-57pt1r4
Electronic Authentication Guideline; NIST Special Publication 800-63-2; Burr, Dodson, Newton, Perlner, Polk, Gupta, Nabbus; August 2013. https://doi.org/10.6028/NIST.SP.800-63-2
Digital Identity Guidelines; NIST Special Publication 800-63-3; Burr, Choong, Danker, Grassi, Garcia, Greene, Fenton, Lefkovitz, Nadeau, Netwon, Perlner, Regenscheid, Richer, Squire, Theofanos; June 2017. https://doi.org/10.6028/NIST.SP.800-63-3 https://pages.nist.gov/800-63-3/
Secure Domain Name System (DNS) Deployment Guide, NIST Special Publication 800-81-2, Chandramouli and Rose, September 2013. https://doi.org/10.6028/NIST.SP.800-81-2
A Framework for Designing Cryptographic Key Management Systems; NIST Special Publication 800-130; Barker, Branstad, Smid, Chokhani; August 2013. https://doi.org/10.6028/NIST.SP.800-130
A Profile for U.S. Federal Cryptographic Key Management Systems (CKMS); NIST Special Publication 800-152; Barker, Smid, Branstad; October 2015. https://doi.org/10.6028/NIST.SP.800-152
X.509 Certificate Policy for the U.S. Federal PKI Common Policy Framework, Version 1.24. https://www.idmanagement.gov/wp-content/uploads/sites/1171/uploads/Common-Policy-Framework.pdf
Internet X.509 Public Key Infrastructure Certificate and CRL Profile; IETF RFC 2459; Housley, Ford, Polk, Solo; January 1999. https://datatracker.ietf.org/doc/rfc2459
Secret Key Transaction Authentication for DNS (TSIG); RFC 2845; Vixie, Gudmundsson, Eastlake, and Wellington; May 2000. https://datatracker.ietf.org/doc/rfc2845
Secure Domain Name System (DNS) Dynamic Update, RFC 3007, Wellington, November 2000. https://datatracker.ietf.org/doc/rfc3007
ISO/IEC 9798-3 Authentication SASL Mechanism, RFC 3163, Zuccherato and Nystrom, August 2001. https://datatracker.ietf.org/doc/rfc3163
Cryptographic Message Syntax (CMS), RFC 3369, Housley, August 2002. https://datatracker.ietf.org/doc/rfc3369
Cryptographic Message Syntax (CMS) Algorithms, RFC 3370, Housley, August 2002. https://datatracker.ietf.org/doc/rfc3370
Threat Analysis of the Domain Name System (DNS), IETF RFC 3833, Atkins and Austein, August 2004. https://datatracker.ietf.org/doc/rfc3833
Secure/Multipurpose Internet Mail Extensions (S/MIME) Version 3.1, Certificate Handling, RFC 3850, Ramsdell, July 2004. https://datatracker.ietf.org/doc/rfc3850
Secure/Multipurpose Internet Mail Extensions (S/MIME) Version 3.1, Message Specification, RFC 3851, Ramsdell, July 2004. https://datatracker.ietf.org/doc/rfc3851
Resource Records for the DNS Security Extensions; RFC 4034; Arends, Austein, Larson, Massey, and Rose; March 2005. https://datatracker.ietf.org/doc/rfc4034
Protocol Modifications for the DNS Security Extensions; RFC 4035; Arends, Austein, Larson, Massey, and Rose; March 2005. https://datatracker.ietf.org/doc/rfc4035
Lightweight Directory Access (LDAP) Protocol, RFC 4511, Sermersheim, Ed., June 2006. https://datatracker.ietf.org/doc/rfc4511
Automated Updates of DNS Security (DNSSEC) Trust Anchors, RFC 5011, StJohns, September 2007. https://datatracker.ietf.org/doc/rfc5011
Internet X.509 Public Key Infrastructure Certificate and Certificate Revocation List (CRL) Profile; Proposed Standard; RFC 5280; Cooper, Santesson, Farrell, Boeyen (Entrust), Housley, Polk; May 2008. https://datatracker.ietf.org/doc/rfc5280/
Simple Mail Transfer Protocol, RFC 5321, Draft Standard, Kleinstein, October 2008. https://datatracker.ietf.org/doc/rfc5321
IPv4 Address Blocks Reserved for Documentation; Informational; RFC 5737; Arkko, Cotton, and Vegoda, January 2010. https://tools.ietf.org/html/rfc5737
Secure/Multipurpose Internet Mail Extensions (S/MIME), Version 3.2, Message Specification, Proposed Standard, RFC 5751, Ramsdell and Turner, January 2010. https://datatracker.ietf.org/doc/rfc5751
Multicast Mobility in Mobile IP Version 6 (MIPv6): Problem Statement and Brief Survey; RFC 5757; Schmidt, Waehlisch, and Fairhurst; February 2010. https://datatracker.ietf.org/doc/rfc5757
The E.164 to Uniform Resource Identifiers (URI) Dynamic Delegation Discovery System (DDDS) Application (ENUM); RFC 6116; Bradner, Conroy, and Fujiwara; March 2011. https://datatracker.ietf.org/doc/rfc6116
Use Cases and Requirements for DNS-Based Authentication of Named Entities (DANE), RFC 6394, Barnes, October 2011. https://datatracker.ietf.org/doc/rfc6394
Updates to the Internet X.509 Public Key Infrastructure Certificate and Certificate Revocation List (CRL) Profile, Proposed Standard, RFC 6818, Yee, January 2013. https://datatracker.ietf.org/doc/rfc6818
Adding Acronyms to Simplify Conversations about DNS-Based Authentication of Named Entities (DANE), RFC 7218, Gudmundsson, April 2014. https://datatracker.ietf.org/doc/rfc7218
The DNS-Based Authentication of Named Entities (DANE) Protocol: Updates and Operational Guidance, RFC 7671, Dukhovni and Hardaker, October 2015. https://datatracker.ietf.org/doc/rfc7671
SMTP Security via Opportunistic DNS-Based Authentication of Named Entities (DANE) Transport Layer Security (TLS), RFC 7672, Dukhovni and Hardaker, October 2015. https://datatracker.ietf.org/doc/rfc7672
Using Secure DNS to Associate Certificates with Domain Names for S/MIME, RFC 8162, Hoffman and Schlyter, May 2017. https://datatracker.ietf.org/doc/rfc8162/
Domain Name System-Based Security for Electronic Mail, Barker, National Institute of Standards and Technology’s Dakota Consulting IDIQ Contract SB1341-12-CQ-0011, Task Order 15- 421 Task 3 Report #2, December 17, 2016. https://nccoe.nist.gov/library/dns-based-secured-email
Appendix C Platform Operation and Observations
C.1 Operations Scenarios
Both server-to-server encryption (Scenario 1) and user signature (Scenario 2) of email are demonstrated. Demonstrations of the security platform include attempts by fraudulent actors to pose as the originator of email and man-in-the-middle attackers attempting to disrupt the validation of the S/MIME signature. Events are included that involve all components and demonstrate that each of the MUAs can be used with both MTAs, and both MTAs can run with each of the four DNS stacks. Use of self-signed certificates and of certificates from local and well-known certificate authorities are included. The events do not cover all possible combinations of components for both mail origination and receipt, but they do include demonstration of both Exchange and Postfix as senders, all four DNS services, and both Exchange and Postfix as recipients accessed by both Outlook and Thunderbird MUAs. For each event identified below, we identify the components involved, operator actions required by both the sender and the receiver, and observed results. For purposes of avoiding excessive repetition in test events, each event includes demonstration of both scenarios.
C.1.1 Server-to-Server Encrypted Email in Scenario 1
An individual needed to enter into an email exchange with an individual in another organization that required protected transfer of information. Each individual exchanged email via the respective parent organizations’ mail servers. Users connected to their organizations’ respective mail servers within a physically protected zone of control.
The policy of the parent organizations required encryption of the information being exchanged. The security afforded by the cryptographic process was dependent on the confidentiality of encryption keys from unauthorized parties. The mail servers were configured to use X.509 certificates to convey keying material during an encryption key establishment process.
DNSSEC was employed to ensure that each sending mail server connected to the legitimate and authorized receiving mail server from which its X.509 certificate was obtained. DANE resource records were employed to bind the cryptographic keying material to the appropriate server name. STARTTLS was employed to negotiate the cryptographic algorithm to be employed with TLS in the email exchange in which the message was transferred. Encryption of the email message was accomplished by the originator’s email server, and decryption of the email message was accomplished by the recipient’s email server.
C.1.2 Signed Email in Scenario 2
Scenario 2 supports the case of an individual needing to enter into an exchange of email that requires integrity protection with an individual in another organization. Each individual exchanged email via the respective parent organizations’ mail servers. Users connected to their organizations’ respective mail servers within a physically protected zone of control.
The policies of the parent organizations required cryptographic digital signature of the message to provide integrity protection and source authentication of the email message. S/MIME is a widely available and used protocol for digitally signing email. Each organization therefore generated X.509 certificates for their users that included the public portion of their signature keys. These certificates were then published in the DNS using the appropriate DANE DNS Resource Record (RR) type.
DNSSEC was used to provide assurance that the originating user’s mail server connected to the intended recipient’s mail server. DANE records were employed to bind the cryptographic certificates to the appropriate server (for TLS) and individual user (for S/MIME), respectively. TLS was employed to provide confidentiality. Digital signature of the email message was accomplished by the originator’s email client. Validating the signature (hence the integrity of the authorization provided in the email message) was accomplished by the recipient’s email client.
C.1.3 Handling of Email from Fraudulent Sender
Demonstrations of the security platform in both scenarios included an attempt by a fraudulent actor to pose as the originator of the email. Where it was implemented, DANE was used to expose the fraudulent originator’s attempt.
C.1.4 Handling of Man-in-the-Middle Attack
Demonstration of the security platform in both scenarios also included a man-in-the-middle attacker attempting to disrupt the validation of the S/MIME signature. Where DANE was implemented, the attempts were shown to fail due to use of DNSSEC and DANE records.
C.1.5 Effects of DNS Errors
A DANE-enabled Postfix MTA sent message traffic to four Exchange MTAs with one Authoritative Server serving all four zones. An NSD4 Authoritative DNS server and Unbound recursive server was provided for the Postfix MTA, and a Secure64 DNS Authority and Signer provided the DNS services for the Exchange zones.
C.2 Test Sequences
The test and demonstration events selected were chosen to demonstrate the functionality available in both scenarios, the effectiveness of available DNS services, and the interoperability of components. The event selection objectives also included keeping the events to a manageable number, while capturing significant performance information. As a result, several stacks of contributed MUA, MTA, and DNS service components were demonstrated in the NCCoE laboratory environment, and representative NCCoE laboratory configurations were shown exchanging email with two different external sites using several cryptographic certificate types (certificates from Well-Known CAs (with TLSA RR cert usage (CU) of 1), Enterprise CAs (with TLSA RR cert usage of 2), and Self-Signed CAs (with TLSA RR cert usage of 3). The first external site used Secure64 DNS services, a Postfix MTA, and a Thunderbird MUA with an Apple Keychain Utility. The second external site used NLnet Labs DNS services, a Postfix MTA, and a Thunderbird MUA.
C.2.1 Test Sequence 1: MUA/MTA/DNS Service Combinations Exchanged Signed and Encrypted Email with a Secure64 Site and an NLnet Labs Site
An Outlook MUA, interfacing with an Exchange MTA, was configured to use Active Directory and BIND DNS services in turn. Each of the six configurations exchanged email with 1) a Secure64 MUA/MTA/DNS service stack that included a Postfix MTA and a Thunderbird MUA running on a Mac OS System, and 2) an NLnet Labs MUA/MTA/ DNS service stack that included a Postfix MTA and a Thunderbird MUA running on Linux. The events include events showing use of Well-Known CAs (CU-1), Enterprise CAs (CU=2), and Self-Signed Certificates (CU=3) for TLS and S/MIME-enabled mail receivers and S/MIME. Digital signature of the messages was logged. All messages were S/MIME signed. Outlook attempted to verify received messages (Scenario 2). Signature verification results were noted. DNS name verification results were noted. Figure 2.1 depicts the set-up for laboratory support for the Secure64 destination variant of this test sequence. The connections depicted in Figure 2.1 are actually for the first Sequence 2 configuration. Capabilities for Sequence 1 support are shown as dotted lines.
C.2.1.1 Active Directory and DNS Server in NCCoE Laboratory
The Active Directory, DNS Server, an Exchange MTA, and an Outlook MUA were configured with appropriate certificates for each deployment scenario. These certificate policies include S/ MIME and TLS certificates from a Well-Known CA, certificates from an Enterprise CA, and self- signed certificates (using TLSA and SMIMEA parameters CU=1, CU=2, and CU=3 respectively). Each of these three variations sent S/MIME signed and TLS encrypted email to a Secure64 site and an NLnet Labs site. The Secure64 site was using a MacBook-hosted Thunderbird MUA, a Postfix/Dovecot MTA, DNS Cache/DNS Authority services for processing received messages, and DNS Signer for outbound messages. The NLnet site was using an Intel-hosted Thunderbird MUA, a Postfix/Dovecot MTA, NSD4 and Unbound for processing received messages, and OpenDNSSEC for outbound messages. Each of the events included the NCCoE Laboratory configuration sending a signed and encrypted message to the remote sites, and a signed response being sent from each remote site to the NCCoE configuration.
Event 1: Outlook MUA Using an Exchange MTA using Well-Known CA issued Certificates for TLS and S/MIME
Expected Outcome: NCCoE Outlook MUA sent a test message in an S/MIME signed email using Active Directory DNS Services and a Well-Known CA (CU=1) to Secure 64 and NLnet Labs, and both recipients returned responses that were S/MIME signed. The signature for the received messages was verified.
Observed Outcome: As expected, the messages were authenticated and a log file was saved.
Event 2: Outlook MUA Using an Exchange MTA using Enterprise CA issued Certificates for TLS and S/MIME
Expected Outcome: NCCoE Outlook MUA sent a test message in an S/MIME signed email using Active Directory DNS Services and an Enterprise CA (CU=2) to Secure 64 and NLnet Labs, and both recipients returned responses that were S/MIME signed. The signature for the received messages was verified.
Observed Outcome: As expected, the messages were authenticated and a log file was saved.
Event 3: Outlook MUA Using an Exchange MTA using Self-Signed Certificate for TLS and S/ MIME
Expected Outcome: NCCoE Outlook MUA sent a test message in an S/MIME signed email using Active Directory DNS Services and a self-signed TLS certificate (CU=3) to Secure 64 and NLnet Labs, and both recipients returned responses that were S/MIME signed. The signature for the received messages was verified.
Observed Outcome: As expected, the message was authenticated and a log file was saved.
C.2.1.2 BIND in NCCoE Laboratory
The BIND DNS Server, an Exchange MTA, and an Outlook MUA were configured with appropriate certificates for each deployment scenario. These certificate policies include S/MIME and TLS certificates Well-Known CA, certificates from an Enterprise CA, and self-signed certificates (TLSA/SMIMEA parameters CU=1, CU=2, and CU=3 respectively). Each of these three variations sent S/MIME signed and TLS encrypted email to a Secure64 site and an NLnet Labs site. The Secure64 site was using a MacBook-hosted Thunderbird MUA, a Postfix/Dovecot MTA, DNS Cache/DNS Authority services for processing received messages, and DNS Signer for outbound messages. The NLnet site was using an Intel-hosted Thunderbird MUA, a Postfix/ Dovecot MTA, NSD4 and Unbound for processing received messages, and OpenDNSSEC for outbound messages. Each of the events included the NCCoE Laboratory configuration sending a signed message to the remote sites, and a signed response being sent from each remote site to the NCCoE configuration.
Event 4: Outlook MUA Using an Exchange MTA using Well-Known CA issued Certificates for TLS and S/MIME
Expected Outcome: NCCoE Outlook MUA sent a test message in an S/MIME signed email using a BIND DNS Server and Well-Known CA (CU=1) issued certificates to Secure64 and NLnet Labs, and both Secure64 and NLnet Labs returned a response that was S/MIME signed. The signature for the received messages was verified.
Observed Outcome: As expected, the message was authenticated and a log file was saved.
Event 5: Outlook MUA Using an Exchange MTA using an Enterprise CA issued Certificates for TLS and S/MIME
Expected Outcome: NCCoE Outlook MUA sends a test message in an S/MIME signed email using a BIND DNS Server and an Enterprise CA (CU=2) issued certificates to Secure64 and NLnet Labs, and both Secure64 and NLnet Labs returned a response that was S/MIME signed. The signature for the received messages was verified.
Observed Outcome: As expected, the message was authenticated and a log file was saved.
Event 6: Outlook MUA Using an Exchange MTA using Self-Signed Certificates for TLS and S/ MIME
Expected Outcome: NCCoE Outlook MUA sent a test message in an S/MIME signed email using a BIND DNS Server and self-signed certificates (CU=3) to Secure64 and NLnet, and both Secure64 and NLnet returned a response that was S/MIME signed. The signature for the received messages was verified.
Observed Outcome: As expected, the message was authenticated and a log file was saved.
C.2.2 Test Sequence 2: MUA/MTA/DNS Service Combinations Exchanged Signed and Encrypted Email with an NLnet Labs Site and a Secure64 Site
Outlook and Thunderbird MUAs, configured to use a Postfix MTA with Dovecot IMAP support, were configured in turn to use BIND and Secure64’s DNS Authority, DNS Cache, and DNS Signer implementations. Each of the six configurations exchanged email with a Secure64 site that included a ThunderBird MUA, DNS Cache/DNS Signer/DNS Authority DNS services, and Postfix/ Dovecot MTA and an NLnet Labs MUA/MTA/ DNS service stack that included a ThunderBird MUA, NSD4, Unbound, and OpenDNSSEC DNS services and a Postfix/Dovecot MTA. The test events include using Well-Known CA issued (TLSA/SMIMEA CU=1), Enterprise CA issued (CU=2), and Self-Signed Certificates (CU=3). Email messages between MTAs were encrypted and successfully decrypted. (Scenario 1). Signature and encryption were logged. All messages were S/MIME signed. Outlook attempted to verify received messages (Scenario 2). Signature verification results were noted. DNS name verification results were noted. Figure 2.1 depicts the set-up for laboratory support for this test sequence, with connections selected for Event 7 below.
C.2.2.1 BIND and Postfix/Dovecot in NCCoE Laboratory
Outlook, then Thunderbird mail clients were configured to use Postfix/Dovecot MTAs and BIND DNS servers. Each of these three configurations sent S/MIME signed and TLS encrypted email to a Secure64 site and an NLnet Labs site. The Secure64 site was using a Thunderbird MUA using Secure64’s Apple Key Chain Utility tool that allows a host to obtain X.509 certificates via of DANE RRs, DNS Cache/DNS Signer/DNS Authority DNS services, and a Postfix/Dovecot MTA for mail. The NLnet Labs site was using a Thunderbird MUA, a Postfix/Dovecot MTA, and NSD4, Unbound, and OpenDNSSEC DNS Services. Each of the three events included the NCCoE Laboratory configuration sending a S/MIME signed and TLS encrypted message to the Secure64 and NLnet Labs sites, and signed and encrypted responses being sent from the Secure64 and NLnet Labs site to the NCCoE.
Event 7: Outlook MUA Using a Postfix/Dovecot MTA and Well-Known CA Issued Certificates for TLS and S/MIME
Expected Outcome: NCCoE Outlook MUA using BIND for DNS sent a test message in an S/ MIME signed email to Secure64 and NLnet Labs. Secure64 and NLnet Labs returned responses that were S/MIME signed and TLS encrypted. The received messages were successfully decrypted, and the signatures were verified. All S/MIME and MTA TLS certificates in this test were issued from a well-known CA and TLSA/SMIMEA RR Certificate Usage parameter set to 1.
Observed Outcome: As expected, the message was authenticated and decrypted, and a log file was saved.
Event 8: Thunderbird MUA Using a Postfix/Dovecot MTA and Enterprise CA Issued Certificates for TLS and S/MIME
Expected Outcome: NCCoE Thunderbird MUA using BIND for DNS sent a test message in an S/MIME signed email to Secure64 and NLnet Labs. Secure64 and NLnet Labs returned responses that were S/MIME signed and TLS encrypted. The received messages were successfully decrypted, and the signatures were verified. All S/MIME and MTA TLS certificates in this test were issued from an enterprise local CA and TLSA/SMIMEA RR Certificate Usage parameter set to 2.
Observed Outcome: As expected, the message was authenticated and decrypted, and a log file was saved.
Event 9: Thunderbird MUA Using a Postfix/Dovecot MTA and Self-Signed Certificates for TLS
Expected Outcome: NCCoE Thunderbird MUA using BIND for DNS sent a test message in an S/MIME signed email to Secure64 and NLnet Labs. Secure64 and NLnet Labs returned responses that were S/MIME signed and TLS encrypted. The received messages were successfully decrypted, and the signatures were verified. All S/MIME and MTA TLS certificates in this test were self-signed and TLSA/SMIMEA RR Certificate Usage parameter set to 3.
Observed Outcome: As expected, the message was authenticated and decrypted, and a log file was saved.
C.2.2.2 Postfix/Dovecot with DNS Authority, DNS Cache, and DNS Signer in NCCoE Laboratory
Event 10: Thunderbird MUA Using a Postfix/Dovecot MTA and Well-Known CA Issued Certificates for TLS and S/MIME
Expected Outcome: NCCoE Thunderbird MUA using DNS Authority/Cache/Signer DNS Services and a Postfix MTA sent a test message in an S/MIME signed email to Secure64 and NLnet Labs. Secure64 and NLnet Labs returned that a message that we had S/MIME signed and TLS encrypted. The received messages were successfully decrypted, and the signatures were verified. All certificates in this test were issued from a well-known CA and TLSA/ SMIMEA RR Certificate Usage parameter set to 1.
Observed Outcome: As expected, the message was authenticated and decrypted, and a log file was saved.
Event 11: Thunderbird MUA Using a Postfix/Dovecot MTA and Enterprise CA Issued Certificates for TLS and S/MIME
Expected Outcome: NCCoE Thunderbird MUA using DNS Authority/Cache/Signer DNS Services and a Postfix MTA sent a test message in an S/MIME signed email to Secure64 and NLnet Labs. Secure64 and NLnet Labs returned a message that we had S/MIME signed and TLS encrypted. The received messages were successfully decrypted, and the signatures were verified. All certificates in this test were issued from an enterprise CA and TLSA/ SMIMEA RR Certificate Usage parameter set to 2.
Observed Outcome: As expected, the message was authenticated and decrypted, and a log file was saved.
Event 12: Thunderbird MUA Using a Postfix/Dovecot MTA and Self-Signed Certificates for TLS and S/MIME
Expected Outcome: NCCoE Thunderbird MUA using DNS Authority/Cache/Signer DNS Services and a Postfix MTA sent a test message in an S/MIME signed email to Secure64 and NLnet Labs. Secure64 and NLnet Labs returned a message that we had S/MIME signed and TLS encrypted. The received messages were successfully decrypted, and the signatures were verified. All certificates in this test were self-signed and TLSA/SMIMEA RR Certificate Usage parameter set to 3.
Observed Outcome: As expected, the message was authenticated and decrypted, and a log file was saved.
C.2.3 Sequence 3: Fraudulent DNS Address Posing as Valid DNS Address Contacting Recipient MTAs
Fraudulently S/MIME signed email was sent from a malicious sender to recipients using Outlook and Thunderbird MUAs configured to use Exchange and Postfix as MTAs. The Outlook/Exchange configuration used Active Directory as its DNS server. The configurations employing Postfix/Dovecot MTAs were demonstrated with each of the other three contributed DNS Services. In one event, the Thunderbird MUA employed an Apple Key Chain Utility tool that allows a host to obtain X.509 certificates via of DANE RRs. All events were conducted using well- known CA and Enterprise CA-issued certificates for the impersonated sender. The fraudulent site attempted to spoof a valid sending domain belonging to a Secure64 site that was configured with DNS Authority/Cache/Signer DNS services, a Postfix/Dovecot MTA, and Thunderbird (technically, this should not matter. Secure64 is not sending the mail, so the MUA is not involved) equipped with the Apple Key Chain utility. An Outlook/Exchange/Active Directory set-up acted as the fraudulent site. The email exchange between organizations was carried over TLS, and the email message was S/MIME signed on the fraudulent user’s client device. The set- up for this sequence is depicted in figure C.1 below.
C.2.3.1 Spoofing Attempts Against Exchange and Postfix/Dovecot Configurations Using Enterprise CA Issued Certificates (CU=1)
The target set-up is comprised of (alternatively): Active Directory and DNS Server, BIND DNS Server, NLnet Labs DNS Services, and Secure64 DNS services with Microsoft Outlook/Exchange, Outlook/Postfix/Dovecot, and Thunderbird/Postfix/ Dovecot mail configurations. For purposes of this demonstration, two certificates were issued for each domain. One of these was valid and published as a DNSSEC signed SMIMEA RR in the target’s zone. The second (spoofed) certificate is not in the DNS. The fraudulent site possessed the spoofed certificates and, posing as a valid Secure64 site, attempted to send emails to the NCCoE Laboratory target configurations. The email and DNS transactions were logged in each case, and the results are provided below.
Figure C.1 Fraudulent DNS Address Spoofing Configurations
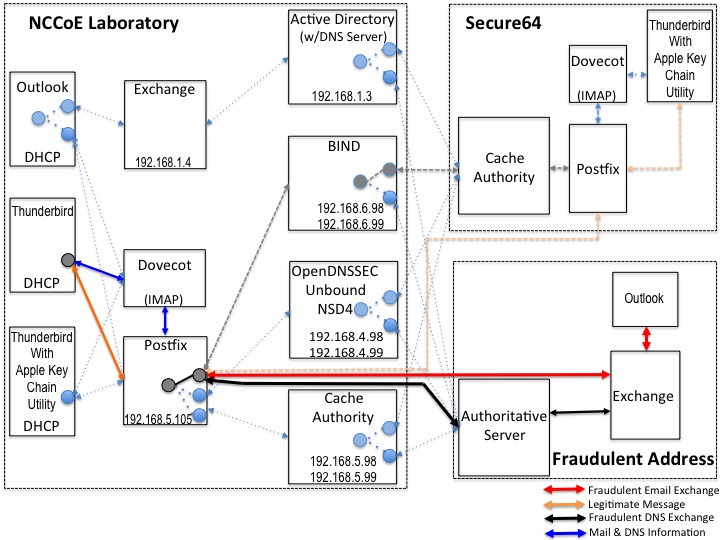
Event 13: Outlook MUA, Exchange MTA, and Active Directory DNS Services
Expected Outcome: Using S/MIME, Outlook validated the message from the attacker (as DANE is not enabled in Outlook at this time).
Observed Outcome: As expected and a log file was saved.
Event 14: Thunderbird MUA, Postfix/Dovecot MTA and NLnet Labs DNS Services
Expected Outcome: Using S/MIME and DANE, Thunderbird recognizes that the certificate has not been validated and does not deliver the message to the user. Thunderbird will flag the signature as invalid.
Observed Outcome: As expected and a log file was saved.
Event 15: Thunderbird MUA, Postfix/Dovecot MTA and Secure64 DNS Services
Expected Outcome: Using S/MIME and DANE, Thunderbird with the Apple Key Chain Utility recognizes that the certificate has not been validated and does not deliver the message to the user.
Observed Outcome: As expected and a log file was saved.
C.2.3.2 Spoofing Attempts Against Exchange and Postfix/Dovecot Configurations Using Self-Signed Certificates (CU=3)
The target set-up is configured to use Active Directory with Outlook and Exchange; and in a separate set of tests: BIND and NLnet Labs DNS Services (alternatively) were configured with a Thunderbird MUA and a Postfix/Dovecot MTA. The fraudulent site, posing as a valid Secure64 site, attempted to send an email to the NCCoE Laboratory target. The email and DNS transactions were logged in each case, and the results are provided below.
Event 16: Postfix MTA Using an Active Directory DNS Service
Expected Outcome: Using only S/MIME, Outlook will fail to validate the message from the attacker as it was signed by an untrusted root, but not marked as a possible attack.
Observed Outcome: As expected and a log file was saved.
Event 17: Postfix MTA Using a BIND DNS Service
Expected Outcome: Using S/MIME and DANE, Thunderbird with the Apple Key Chain Utility recognizes that the certificate has not been validated and does not deliver the message to the user.
Observed Outcome: As expected and a log file was saved.
Event 18: Postfix MTA Using an NLnet DNS Service
Expected Outcome: Using S/MIME and DANE, Thunderbird with the Apple Key Chain Utility recognizes that the certificate has not been validated and does not deliver the message to the user.
Observed Outcome: As expected and a log file was saved.
C.2.4 Sequence 4: Man-in-the-Middle Attack on Postfix-to-Postfix Connection
An NCCoE system attempted to send a TLS protected email from Exchange and Postfix MTAs (in turn) to an external Postfix MTA using DNS Authority/Cache/Signer for DNS services. The NCCoE Exchange MTA used Active Directory DNS Services, and the Postfix/Dovecot MTA used BIND and NSD4/Unbound/OpenDNSSEC DNS services. A S/MIME signed email was sent to an external Postfix MTA. Four events were conducted using Well-Known CA issued certificates, four events were conducted using Enterprise CA issued certificates (TLSA/SMIMEA RR parameter of CU=2) for TLS and S/MIME on the receiver side, and three events were conducted using self-signed certificates (TLSA/SMIMEA RR parameter of CU=3) for TLS and S/MIME on the receiver side. An Outlook/Exchange/Active Directory stack acted as a man-in-the-middle and attempted to intercept the message. Figure C.2 depicts the configuration for a man-in-the-middle demonstration. Note that the sender is being misdirected to a malicious email server only. This is to simulate a lower level attack where email is sent (via route hijacking or similar low-level attack) to a Man-in-the-Middle. Figure C.2 depicts the configurations used with the Thunderbird/Postfix/Dovecot/Bind option selected.
C.2.4.1 Man-in-the-Middle Attack when Senders and Receivers use Well-Known CA Issued Certificates
The sender set-up was comprised of Active Directory and DNS Server, BIND DNS Service, or NLnet Labs DNS Services with Outlook and Thunderbird MUAs using an Exchange MTA. In the fourth event, the sender is a Thunderbird MUA with a Secure64 Apple Key Chain utility utilizing NSD4/Unbound/OpenDNSSEC DNS services and a Postfix/Dovecot MTA. Enterprise CA-issued certificates are used on the receiver side for TLS. Each of the four configurations attempts to initiate an email exchange with an external Secure64 site. The man-in-the-middle, an Outlook/Exchange/Active Directory stack, attempts to spoof the intended receiver and accept the email. The email and DNS transactions were logged in each case, and the results are provided below.
Figure C.2 Man-in-the-Middle Event Configurations
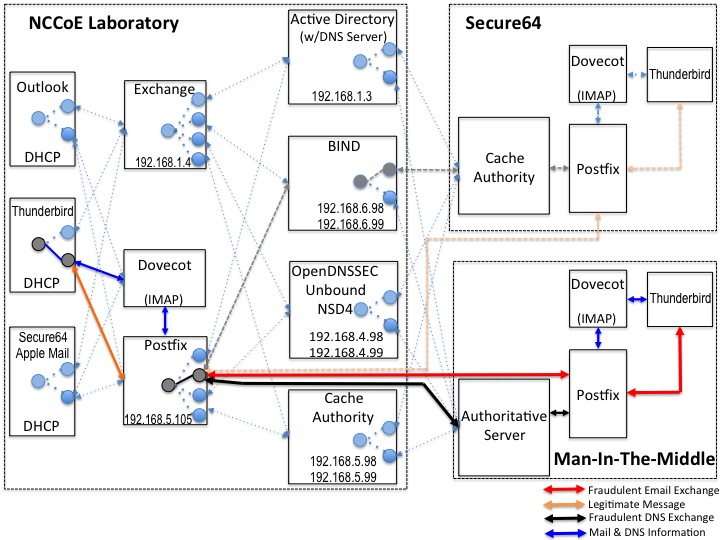
Event 19: Outlook MUA, Exchange MTA, and Active Directory DNS Service as Sender
Expected Outcome: The sending MTA fails to detect the spoofing. The mail connection to the MTA is established and mail is transferred.
Observed Outcome: As expected and a log file was saved.
Event 20: Thunderbird MUA, Exchange MTA, and BIND DNS Service as Sender
Expected Outcome: The sending MTA fails to detect the spoofing. The mail connection to the MTA is established and mail is transferred.
Observed Outcome: As expected and a log file was saved.
Event 21: Thunderbird MUA, Postfix MTA and NSD4/Outbound/OpenDNSSEC DNS Services as Sender
Expected Outcome: The MUA using a SMIMEA utility was able to detect the fraudulent email and mark the email as not validated.
Observed Outcome: As expected and a log file was saved.
Event 22: Thunderbird MUA with Secure64 Apple Key Chain Utility, Postfix/Dovecot MTA and DNS Authority/Cache/Signer DNS Services
Expected Outcome: The MUA using a SMIMEA utility was able to detect the fraudulent email and mark the email as not validated.
Observed Outcome: As expected and a log file was saved.
C.2.4.2 Man-in-the-Middle Attack when Senders and Receivers use Enterprise CA-Issued Certificates (CU=2)
The sender set-up was composed of Active Directory and DNS Server, BIND DNS Service, or NLnet Labs DNS Services with Outlook and Thunderbird MUAs using an Exchange MTA. In the fourth event, the sender is a Thunderbird MUA with a Secure64 Apple Key Chain utility utilizing NSD4/Unbound/OpenDNSSEC DNS services and a Postfix/Dovecot MTA. Enterprise CA issued certificates are used on the receiver side for TLS. Each of the four configurations attempts to initiate an email exchange with an external Secure64 site. The man-in-the-middle, an Outlook/Exchange/Active Directory stack, attempts to spoof the intended receiver and accept the email. The email and DNS transactions were logged in each case, and the results are provided below.
Event 23: Outlook MUA, Exchange MTA, and Active Directory DNS Service as Sender.
Expected Outcome: The sending MTA fails to detect the spoofing. The mail connection to the MTA is established and mail transferred.
Observed Outcome: As expected and a log file was saved.
Event 24: Thunderbird MUA, Exchange MTA, and BIND DNS Service as Sender.
Expected Outcome: The sending MTA fails to detect the spoofing. The mail connection to the MTA is established and mail transferred.
Observed Outcome: As expected and a log file was saved.
Event 25: Thunderbird MUA, Postfix MTA and NSD4/Outbound/OpenDNSSEC DNS Services as Sender
Expected Outcome: The Postfix MTA detects the spoofing and closes the SMTP connection before the email is sent.
Observed Outcome: As expected and a log file was saved.
Event 26: Thunderbird MUA with Secure64 Apple Key Chain Utility, Postfix/Dovecot MTA and DNS Authority/Cache/Signer DNS Services
Expected Outcome: The postfix MTA detects the spoofing and closes the SMTP connection before the email is sent.
Observed Outcome: As expected.
C.2.4.3 Man-in-the-Middle with Self-Signed Certificates
The sender uses an Outlook and Thunderbird MUAs sending mail through a Postfix/Dovecot MTA and using (in turn): Active Directory and DNS Server, BIND DNS Server, and NLnet Labs DNS Services. Self-signed certificates are used on the legitimate receiver side (TLSA RR parameter CU=3) for TLS. Each of the three configurations attempts to initiate an email exchange with an external Secure64 site. The man-in-the-middle, an Outlook/Exchange/Active Directory stack, attempts to intercept the email from the NCCoE Laboratory Configuration by acting as a Man- in-the-Middle. The email and DNS transactions were logged in each case, and the results are provided below.
Event 27: Postfix MTA Using an Active Directory DNS Service
Expected Outcome: TLSA detects spoofing. The mail connection to the MTA is established but breaks before the mail is transferred.
Observed Outcome: As expected and a log file was saved.
Event 28: Thunderbird MUA, Exchange MTA, and BIND DNS Service
Expected Outcome: Exchange fails to detect the man-in-the-middle and sends the email.
Observed Outcome: As expected and a log file was saved.
Event 29: Thunderbird MUA with Secure64 Apple Key Chain Utility, Exchange MTA and NSD4/Outbound/OpenDNSSEC DNS Services
Expected Outcome: Exchange fails to detect the man-in-the-middle and sends the email.
Observed Outcome: As expected and a log file was saved.
C.2.5 Sequence 5: Effects of DANE Errors
In Sequence 5, A DANE-enabled Postfix MTA sent message traffic to four other Postfix MTAs. See Figure C.3. A single BIND instance was set up to serve the TLSA and A RRs for the four receivers. One of the receiving MTAs did not employ DANE. The second employed DANE with a valid TLSA with the certificate usage field [5] set to 3. The third employed a TLSA with a certificate usage field of 2, but with an incomplete (i.e. bad) PKI certification path (generating a PKIX validation failure). The TLSA contained a local enterprise trust anchor, but the server did not have the full certificate chain (missing intermediate certificate). The final one employed DANE with a TLSA RR using Certificate Usage of 3, but there was a mismatch between the server cert and TLSA RR (generating a DANE validation failure).
C.2.5.1 Event 30: DNS/DANE Error Results
The test sequence was set up as described above. The sending MTA was set with different TLS and DANE requirements configuration. Postfix can be configured for different “levels” of TLS and DANE processing and reliance. In the Postfix configuration file (main.cf) the option to turn on DANE processing is:
smtp_tls_security_level = none | may | encrypt | dane | dane-only | fingerprint | verify | secure
For this test, only none, may, dane and dane-only are relevant. These values affect how postfix establish and use TLS when sending email:
- none: The sender does not use TLS even when offered or available. Email is always sent in plaintext.
- may: The sender uses TLS opportunistically when available. No effort will be made to validate the server peer certificate, but will be used regardless.
- encrypt: The sender will only send mail when TLS is available, even if the server peer certificate is on validated. If STARTTLS is not offered, mail is deferred.
- dane: The sender attempts to use TLS when offered, and queries for TLSA RRs to help validate the server peer certificate. Mail is still sent if the validation fails, so this is sometimes referred to as “opportunistic DANE”.
- dane-only: The sender only sends mail when TLS is offered, and there is a valid TLSA RR found. Otherwise, mail is deferred.
Figure C.3 Failed Delivery Logs
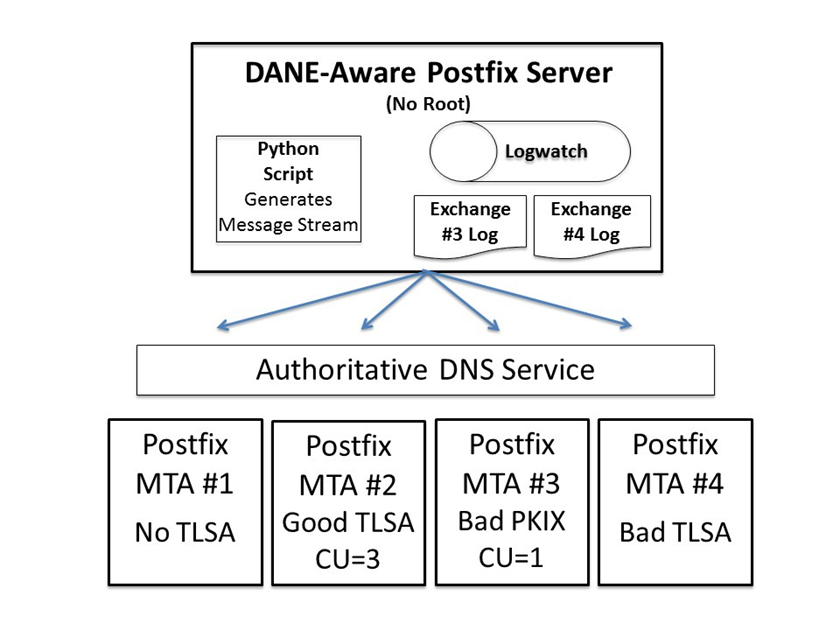
Expected Outcome: Little or nothing appears in the sender’s logs for messages sent to either the MTA not employing TLS or the employing a valid TLSA. The growth rates for logs for the MTA that employs a TLSA with a certificate usage field of 1, but with a PKIX failure and the one that employs mismatched server cert/TLSA (i.e. DANE validation failure) are measured.
Observed Outcome: The delivery of the email depended on the TLS/DANE status of the receiver and the TLS/DANE configuration on the sender. The results were:
Table C.1 Transaction Results Based on Sender TLS/DANE Connection
| TLS/DANE Option | Receiver TLS/DANE Deployment | |||
| No TLS | TLS with Valid DANE RR | TLS with DANE PKIX Failure | TLS with DANE TLSA RR Error | |
| none | Mail sent in plaintext | Mail sent in plaintext | Mail sent in plaintext | Mail sent in plaintext |
| may | Mail sent in plaintext | Mail sent over anonymous TLS (i.e., no validation of certificate) | Mail sent over anonymous TLS (i.e., no validation of certificate) | Mail sent over anonymous TLS (i.e., no validation of certificate) |
| dane | Mail sent in plaintext | Mail sent over TLS (with DANE validation logged) | Mail sent over anonymous TLS (i.e., no validation of certificate) | Mail sent over anonymous TLS (i.e., no validation of certificate) |
| dane-only | Mail not sent | Mail sent over TLS (with DANE validation logged) | Mail not sent | Mail not sent |
From the above table, when the sender was configured to never use TLS, the mail was sent in plaintext regardless of the TLS/DANE configuration of the receiver. When the sender was configured to use TLS opportunistically, it used TLS regardless of the status of the certificate, or TLSA. In fact, the sender did not issue a query to find TLSA RRs even if published. When the sender used opportunistic DANE, it used TLS when available regardless of the DANE validations results. If validation failed, the mail was still sent and the result was logged as an Untrusted or Anonymous TLS connection, depending on the presence of a TLSA RR.
Of the four options used in the lab, dane-only was the most rigorous in what a sender will accept before sending mail. When the receiver did not offer the STARTTLS option, or lacked a TLSA RR, mail was not sent. Likewise, if a TLSA RR was present, but there was an error in validation (either the TLSA RR itself had an error, or PKIX failed), the mail was not sent.
Therefore, use of this option was not recommended for general use as this resulted in the majority of email being deferred. It should only be used in scenarios where senders and receivers are coordinated and maintain a stable DANE deployment.
Appendix D Secure Domain Name System (DNS) Deployment Checklist
The following checklist includes actions recommended by NIST SP 800-81-2, Secure Domain Name System (DNS) Deployment Guide. The checklist provides secure deployment guidelines for each DNS component based on policies and best practices. The primary security specifications (with associated mechanisms) on which the checklist is based are as follows:
- Internet Engineering Task Force (IETF) Domain Name System Security Extensions (DNSSEC) specifications, covered by Request for Comments (RFC) 3833, 4033, 4034, and 4035
- IETF Transaction Signature (TSIG) specifications, covered by RFCs 2845 and 3007
While not all of the checklist recommendations apply to all cases of DNS-protected email security, the checklist is a reliable guide for secure deployment of DNS components.
Checklist item 1: When installing the upgraded version of name server software, the administrator should make necessary changes to configuration parameters to take advantage of new security features.
Checklist item 2: Whether running the latest version or an earlier version, the administrator should be aware of the vulnerabilities, exploits, security fixes, and patches for the version that is in operation in the enterprise. The following actions are recommended (for BIND deployments):
- Subscribe to ISC’s mailing list called bind-announce or nsd-users for NSD
- Periodically refer to the BIND vulnerabilities page at https://www.isc.org/downloads/bind/
- Refer to CERT/CC’s Vulnerability Notes Database at http://www.kb.cert.org/vuls/ and the NIST NVD metabase at https://nvd.nist.gov/.
For other implementations (e.g., MS Windows Server), other announcement lists may exist.
Checklist item 3: To prevent unauthorized disclosure of information about which version of name server software is running on a system, name servers should be configured to refuse queries for its version information.
Checklist item 4: The authoritative name servers for an enterprise should be both network and geographically dispersed. Network-based dispersion consists of ensuring that all name servers are not behind a single router or switch, in a single subnet, or using a single leased line. Geographic dispersion consists of ensuring that not all name servers are in the same physical location, and hosting at least a single secondary server off-site.
Checklist item 5: If a hidden master is used, the hidden authoritative master server should only accept zone transfer requests from the set of secondary zone name servers and refuse all other DNS queries. The IP address of the hidden master should not appear in the name server set in the zone database.
Checklist item 6: For split DNS implementation, there should be a minimum of two physical files or views. One should exclusively provide name resolution for hosts located inside the firewall. It also can contain RRsets for hosts outside the firewall. The other file or view should provide name resolution only for hosts located outside the firewall or in the DMZ, and not for any hosts inside the firewall.
Checklist item 7: It is recommended that the administrator create a named list of trusted hosts (or blacklisted hosts) for each of the different types of DNS transactions. In general, the role of the following categories of hosts should be considered for inclusion in the appropriate ACL:
- DMZ hosts defined in any of the zones in the enterprise
- all secondary name servers allowed to initiate zone transfers
- internal hosts allowed to perform recursive queries
Checklist item 8: The TSIG key (secret string) should be a minimum of 112 bits in length if the generator utility has been proven to generate sufficiently random strings [800-57P1]. 128 bits recommended.
Checklist item 9: A unique TSIG key should be generated for each set of hosts (i.e. a unique key between a primary name server and every secondary server for authenticating zone transfers).
Checklist item 10: After the key string is copied to the key file in the name server, the two files generated by the dnssec-keygen program should either be made accessible only to the server administrator account (e.g., root in Unix) or, better still, deleted. The paper copy of these files also should be destroyed.
Checklist item 11: The key file should be securely transmitted across the network to name servers that will be communicating with the name server that generated the key.
Checklist item 12: The statement in the configuration file (usually found at /etc/named.conf for BIND running on Unix) that describes a TSIG key (key name (ID), signing algorithm, and key string) should not directly contain the key string. When the key string is found in the configuration file, the risk of key compromise is increased in some environments where there is a need to make the configuration file readable by people other than the zone administrator. Instead, the key string should be defined in a separate key file and referenced through an include directive in the key statement of the configuration file. Every TSIG key should have a separate key file.
Checklist item 13: The key file should be owned by the account under which the name server software is run. The permission bits should be set so that the key file can be read or modified only by the account that runs the name server software.
Checklist item 14: The TSIG key used to sign messages between a pair of servers should be specified in the server statement of both transacting servers to point to each other. This is necessary to ensure that both the request message and the transaction message of a particular transaction are signed and hence secured.
Checklist item 15: Name servers that deploy DNSSEC signed zones or query signed zones should be configured to perform DNSSEC processing.
Checklist item 16: The private keys corresponding to both the ZSK and the KSK should not be kept on the DNSSEC-aware primary authoritative name server when the name server does not support dynamic updates. If dynamic update is supported, the private key corresponding to the ZSK alone should be kept on the name server, with appropriate directory/file-level access control list-based or cryptography-based protections.
Checklist item 17: Signature generation using the KSK should be done offline, using the KSK- private stored offline; then the DNSKEY RRSet, along with its RRSIG RR, can be loaded into the primary authoritative name server.
Checklist item 18: The refresh value in the zone SOA RR should be chosen with the frequency of updates in mind. If the zone is signed, the refresh value should be less than the RRSIG validity period.
Checklist item 19: The retry value in a zone SOA RR should be 1/10th of the refresh value.
Checklist item 20: The expire value in the zone SOA RR should be 2 to 4 weeks.
Checklist item 21: The minimum TTL value should be between 30 minutes and 5 days.
Checklist item 22: A DNS administrator should take care when including HINFO, RP, LOC, or other RR types that could divulge information that would be useful to an attacker, or the external view of a zone if using split DNS. These RR types should be avoided if possible and only used if necessary to support operational policy.
Checklist item 23: A DNS administrator should review the data contained in any TXT RR for possible information leakage before adding it to the zone file.
Checklist item 24: The validity period for the RRSIGs covering a zone’s DNSKEY RRSet should be in the range of 2 days to 1 week. This value helps reduce the vulnerability period resulting from a key compromise.
Checklist item 25: A zone with delegated children should have a validity period of a few days to 1 week for RRSIGs covering the DS RR for a delegated child. This value helps reduce the child zone’s vulnerability period resulting from a KSK compromise and scheduled key rollovers.
Checklist item 26: If the zone is signed using NSEC3 RRs, the salt value should be changed every time the zone is completely resigned. The value of the salt should be random, and the length should be short enough to prevent a FQDN to be too long for the DNS protocol (i.e. under 256 octets).
Checklist item 27: If the zone is signed using NSEC3 RRs, the iterations value should be based on available computing power available to clients and attackers. The value should be reviewed annually and increased if the evaluation conditions change.
Checklist item 28: TTL values for DNS data should be set between 30 minutes (1800 seconds) and 24 hours (86400 seconds).
Checklist item 29: TTL values for RRsets should be set to be a fraction of the DNSSEC signature validity period of the RRSIG that covers the RRset.
Checklist item 30: The (often longer) KSK needs to be rolled over less frequently than the ZSK. The recommended rollover frequency for the KSK is once every 1 to 2 years, whereas the ZSK should be rolled over every 1 to 3 months for operational consistency but may be used longer if necessary for stability or if the key is of the appropriate length. Both keys should have an Approved length according to NIST SP 800-57 Part 1 [800-57P1], [800-57P3].
Zones that pre-publish the new public key should observe the following:
- Checklist item 31: The secure zone that pre-publishes its public key should do so at least one TTL period before the time of the key rollover.
- Checklist item 32: After removing the old public key, the zone should generate a new signature (RRSIG RR), based on the remaining keys (DNSKEY RRs) in the zone file.
- Checklist item 33: A DNS administrator should have the emergency contact information for the immediate parent zone to use when an emergency KSK rollover must be performed.
- Checklist item 34: A parent zone must have an emergency contact method made available to its delegated child subzones in case of emergency KSK rollover. There also should be a secure means of obtaining the new KSK.
- Checklist item 35: Periodic re-signing should be scheduled before the expiration field of the RRSIG RRs found in the zone. This is to reduce the risk of a signed zone being rendered bogus because of expired signatures.
- Checklist item 36: The serial number in the SOA RR must be incremented before re-signing the zone file. If this operation is not done, secondary name servers may not pick up the new signatures because they are refreshed purely on the basis of the SOA serial number mismatch. The consequence is that some security-aware resolvers will be able to verify the signatures (and thus have a secure response) but others cannot.
- Checklist item 37: Recursive servers/resolvers should be placed behind an organization’s firewall and configured to only accept queries from internal hosts (e.g., Stub Resolver host).
- Checklist Item 38: Whenever Aggregate Caches are deployed, the forwarders must be configured to be Validating Resolvers.
- Checklist item 39: Each recursive server must have a root hints file containing the IP address of one or more DNS root servers. The information in the root hints file should be periodically checked for correctness.
- Checklist item 40: The root hints file should be owned by the account under which the name server software is run. The permission bits should be set so that the root hints file can be read or modified only by the account that runs the name server software.
- Checklist item 41: Administrators should configure two or more recursive resolvers for each stub resolver on the network.
- Checklist item 42: Enterprise firewalls should consider restricting outbound DNS traffic from stub resolvers to only the enterprise’s designated recursive resolvers.
- Checklist item 43: Each recursive server must have a root hints file containing the IP address of one or more DNS root servers. The information in the root hints file should be periodically checked for correctness.
- Checklist item 44: The root hints file should be owned by the account under which the name server software is run. The permission bits should be set so that the root hints file can be read or modified only by the account that runs the name server software.
- Checklist item 45: Administrators should configure two or more recursive resolvers for each stub resolver on the network.
- Checklist item 46: Enterprise firewalls should consider restricting outbound DNS traffic from stub resolvers to only the enterprise’s designated recursive resolvers.
- Checklist item 47: Non-validating stub resolvers (both DNSSEC-aware and non-DNSSEC- aware) must have a trusted link with a validating recursive resolver.
- Checklist item 48: Validators should routinely log any validation failures to aid in diagnosing network errors.
- Checklist item 49: Mobile or nomadic systems should either perform their own validation or have a trusted channel back to a trusted validator.
- Checklist item 50: Mobile or nomadic systems that perform their own validations should have the same DNSSEC policy and trust anchors as validators on the enterprise network.
- Checklist item 51: Validator administrator must configure one or more trust anchors for each validator in the enterprise.
- Checklist item 52: The validator administrator regularly checks each trust anchor to ensure that it is still in use, and updates the trust anchor as necessary.
Appendix E Overview of Products Contributed by Collaborators
E.1 Open Source MUA and MTA Components
E.1.1 Thunderbird Mail User Agent
Mozilla Thunderbird is a free, open source, cross-platform email, news, and chat client developed by the Mozilla Foundation. Thunderbird is an email, newsgroup, news feed, and chat (XMPP, IRC, Twitter) client. The Mozilla Lightning extension, which is installed by default, adds PIM functionality. Thunderbird can manage multiple email, newsgroup, and news feed accounts and supports multiple identities within accounts. Features such as quick search, saved search folders (virtual folders), advanced message filtering, message grouping, and labels help manage and find messages. On Linux-based systems, system mail (movemail) accounts are supported. Thunderbird incorporates a Bayesian spam filter, a whitelist based on the included address book, and can also understand classifications by server-based filters such as SpamAssassin.
Thunderbird has native support for RFC 3851 S/MIME, but RFC 5757 (S/MIME version 3.2) is not supported. Support for other security systems can be added by installing extensions (e.g., the Enigmail extension adds support for PGP). S/MIME and PGP cannot both be used in the same message. SSL/TLS is also supported, but it is used only to temporarily encrypt data being sent and received between an email client and server. SSL/TLS can work in combination with S/ MIME or OpenPGP.
Thunderbird supports POP and IMAP. It also supports LDAP address completion. Thunderbird supports the S/MIME standard, extensions such as Enigmail add support for the OpenPGP standard. A list of supported IMAP extensions can be found at wiki.mozilla.org. Since version 38, Thunderbird has integrated support for automatic linking of large files instead of attaching them directly to the mail message.
Thunderbird runs on a variety of platforms. Releases available on the primary distribution site support Linux, Windows, and OS X operating systems. Unofficial ports are available for FreeBSD, OpenBSD, OpenSolaris, OS/2, and eComStation.
E.1.2 Dovecot
Dovecot is used in this project to permit MUA access to the Postfix MTA. Dovecot is an open source IMAP (Internet Message Access Protocol is a mail protocol used for accessing email on a remote web server from a local client. IMAP and POP3 are the two most commonly used Internet mail protocols for retrieving emails. Both protocols are supported by all modern email clients and web servers) and POP3 email server for Linux/UNIX-like systems, written with security primarily in mind. Dovecot is used in both small and large installations. It is compact and requires no special administration and it uses very little memory. Dovecot supports the standard mbox and Maildir formats. The mailboxes are transparently indexed and provide full compatibility with existing mailbox handling tools. Dovecot v1.1 passes all IMAP server standard compliance tests. Dovecot allows mailboxes and their indexes to be modified by multiple computers at the same time, providing compatibility with clustered file systems. Caching problems can be worked around with director proxies. Postfix 2.3+ and Exim 4.64+ users can do SMTP authentication directly against Dovecot’s authentication backend without having to configure it separately, and Dovecot supports easy migration from many existing IMAP and POP3 servers, allowing the change to be transparent to existing users.
Dovecot currently offers IMAP4rev1, POP3, IPv6, SSL and TLS support. It supports multiple commonly used IMAP extensions, including SORT, THREAD and IDLE. Shared mailboxes are supported in v1.2+. Maildir++ quota is supported, but hard file system quota can introduce problems. Dovecot is commonly used with Linux, Solaris, FreeBSD, OpenBSD, NetBSD and Mac OS X. See the Dovecot Wiki page (http://wiki2.dovecot.org/OSCompatibility) about OS compatibility for more.
E.1.3 Postfix
Postfix is a free and open-source mail transfer agent (MTA) that routes and delivers email. Postfix is released under the IBM Public License 1.0 which is a free software license. As an SMTP client, Postfix implements a high-performance parallelized mail-delivery engine. Postfix is often combined with mailing-list software (such as Mailman).
Postfix consists of a combination of server programs that run in the background, and client programs that are invoked by user programs or by system administrators. The Postfix core consists of several dozen server programs that run in the background, each handling one specific aspect of email delivery. Examples are the SMTP server, the scheduler, the address rewriter, and the local delivery server. For damage-control purposes, most server programs run with fixed reduced privileges, and terminate voluntarily after processing a limited number of requests. To conserve system resources, most server programs terminate when they become idle.
Client programs run outside the Postfix core. They interact with Postfix server programs through mail delivery instructions in the user’s ~/.forward file, and through small “gate” programs to submit mail or to request queue status information.
As an SMTP server, Postfix implements a first layer of defense against spambots and malware. Administrators can combine Postfix with other software that provides spam/virus filtering (e.g., Amavisd-new), message-store access (e.g., Dovecot), or complex SMTP-level access-policies (e.g., postfwd, policyd-weight or greylisting).
Features include:
- standards-compliant support for SMTPUTF8, SMTP, LMTP, STARTTLS encryption including DANE protocol support and “perfect” forward secrecy, SASL authentication, MIME encapsulation and transformation, DSN delivery status notifications, IPv4, and IPv6
- configurable SMTP-level access policy that automatically adapts to overload
- virtual domains with distinct address-namespaces
- UNIX-system interfaces for command-line submission, for delivery to command, and for direct delivery to message stores in mbox and maildir format
- light-weight content inspection based on regular expressions
- database lookup mechanisms including Berkeley DB, CDB, OpenLDAP LMDB, Memcached, LDAP and multiple SQL database implementations
- a scheduler that implements parallel deliveries, with configurable concurrency and back-off strategies
- a scalable zombie blocker that reduces SMTP server load due to botnet spam
Postfix extensions use the SMTP or Milter (Sendmail mail filter) protocols which both give full control over the message envelope and content, or a simple text-based protocol that enables complex SMTP-level access control policies. Extensions include:
- deep content inspection before or after a message is accepted into the mail queue
- mail authentication with DMARC, DKIM, SPF, or other protocols
- SMTP-level access policies such as greylisting or rate control
Postfix runs on BSD, GNU/Linux, OS X, Solaris and most other Unix-like operating system, generally ships with a C compiler, and delivers a standard POSIX development environment. It is the default MTA for the OS X, NetBSD and Ubuntu operating systems.
E.2 Microsoft Windows-Based Components
Microsoft’s contribution includes a complete MUA, MTA, and DNS service stack, though each of the components can be integrated into systems provided by other contributors.
E.2.1 Outlook
Microsoft Outlook is a personal information manager from Microsoft, available as a part of the Microsoft Office suite. Although often used mainly as an email application, it also includes a calendar, task manager, contact manager, note taking, journal, and web browsing. It can be used as a stand-alone application, or can work with Microsoft Exchange Server and Microsoft SharePoint Server for multiple users in an organization, such as shared mailboxes and calendars, Exchange public folders, SharePoint lists, and meeting schedules. Microsoft has also released mobile applications for most mobile platforms, including iOS and Android. Developers can also create their own custom software that works with Outlook and Office components using Microsoft Visual Studio. In addition, mobile devices can synchronize almost all Outlook data to Outlook Mobile. Microsoft Outlook mail system uses the proprietary Messaging Application Programming Interface (MAPI) to access Microsoft Exchange email servers.
Outlook supports S/MIME (Secure/Multipurpose Internet Mail Extensions), a standard for public key encryption and signing of MIME data. S/MIME is on an IETF standards track and defined in a number of documents, most importantly RFCs 3369, 3370, 3850 and 3851.
E.2.2 Exchange
Microsoft Exchange Server is a calendaring and mail server developed by Microsoft that runs exclusively on the Microsoft Windows Server product line. Exchange Server was initially Microsoft’s internal mail server but is now published outside Microsoft. It uses the Active Directory service. It is bundled with the Outlook email client.
Exchange Server supports POP3, IMAP, SMTP and EAS. It also supports IPv6, SMTP over TLS, PoP over TLS, NNTP, and SSL. Exchange Server is licensed both in the forms of on-premises software and software as a service. In the on-premises form, customer purchase client access licenses (CALs). In the software as a service form, Microsoft receives a monthly service fee instead (see https://en.wikipedia.org/wiki/Office_365).
E.2.3 Server DNS Services
Windows Server 2016 is a server operating system developed by Microsoft as part of the Windows NT family of operating systems, developed concurrently with Windows 10. Microsoft Server features server virtualization, networking, server management and automation, a web and application platform, access and information protection, and virtual desktop infrastructure. Key operating system elements for the project are Active Directory and DNS Server.
E.2.3.1 Active Directory
Active Directory (AD) is a directory service that Microsoft developed for Windows domain networks. It is included in most Windows Server operating systems as a set of processes and services. Initially, Active Directory was only in charge of centralized domain management. Active Directory is an umbrella title for a broad range of directory-based identity-related services. A server running Active Directory Domain Services (AD DS) is called a domain controller. It authenticates and authorizes all users and computers in a Windows domain type network-assigning and enforcing security policies for all computers and installing or updating software. For example, when a user logs into a computer that is part of a Windows domain, Active Directory checks the submitted password and determines whether the user is a system administrator or normal user.
Active Directory uses Lightweight Directory Access Protocol (LDAP) versions 2 and 3, Microsoft’s version of Kerberos, and DNS. Active Directory Domain Services (AD DS) is the cornerstone of every Windows domain network. It stores information about members of the domain, including devices and users, verifies their credentials and defines their access rights. The server (or the cluster of servers) running this service is called a domain controller. A domain controller is contacted when a user logs into a device, accesses another device across the network, or runs a line-of-business Metro-style application side loaded into a device. Other Active Directory services (excluding LDS, as well as most of Microsoft server technologies rely on or use Domain Services; examples include Group Policy, Encrypting File System, BitLocker, Domain Name Services, Remote Desktop Services, Exchange Server and SharePoint Server.
Active Directory Certificate Services (AD CS) establishes an on-premises public key infrastructure. It can create, validate and revoke public key certificates for internal uses of an organization. These certificates can be used to encrypt files (when used with Encrypting File System), emails (per S/MIME standard), network traffic (when used by virtual private networks, Transport Layer Security protocol or IPSec protocol).
E.2.3.2 DNS Server
Microsoft Windows server operating systems can run the DNS Server service, a monolithic DNS server that provides many types of DNS service, including caching, Dynamic DNS update, zone transfer, and DNS notification. DNS notification implements a push mechanism for notifying a select set of secondary servers for a zone when it is updated. DNS Server has improved interoperability with BIND and other implementations in terms of zone file format, zone transfer, and other DNS protocol details.
Microsoft’s DNS server supports different database back ends. Microsoft’s DNS server supports two such back ends. DNS data can be stored either in master files (also known as zone files) or in the Active Directory database itself. In the latter case, since Active Directory (rather than the DNS server) handles the actual replication of the database across multiple machines, the database can be modified on any server (multiple-master replication), and the addition or removal of a zone will be immediately propagated to all other DNS servers within the appropriate Active Directory “replication scope”. (Contrast this with BIND, where when such changes are made, the list of zones, in the /etc/named.conf file, has to be explicitly updated on each individual server.)
Microsoft’s DNS server can be administered using either a graphical user interface, the DNS Management Console, or a command line interface, the dnscmd utility. New to Windows Server 2012 is a fully featured PowerShell provider for DNS server management.
E.3 NLnet Labs Name Server Daemon-Based Components
E.3.1 NSD4 Authoritative Name Server
Name Server Daemon (NSD) is an open-source DNS server. It was developed from scratch by NLnet Labs of Amsterdam in cooperation with the RIPE NCC, as an authoritative name server (i.e., not implementing the recursive caching function by design). The intention of this development is to add variance to the “gene pool” of DNS implementations originally intended for root servers, top-level domains (TLDs) and second-level domains (SLDs), thus increasing the resilience of DNS against software flaws or exploits.
NSD uses BIND-style zone-files (zone-files used under BIND can usually be used unmodified in NSD, once entered into the NSD configuration).
The collection of programs/processes that make-up NSD are designed so that the NSD daemon itself runs as a non-privileged user and can be easily configured to run in a Chroot jail, such that security flaws in the NSD daemon are not so likely to result in system-wide compromise as without such measures.
The latest current stable release is NSD 4.1.13. Download the latest version here: https://www.nlnetlabs.nl/downloads/nsd/nsd-4.1.10.tar.gz.
NSD is thoroughly tested; there is a regression tests report available.
For NSD 4, the memory estimation tool can be compiled in the source tarball with make nsd- mem and running it on a config file with the zone files in question.
NLnet Labs has a long-term commitment for supporting NSD. There will be an advanced notice when the organization’s commitment ends. The latest NSD release will supported for at least two years after an end-of-life notification has been sent to the community.
Manual pages are installed; they can also be viewed:
- nsd(8) man page: https://www.nlnetlabs.nl/projects/nsd/nsd.8.html
- nsd-control(8) man page: https://www.nlnetlabs.nl/projects/nsd/nsd-control.8.html
- nsd-checkconf(8) man page: https://www.nlnetlabs.nl/projects/nsd/nsd-checkconf.8.html
- nsd-checkzone(8) man page: https://www.nlnetlabs.nl/projects/nsd/nsd-checkzone.8.html
- nsd.conf(5) man page: https://www.nlnetlabs.nl/projects/nsd/nsd.conf.5.html
NSD users can subscribe to nsd-users and browse the archives of nsd-users here: http://open.nlnetlabs.nl/mailman/listinfo/nsd-users/.
The repository of NSD is available at /svn/nsd/, the NSD 4.x.x development tree is located in trunk/.
E.3.2 OpenDNSSEC Domain Name Security Manager
OpenDNSSEC software manages the security of domain names on the Internet. The OpenDNSSEC project is a cooperative effort intended to drive adoption of Domain Name System Security Extensions (DNSSEC) in order to further enhance Internet security. OpenDNSSEC was created as an open-source turn-key solution for DNSSEC. It secures DNS zone data just before it is published in an authoritative name server. OpenDNSSEC takes in unsigned zones, adds digital signatures and other records for DNSSEC and passes it on to the authoritative name servers for that zone. OpenDNSSEC will furthermore take care of the key management and roll-over procedure to replace keys. It acts as a bump in the wire, where it will fit in an existing DNS tool chain without modification in that tool chain. Incrementally incorporating changes and re-using already signed zones to perform a constant up-to-date zone.
All keys are stored in a hardware security module and accessed via PKCS #11, a standard software interface for communicating with devices which hold cryptographic information and perform cryptographic functions. OpenDNSSEC uses SoftHSM, OpenSSL, the Botan cryptographic library, and SQLite or MySQL as database back-end. It is used on the .se, .dk, .nl, .ca, .za, .uk, and other top-level domains. OpenDNSSEC can be downloaded from:
- https://dist.opendnssec.org/source/opendnssec-2.0.1.tar.gz
- https://dist.opendnssec.org/source/opendnssec-2.0.1.tar.gz.sig
- Checksum SHA256: bf874bbb346699a5b539699f90a54e0c15fff0574df7a3c118abb30938b7b346
In August of 2014, NLnet Labs took responsibility for continuing the OpenDNSSEC activities of both the OpenDNSSEC software project and the Swedish OpenDNSSEC AB.
E.3.3 Unbound DNS Resolve
Unbound is a validating, recursive, and caching DNS resolver. The C implementation of Unbound is developed and maintained by NLnet Labs. It is based on ideas and algorithms taken from a Java prototype developed by Verisign labs, Nominet, Kirei and ep.net. Unbound is designed as a set of modular components, so that also DNSSEC (secure DNS) validation and stub-resolvers (that do not run as a server, but are linked into an application) are easily possible.
The source code is under a BSD License.
Release 1.5.9 of Unbound was released June 9, 2016. The repository for unbound is available https://unbound.nlnetlabs.nl/svn/. The development tree is located in trunk/.
The latest source code tarball is available for download.
Unbound problems can be reported through the NLnet Labs bugzilla web interface. In the case NLnet Labs will stop supporting the product, and they will announce such two years in advance. Unbound is subject to NLnet Labs Security Patch Policy. Commercial support for Unbound is available from several organizations.
E.4 ISC BIND Component
Internet Systems Consortium, Inc., also known as ISC, is a non-profit corporation that supports the infrastructure of the Internet by developing and maintaining core production-quality software, protocols, and operations. ISC has developed several key Internet technologies that enable the global Internet, including BIND.
BIND is open source software that implements the Domain Name System (DNS) protocols for the Internet. It is a reference implementation of those protocols, but it is also production-grade software, suitable for use in high-volume and high-reliability applications. The acronym BIND stands for Berkeley Internet Name Domain, because the software originated in the early 1980s at the University of California at Berkeley.
BIND is widely used DNS software that provides a stable platform on top of which organizations can build distributed computing systems that are fully compliant with published DNS standards.
BIND is transparent open source. If an organization needs some functionality that is not in BIND, it is possible to modify it, and contribute the new feature back to the community by sending ISC its source. It is possible to download a tar ball from the ISC web site (https://www.isc.org/downloads/), ftp.isc.org (http://ftp.isc.org/isc/bind9/cur/), or a binary from an organization’s operating system repository.
The BIND software distribution has three parts:
E.4.1 Domain Name Resolve
The BIND resolver is a program that resolves questions about names by sending those questions to appropriate servers and responding appropriately to the servers’ replies. In the most common application, a web browser uses a local stub resolver library on the same computer to look up names in the DNS. That stub resolver is part of the operating system. (Many operating system distributions use the BIND resolver library.) The stub resolver usually will forward queries to a caching resolver, a server or group of servers on the network dedicated to DNS services. Those resolvers will send queries to one or multiple authoritative servers in order to find the IP address for that DNS name.
DNS authoritative operations include the following features:
- NXDOMAIN Redirect: When a user searches for a non-existent domain, (NXDOMAIN response) the user can be redirected to another web page. This is done using the BIND DLZ feature.
- Flexible Cache Controls: From time to time users can get incorrect or outdated records in the resolver cache. BIND gives users the ability to remove them selectively or wholesale.
- Split DNS: BIND provides the ability to configure different views in a single BIND server. This allows users to give internal (on-network) and external (from the Internet) users different views of DNS data, keeping some DNS information private.
- Cache Hit Rate Optimization: BIND is designed to be persistent and resilient in resolving queries even when there is a delay in responding, in order to populate the cache for later requests. DNS Pre-fetch is a technique for continuously refreshing the cached records for popular domains, reducing the time the user has to wait for a response.
- Resolver Rate-limiting: Beginning with BIND 9.10.3, two new configuration parameters were added, fetches-per-zone and fetches-per-server. These features enable rate-limiting queries to authoritative systems that appear to be under attack. These features have been successful in mitigating the impact of a DDOS attack on resolvers in the path of the attack.
- DNSSEC Validation: DNSSEC validation protects clients from impostor sites. In BIND, this is enabled with a single command. BIND supports RFC 5011 maintenance of root key trust anchors. BIND also has a Negative Trust Anchor feature (introduced in the 9.9 subscription branch), which temporarily disables DNSSEC validation when there is a problem with the authoritative server’s DNSSEC support.
- Geo IP: GeoIP, or Geographic IP, allows a BIND DNS server to provide different responses based on the network information about the recursive DNS resolver that a user is using. There is an active Internet Draft describing another mechanism for providing location information, called EDNS-Client-Subnet-Identifier. This requires the resolver to cache multiple different addresses for a given DNS record, depending on the address of the requester. This feature has not been added to the BIND9 resolver, although the corresponding feature has been developed for the BIND9 authoritative server.
- Response Policy Zone: A Response Policy Zone or RPZ is a specially-constructed zone that specifies a policy rule set. The primary application is for blocking access to zones that are believed to be published for abusive or illegal purposes. There are companies who specialize in identifying abuse sites on the Internet, who market these lists in the form of RPZ feeds. For more information on RPZ, including a list of DNS reputation feed providers, see https://dnsrpz.info.
E.4.2 Domain Name Authority Server
The authoritative DNS server answers requests from resolvers, using information about the domain names it is authoritative for. Enterprises can provide DNS services on the Internet by installing this software on a server and giving it information about the enterprise’s domain names.
- Response Rate Limiting: An enhancement to the DNS protocol to reduce the problem of “amplification attacks” by limiting DNS responses. Response rate limiting is on by default.
- Dynamically-Loadable Zones: enable BIND9 to retrieve zone data directly from an external database. This is not recommended for high-query rate authoritative environments.
- Reload Time Reduction: BIND server zone files can be updated via nsupdate, and ‘dynamic’ zone files can be added via RNDC, both without restarting BIND. For those times when it is necessary to restart, the MAP zone file format can speed up re-loading a large zone file into BIND, such as on restart.
- Hardware Security Modules: BIND supports the use of Hardware Security Modules through either a native PKCS#11 interface, or the OpenSSL PKCS#11 provider. HSMs are used to store key material outside of BIND for security reasons.
- DNSSEC with in-line Signing: BIND fully supports DNSSEC with in-line Signing and has an easy-to use implementation. Once an enterprise has initially signed its zones, BIND can automatically re-sign the records as they are updated with in-line signing, maintaining the DNSSEC validity of the records. BIND supports both NSEC and NSEC3 and inline signing works with NSEC3.
- Catalog Zones: Catalog Zones were introduced in BIND 9.11.0 to facilitate the provisioning of zone information across a nameserver constellation. Catalog Zones are particularly useful when there are a large number of secondary servers. A special zone of a new type, a catalog zone, is set up on the master. Once a catalog zone is configured, when an operator wishes to add a new zone to the nameserver constellation s/he can provision the zone in one place only, on the master server and add an entry describing the zone to the catalog zone. As the secondary servers receive the updated copy of the catalog zone data they will note the new entry and automatically create a zone for it. Deletion of a zone listed in a catalog zone is done by deleting the entry in the catalog zone on the master.
- Scalable Master/Slave Hierarchy: A DNS authoritative system is composed of a zone primary or master with one or more slave servers. Zones files are established and updated on a master BIND server. Slaves maintain copies of the zone files and answer queries. This configuration allows scaling the answer capacity by adding more slaves, while zone information is maintained in only one place. The master signals that updated information is available with a notify message to the slaves, and the slaves then initiate an update from the master. BIND fully supports both the AXFR (complete transfer) and IXFR (incremental transfer) methods, using the standard TSIG security mechanism between servers. There are a number of configuration options for controlling the zone updating process.
E.4.3 Tools
ISC includes several diagnostic and operational tools. Some of them, such as the popular DIG tool, are not specific to BIND and can be used with any DNS server.
E.5 Secure64 Component
The Secure64 contributions included an automated online Secure64 DNS Signer delivered on dedicated hardware and DNSSEC-capable VM images of DNS Cache, DNS Authority, and DNS Manager. DNS Manager provided centralized management of Secure64 DNS Cache software and configurations and provided network-wide monitoring of key performance indicators. DNS Manager allowed creation of groups of servers and assignment of configurations to a group, a single server, or all servers. DNS Authority is an authoritative signer and server as a single platform. This stack was able to demonstrate Outlook, Thunderbird, or Apple Mail as MUAs and uses Postfix as an MTA and Dovecot to provide IMAP for clients. Descriptions of the DNS service components follow:
E.5.1 DNS Signer
Secure64 DNS Signer is DNSSEC key management and zone signing software that is designed to facilitate and provide security for DNSSEC implementation. Secure64 DNS Signer fully automates DNSSEC key generation, key rollover, zone signing and re-signing processes, it is designed to scale to large, dynamic environments by maintaining DNSSEC signing keys securely online while providing incremental zone signing and high signing performance. Signer integrates into existing infrastructures configurations. It is fully compatible with Secure64 DNS Authority, BIND, NSD, and Microsoft DNS masters and slaves. Signer supports all of the RFCs and best practices required to deploy DNSSEC.
E.5.2 DNS Authority
Secure64 DNS Authority is a name server software product. It provides built-in DoS protection that identifies and blocks TCP or UDP attack traffic. It is designed to respond to legitimate queries, even while under attack. DNS Authority provides real-time alerts and attack characteristics through syslog and SNMP traps in order to enable remedial action. Authority is also designed to be anycasted in any data center, even for enterprises that don’t operate the routing infrastructure. The administrator can insert and withdraw servers without requiring router changes or deploying dedicated router hardware. Authority directly reads existing BIND configuration files and is interoperable with name servers running BIND, NSD, or Microsoft Windows DNS software. Some specific features include the following:
- IPv6 support: Authority supports IPv6 in either dual stack or IPv6-only mode.
- PipeProtector: Authority’s PipeProtectorTM feature protects networks by automatically identifying the sources of amplified flood attacks and communicating with the upstream router to blackhole the attack traffic.
- Built-in BGP: Built-in Border Gateway Protocol (BGP) permits Authority to be set up in an anycast configuration, which provides greater resiliency against denial-of-service attacks and improved performance. After BGP is initially configured, the administrator can insert and withdraw the server from the anycast cluster without making router changes.
- Secured runtime environment: Authority is designed to run on a SourceT operating system and to utilizes server hardware security capabilities to eliminate all paths for injection or execution of malicious code at runtime.
- System Authentication: Digital signatures of the firmware, operating system and application code are all validated during the boot process. This protects against the operating system and the application code images on disk from being compromised by a rootkit.
- Secured zone data: Authority provides end-to-end integrity protection of zone data by supporting DNSSEC, TSIG and ACLs for queries, notifies and zone transfers.
- Synthesized PTR records: Reverse DNS records for IPv6 addresses or other large address blocks can be generated on the fly where necessary to preserve compatibility with other systems that rely upon the existence of these reverse records.
- Standards support: Authority supports ENUM standards, including RFC 3163 (SIP initiation protocol), RFC 6116 (storage of data for E.164 numbers in the DNS) and 3GPP TS 29.303 (DNS procedures for the Evolved Packet System).
- Split horizon DNS: Views permit configuration of an authoritative server to provide different functionality and responses based on characteristics of the requesting client.
E.5.3 DNS Cache
Secure64 DNS Cache is scalable, secure, caching DNS software designed to provide built-in protection against high volume denial-of-service attacks and immunity to BIND-specific security vulnerabilities. DNS Guard is a family of security services that protect users and the network from malicious activity, while the Web Error Redirection Module allows service providers to improve the end user’s experience while generating incremental revenues that flow right to the bottom line. Some specific features include the following:
- IPv6 Support: DNS Cache supports both dual stack and deployment of a pure IPv6 network while providing compatibility with IPv4 networks.
- Built-In DDoS Protection: Built-in DDoS detection and mitigation allows DNS Cache to continue to respond to legitimate queries while fending off high volume denial-of-service- attacks. This combats a common issue with DNS solutions that crash or become unavailable at lower levels of attack traffic. In addition to mitigating high volume attacks, DNS Cache automatically detects cases of individual clients exceeding a user-defined query threshold and temporarily blacklists them while logging information about the offending client. This helps prevent inadvertent participation in a denial-of-service attack.
- SNMP: DNS Cache provides several MIBs, that allow monitoring of the chassis, network, operating system and application in real time and support a variety of network monitoring systems. In addition, DNS Cache directly provides alerts of critical operational conditions through SNMP traps without requiring special configuration within the network monitoring system.
- Centralized management: DNS Cache servers can be managed individually, or can be centrally managed and monitored through Secure64 DNS Manager.
- Scalable performance: At a 90% cache hit rate, DNS Cache delivers over 125,000 queries per second, which can easily be increased to 280,000 queries per second through the optional software-based Capacity Expansion Module.
- DNSSEC validation overrides: DNS Cache can be configured to validate DNSSEC signed answers. Because DNSSEC configuration errors are not uncommon, operators can readily identify domains failing validation and specify which of these should be allowed to resolve normally.
- Merge Zones: DNS Cache’s merge zones feature allows a number of dynamic authoritative zones to be split up among different authoritative servers, each of which is queried for a response to a query for that zone until an answer is received.
- Web Error Redirection Module: The optional Web Error Redirection Module allows service providers to redirect NXDOMAIN responses from authoritative servers to a provider- branded search portal that helps guide users to their intended designation.
- Rules engine: DNS Cache’s rules engine provides fine-grained control over which responses are redirected, and includes built-in support for opt-out.
E.5.4 DNS Manager
DNS Manager provides centralized management of Secure64 DNS Cache software and configurations and provides network-wide monitoring of key performance indicators. This GUI based application can configure, manage, and monitor a set of Secure64 DNS Cache servers from one central point. In an environment consisting of many DNS servers, there are likely to be differences in configurations. Some servers may be anycasted, while others are load balanced, for example. Or servers located in different geographies may have different values for local DNS data. DNS Manager allows creation of groups of servers and assigns configurations to a group, a single server, or all servers. Groups may be arranged hierarchically. Common configuration parameters may be assigned to all servers in the network, whereas settings specific to subsets of servers may be assigned at the group level, and IP addresses and other server-specific information are assigned to each specific server. All actions to modify configuration files or software versions are revision controlled and logged. Authorized users can rollback to previous software versions or configurations if necessary. DNS Manager is able to monitor key performance indicators across the DNS network, including queries per second, CPU, disk and memory utilization.
E.5.5 Secure64 Apple Key Chain Utility
The Apple Key Chain Utility is a Secure64 utility for Public Key Retrieval into the Apple Key Chain. This utility is delivered on a MacBook loaded with Apple Mail and is a program for the MacBook that will fetch SMIMEA records and put them in the keystore so that we can demonstrate end-to-end security.
Appendix F Installation and Configuration Log for NSD4, Unbound, and OpenDNSSEC
The following log captures the installation and configuration process for NSD4, Unbound, and OpenDNSSEC for this project. Please note that the IP addresses, domain names, and mail addresses are for the NCCoE laboratory and must not be used in actual implementations.
####
# Unbound installation log for 10.33.XX.XX
###


# Unbound does not depend on a resolver for its installation. However, I
# configure one here so I can use yum from installation of the dependencies. [rdolmans@unbound ~]$ sudo cp /etc/resolv.conf /etc/resolv.conf.orig [rdolmans@unbound ~]$ echo "nameserver 10.97.XX.X" | sudo tee -a /etc/resolv.conf


# Install build tools
[rdolmans@unbound ~]$ sudo yum group install "Development Tools"


# Install unbound dependencies: openssl, expat
[rdolmans@unbound ~]$ sudo yum install openssl-devel expat-devel


# Download Unbound and verify
[rdolmans@unbound ~]$ curl https://unbound.net/downloads/unbound-1.5.8.tar.gz -o unbound- 1.5.8.tar.gz
[rdolmans@unbound ~]$ cat unbound-1.5.8.tar.gz | openssl sha256
(stdin)= 33567a20f73e288f8daa4ec021fbb30fe1824b346b34f12677ad77899ecd09be


# We do not need a nameserver anymore, move back old resolv.conf [rdolmans@unbound ~]$ sudo mv /etc/resolv.conf.orig /etc/resolv.conf


# extract, ./configure, compile and install Unbound [rdolmans@unbound ~]$ tar xvzf unbound-1.5.8.tar.gz [rdolmans@unbound ~]$ cd unbound-1.5.8 [rdolmans@unbound unbound-1.5.8]$ ./configure [rdolmans@unbound unbound-1.5.8]$ make [rdolmans@unbound unbound-1.5.8]$ sudo make install


# Add system user and group
[rdolmans@unbound unbound-1.5.8]$ sudo groupadd -r unbound
[rdolmans@unbound unbound-1.5.8]$ sudo useradd -r -g unbound -s /sbin/nologin -c "unbound name daemon" unbound


# Setup unbound-control, get trust anchor [rdolmans@unbound ~]$ sudo unbound-control-setup [rdolmans@unbound ~]$ sudo unbound-anchor


# Config changes:
# 1. Specify the interfaces to listen on
# 2. Allow second host to use this resolver (ACL)
# 3. Load DNSSEC trust anchor obtained using unbound-anchor
# 4. Enable remote-control (for unbound-control command, limited to localhost)


[rdolmans@unbound ~]$ diff -u /usr/local/etc/unbound/unbound.conf.orig /usr/local/etc/unbound/ unbound.conf
--- /usr/local/etc/unbound/unbound.conf.orig        2016-05-10 09:22:13.917495389 -0400
+++ /usr/local/etc/unbound/unbound.conf 2016-05-12 06:34:02.660574284 -0400
@@ -34,6 +34,9 @@
# specify 0.0.0.0 and ::0 to bind to all available interfaces.
# specify every interface[@port] on a new 'interface:' labelled line.
# The listen interfaces are not changed on reload, only on restart.
+   interface: 192.168.3.98
+   interface: ::1
+   interface: 127.0.0.1
# interface: 192.0.2.153
# interface: 192.0.2.154
# interface: 192.0.2.154@5003
@@ -197,6 +200,7 @@
# access-control: ::0/0 refuse
# access-control: ::1 allow
# access-control: ::ffff:127.0.0.1 allow
+   access-control: 192.168.3.0/23 allow


# if given, a chroot(2) is done to the given directory.
# i.e. you can chroot to the working directory, for example,
@@ -376,7 +380,7 @@
# you start unbound (i.e. in the system boot scripts).  And enable:
# Please note usage of unbound-anchor root anchor is at your own risk
# and under the terms of our LICENSE (see that file in the source).
-   # auto-trust-anchor-file: "/usr/local/etc/unbound/root.key"
+   auto-trust-anchor-file: "/usr/local/etc/unbound/root.key"


# File with DLV trusted keys. Same format as trust-anchor-file.
# There can be only one DLV configured, it is trusted from root down.
@@ -614,7 +618,7 @@
remote-control:
# Enable remote control with unbound-control(8) here.
# set up the keys and certificates with unbound-control-setup.
-   # control-enable: no
+   control-enable: yes

# Set to no and use an absolute path as control-interface to use
# a unix local named pipe for unbound-control.


# Start daemon
[rdolmans@unbound ~]$ sudo unbound-control start


# add local resolver to resolv.conf
[rdolmans@unbound ~]$ echo "nameserver ::1" | sudo tee -a /etc/resolv.conf

# Install ldns tools (incl. drill) [rdolmans@unbound ~]$ sudo yum install ldns


# Test DNSSEC validation
# 1. resolve bogus record with CD bit set, should result in answer
# 2. resolve bogus record with CD bit unset, should result in SERVFAIL

# CD set:
[rdolmans@unbound ~]$ drill txt bogus.nlnetlabs.nl @::1 -o CD
;; ->>HEADER<<- opcode: QUERY, rcode: NOERROR, id: 36453
;; flags: qr rd cd ra ; QUERY: 1, ANSWER: 1, AUTHORITY: 4, ADDITIONAL: 2
;; QUESTION SECTION:
;; bogus.nlnetlabs.nl. IN   TXT


;; ANSWER SECTION:
bogus.nlnetlabs.nl. 59      IN      TXT     "will be Bogus"


;; AUTHORITY SECTION:

nlnetlabs.nl.       10200   IN      NS      sec2.authdns.ripe.net.
nlnetlabs.nl.       10200   IN      NS      anyns.pch.net.
nlnetlabs.nl.       10200   IN      NS      ns.nlnetlabs.nl.
nlnetlabs.nl.       10200   IN      NS      ns-ext1.sidn.nl.

;; ADDITIONAL SECTION:
ns.nlnetlabs.nl.

9831

IN

A

185.49.140.60
ns.nlnetlabs.nl.    9831    IN      AAAA    2a04:b900::8:0:0:60


;; Query time: 581 msec
;; SERVER: ::1
;; WHEN: Thu May 12 05:58:20 2016
;; MSG SIZE  rcvd: 209


# CD unset:
[rdolmans@unbound ~]$ drill txt bogus.nlnetlabs.nl @::1
;; ->>HEADER<<- opcode: QUERY, rcode: SERVFAIL, id: 14388
;; flags: qr rd ra ; QUERY: 1, ANSWER: 0, AUTHORITY: 0, ADDITIONAL: 0
;; QUESTION SECTION:
;; bogus.nlnetlabs.nl. IN   TXT

;; ANSWER SECTION:

;; AUTHORITY SECTION:

;; ADDITIONAL SECTION:

;; Query time: 0 msec
;; SERVER: ::1
;; WHEN: Thu May 12 05:59:06 2016
;; MSG SIZE  rcvd: 36


####
# NSD installation log for 10.33.XX.XX
###

# Add 192.168.3.98 to resolv.conf
[rdolmans@nsd ~]$ echo "nameserver 192.168.3.98" | sudo tee -a /etc/resolv.conf

# install openssl, libevent
[rdolmans@nsd ~]$ sudo yum install openssl-devel libevent-devel

# SoftHSM
[rdolmans@nsd ~]$ tar xvzf softhsm-2.1.0.tar.gz [rdolmans@nsd ~]$ cat softhsm-2.1.0.tar.gz | openssl sha256
(stdin)= 0399b06f196fbfaebe73b4aeff2e2d65d0dc1901161513d0d6a94f031dcd827e [rdolmans@nsd softhsm-2.1.0]$ cd softhsm-2.1.0
[rdolmans@nsd softhsm-2.1.0]$ autoreconf -i -f
# openssl version has no gost support, disable [rdolmans@nsd softhsm-2.1.0]$ ./configure --disable-gost [rdolmans@nsd softhsm-2.1.0]$ make
[rdolmans@nsd softhsm-2.1.0]$ sudo make install
[rdolmans@nsdsofthsm-2.1.0]$sudosofthsm2-util--init-token--slot0--label"OpenDNSSEC"

# LDNS (incl. examples and drill)
[rdolmans@nsd ~]$ curl https://nlnetlabs.nl/downloads/ldns/ldns-1.6.17.tar.gz -o ldns- 1.6.17.tar.gz
[rdolmans@nsd ~]$ cat ldns-1.6.17.tar.gz | openssl sha1 (stdin)= 4218897b3c002aadfc7280b3f40cda829e05c9a4 [rdolmans@nsd ~]$ tar xvzf ldns-1.6.17.tar.gz [rdolmans@nsd ~]$ cd ldns-1.6.17
[rdolmans@nsd ldns-1.6.17]$ ./configure --with-examples --with-drill [rdolmans@nsd ldns-1.6.17]$ make
[rdolmans@nsd ldns-1.6.17]$ sudo make install

# OpenDNSSEC
# install dependencies: SQLite3, libxml2, java (for now)
[rdolmans@nsd ~]$ sudo yum install libxml2-devel sqlite-devel java-1.8.0-openjdk-devel [rdolmans@nsd ~]$ git clone https://github.com/opendnssec/opendnssec.git
[rdolmans@nsd ~]$ cd opendnssec [rdolmans@nsd opendnssec]$ sh autogen.sh [rdolmans@nsd opendnssec]$ ./configure [rdolmans@nsd opendnssec]$ make [rdolmans@nsd opendnssec]$ sudo make install


# Setup SQLite db
[rdolmans@nsd opendnssec]$ sudo ods-enforcer-db-setup

# Use SoftHSM2, reload NSD zone after signing
[rdolmans@nsd ~]$ sudo diff -u /etc/opendnssec/conf.xml.sample /etc/opendnssec/conf.xml
--- /etc/opendnssec/conf.xml.sample 2016-05-12 10:53:35.154584441 -0400
+++ /etc/opendnssec/conf.xml        2016-05-17 12:03:20.719795941 -0400
@@ -5,9 +5,9 @@
<RepositoryList>

<Repository name="SoftHSM">
-   <Module>/usr/local/lib/softhsm/libsofthsm.so</Module>
+   <Module>/usr/local/lib/softhsm/libsofthsm2.so</Module>
<TokenLabel>OpenDNSSEC</TokenLabel>
-   <PIN>1234</PIN>
+   <PIN>**********</PIN>
<SkipPublicKey/>
</Repository>
@@ -87,9 +87,7 @@
<!--

NotifyCommand>
-->
-<!--


<   NotifyCommand>/usr/local/bin/my_nameserver_reload_command</

-   <NotifyCommand>/usr/sbin/rndc reload %zone</NotifyCommand>
--->
+   <NotifyCommand>/usr/local/sbin/nsd-control reload %zone</NotifyCommand>
</Signer>


</Configuration>


# Add policy to KASP config file. We use a policy named dnslab here, which is based on policy default (but uses NSEC).
# See /etc/opendnssec/kasp.xml

[rdolmans@nsd ~]$ sudo ods-enforcer update all Created policy dnslab successfully
Policy dnslab already up-to-date update all completed in 0 seconds.
[rdolmans@nsd ~]$ sudo ods-enforcer policy list Policy:     Description:
dnslab      Policy used for the NCCOE dnslab policy list completed in 0 seconds.
[rdolmans@nsd ~]$ sudo ods-enforcer zone add --zone nev1.dnslab.nccoe.nist.gov --policy dnslab Zone nev1.dnslab.nccoe.nist.gov added successfully
zone add completed in 1 seconds.


# NSD
# Download, verify checksum, extract, configure, compile and install NSD
[rdolmans@nsd ~]$ curl https://nlnetlabs.nl/downloads/nsd/nsd-4.1.9.tar.gz -o nsd-4.1.9.tar.gz [rdolmans@nsd ~]$ cat nsd-4.1.9.tar.gz | openssl sha256
(stdin)= b811224d635331de741f1723aefc41adda0a0a3a499ec310aa01dd3b4b95c8f2 [rdolmans@nsd ~]$ tar xvzf nsd-4.1.9.tar.gz
[rdolmans@nsd ~]$ cd nsd-4.1.9
[rdolmans@nsd nsd-4.1.9]# ./configure --with-pidfile=/var/run/nsd/nsd.pid [rdolmans@nsd nsd-4.1.9]$ make
[rdolmans@nsd nsd-4.1.9]$ sudo make install [rdolmans@nsd ~]$ sudo nsd-control-setup

# enable in config
[rdolmans@nsd ~]$ sudo cp /etc/nsd/nsd.conf.sample /etc/nsd/nsd.conf [rdolmans@nsd ~]$ diff -u /etc/nsd/nsd.conf.sample /etc/nsd/nsd.conf
--- /etc/nsd/nsd.conf.sample        2016-05-17 11:46:58.379795464 -0400
+++ /etc/nsd/nsd.conf       2016-05-18 07:06:14.861829191 -0400
@@ -23,6 +23,9 @@
# ip-address: 1.2.3.4
# ip-address: 1.2.3.4@5678
# ip-address: 12fe::8ef0
+   ip-address: 192.168.3.99
+   ip-address: ::1
+   ip-address: 127.0.0.
# Allow binding to non local addresses. Default no.
# ip-transparent: no
@@ -62,7 +65,7 @@


# the database to use
# if set to "" then no disk-database is used, less memory usage.
-   # database: "/var/db/nsd/nsd.db"
+   database: ""

# log messages to file. Default to stderr and syslog (with
# facility LOG_DAEMON).  stderr disappears when daemon goes to bg.
@@ -141,7 +144,7 @@
remote-control:
# Enable remote control with nsd-control(8) here.
# set up the keys and certificates with nsd-control-setup.
-   # control-enable: no
+   control-enable: yes

# what interfaces are listened to for control, default is on localhost.
# control-interface: 127.0.0.1
@@ -249,4 +252,10 @@
# zonefile: "example.com.zone"
# request-xfr: 192.0.2.1 example.com.key

-
+pattern:
+   name: "local-signed"
+   zonefile: "/var/opendnssec/signed/%s"
+
+zone:
+   name: "nev1.dnslab.nccoe.nist.gov"
+   include-pattern: "local-signed"


[rdolmans@nsd ~]$ sudo groupadd -r nsd
[rdolmans@nsd ~]$ sudo useradd -r -g nsd -s /sbin/nologin -c "nsd daemon" nsd

# Make user nsd the owner of the nsd db and run directories [rdolmans@nsd ~]# sudo chown nsd:nsd /var/db/nsd/ [rdolmans@nsd ~]# sudo chown nsd:nsd /var/run/nsd

# Start NSD
[rdolmans@nsd ~]$ sudo nsd-control start

# Export DS
[rdolmans@nsd ~]$ sudo ods-enforcer key export --zone nev1.dnslab.nccoe.nist.gov --ds
;ready KSK DS record (SHA1):
nev1.dnslab.nccoe.nist.gov. 3600    IN      DS      35674 8 1 79ee1e53ce23658b6d5632297336b3067a80e329
;ready KSK DS record (SHA256):
nev1.dnslab.nccoe.nist.gov. 3600    IN      DS      35674 8 2 0bd77d723e0a6d602a82bf0173a32a8286cfa4d602100e716192425544fb43a2
key export completed in 0 seconds.


Generate key + selfsigned cert:

[rdolmans@unbound cert]$ sudo openssl req -newkey rsa:2048 -nodes \
-keyout nev1.dnslab.nccoe.nist.gov.key -x509 -days 365 -out nev1.dnslab.nccoe.nist.gov.crt Generating a 2048 bit RSA private key
....................+++
.......................................+++
writing new private key to 'nev1.dnslab.nccoe.nist.gov.key'
-----
You are about to be asked to enter information that will be incorporated into your certificate request.
What you are about to enter is what is called a Distinguished Name or a DN. There are quite a few fields but you can leave some blank
For some fields there will be a default value, If you enter '.', the field will be left blank.
-----
Country Name (2 letter code) [XX]:NL State or Province Name (full name) []:
Locality Name (eg, city) [Default City]:Amsterdam
Organization Name (eg, company) [Default Company Ltd]:NLnet Labs Organizational Unit Name (eg, section) []:
Common Name (eg, your name or your server's hostname) []:nev1.dnslab.nccoe.nist.gov Email Address []:


# Generate TLSA record for cert:

[rdolmans@unbound cert]$ ldns-dane create nev1.dnslab.nccoe.nist.gov 25 3 1 1 -c nev1.dnslab.nccoe.nist.gov.crt
_25._tcp.nev1.dnslab.nccoe.nist.gov.        3600    IN      TLSA    3:
1 1 0e8f0af01ea3c87bb5647de3f36cd7ab1eedf5ae466edf5a8800f6174884f60d

# Add TLSA and MX records to zone:

[rdolmans@nsd unsigned]$ diff -u nev1.dnslab.nccoe.nist.gov.old nev1.dnslab.nccoe.nist.gov
--- nev1.dnslab.nccoe.nist.gov.old  2016-05-31 10:13:17.728379254 -0400
+++ nev1.dnslab.nccoe.nist.gov  2016-05-31 10:13:21.403379256 -0400
@@ -9,7 +9,10 @@


    NS      ns.nev1.dnslab.nccoe.nist.gov.
    A       192.168.3.99
+   MX      10 192.168.3.98


TXT "dnslab test zone."
ns  IN      A       192.168.3.99
+
+_25._tcp IN        TLSA    3 1 1 0e8f0af01ea3c87bb5647de3f36cd7ab1eedf5ae466edf5a8800f6174884f60d

# Resign
[rdolmans@nsd unsigned]$ sudo ods-signer sign nev1.dnslab.nccoe.nist.gov Zone nev1.dnslab.nccoe.nist.gov scheduled for immediate re-sign.
Appendix G Microsoft Installation for the NCCoE
The following log captures the installation and configuration process for Microsoft system and applications software for this project. Please note that the IP addresses, domain names, and mail addresses are for the NCCoE laboratory and must not be used in actual implementations.
G.1 Microsoft Server
Two Microsoft Active Directory domains were built for this project. MS1.DNSLAB.DNSOPS.GOV and MS2.DNSLAB.DNSOPS.GOV domains. Two versions of Windows Server were used.
Windows Server 2016 Technical Preview 5, Standard GUI edition (WS2016TP5) which is available from the Microsoft Evaluation Center (https://www.microsoft.com/en-us/evalcenter/evaluate-windows-server-technical-preview); and Active Directory Domain Services with integrated Domain Name Services and Certificate Services run on WS2016TP5. Currently, Exchange 2016 runs on Windows Server 2012R2 due to Exchange requirements (https://technet.microsoft.com/en-us/library/aa996719(v=exchg.160).aspx).
The procession of Microsoft Services to be installed and configured is as follows:
- Active Directory Domain Services
- Active Directory Certificate Services - Root Certification Authority
- Active Directory Certificate Services - Issuing Certification Authority
- Active Directory Domain Name Services
- Exchange 2016
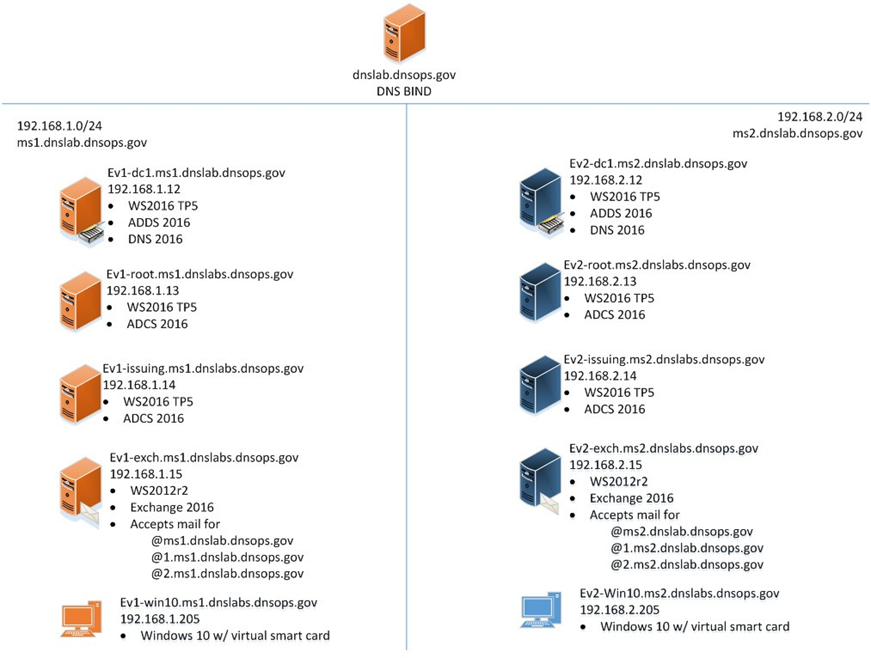
G.2 Active Directory Domain Services
The following procedures were used for the creation of the MS1.DNSLAB.DNSOPS.GOV Active Directory domain on the EV1-DC1.MS1.DNSLAB.DNSOPS.GOV WS2016TP5 server.
Statically assign IP address of the Domain Controller. This domain controller serves as the DNS server for the MS1.DNSLAB.DNSOPS.GOV Active directory domain:
- IP Address: 192.168.1.12
- Netmask: 255.255.255.0
- Gateway: 192.168.1.1
- DNS Server 192.168.1.12
Install Active Directory Domain Services (ADDS) role:
- Server Manager -> Manage -> Add Roles and Features
- Installation type -> Role-based or feature based installation
- Server Selection -> local server
- Server Roles -> Select Active Directory Domain Services, accept the Features to be added with the installation of ADDS.
- On the Features selection menu click Next.
- Click Install.
- Once installation is complete click Close.
Configure the Active Directory Domain Services.
In Server Manager click the exclamation mark underneath the flag icon and click on Promote this server to a domain controller.
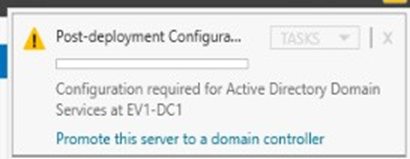
Deployment Configuration -> Add a new forest and specify the root name of MS1.DNSLAB.DNSOPS.GOV.
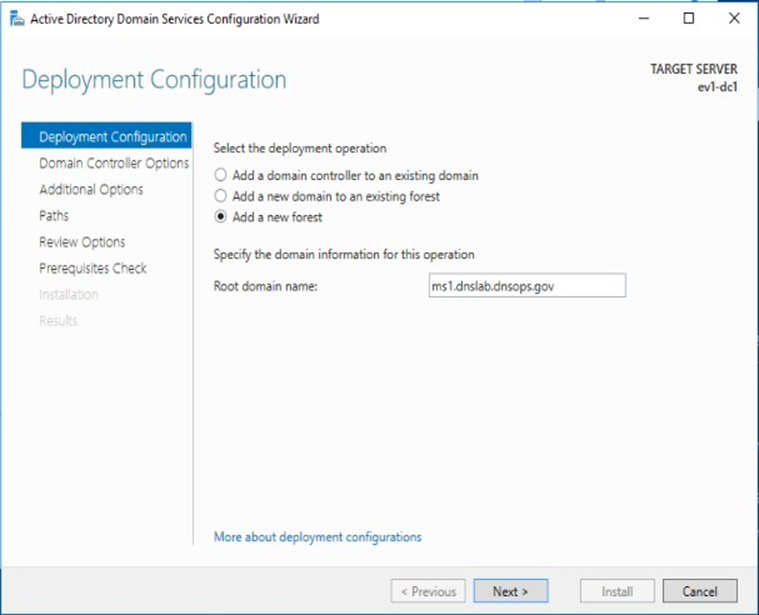
In Domain Controller Options select the defaults and set the Directory Services Restore Mode (DSRM) password.
DNS Options - parent zone could not be found, click Next.
The NetBios domain name will default to the lowest level of the FQDN of the Forest, i.e., MS1.
Accept the default paths for the ADDS Database, Log and SysVol folders. If running on a virtual machine, follow the recommended practice of the virtualization host.
In the Prerequisites Check you will be notified that the DNS cannot be delegated. The DNS server will be hosted on this domain controller.
G.3 Active Directory Certificate Services: Microsoft Certificate Authority
Windows Server 2016 TP5 Active Directory Certificate Services (ADCS) serves as the Public Key Infrastructure for the MS1.DNSLAB.DNSOPS.GOV namespace. It is a two-tier hierarchy with EV1-ROOT.MS1.DNSLAB.DNSOPS.GOV as the root Certification Authority (CA) trust point, and EV1-ISSUING.MS1.DNSLAB.DNSOPS.GOV as the domain joined enterprise issuing CA.
G.3.1 Root CA Installation
The installation of Active Directory Certificate Services must be performed by an enterprise administrator.
Copy CAPolicy.inf to the c:\windows directory:
; NCCoE DANE DNSSEC Building Block

[Version]
Signature= "$Windows NT$"

; Configures CA to allow only a single tier of CAs below it [BasicConstraintsExtension]
PathLength = 1

; Allows all issuance policies, sets HTTP pointer for CPS [PolicyStatementExtension]
Policies = AllIssuancePolicy, LegalPolicy Critical = 0

[AllIssuancePolicy] OID = 2.5.29.32.0

[LegalPolicy] OID = 1.1.1.1.1
Notice = "http://pki.ms1.dnslab.dnsops.gov/CPS.htm" URL = "http://pki.ms1.dnslab.dnsops.gov/CPS.htm"

; Sets key renewal and CRL publication parameters [Certsrv_Server]
RenewalKeyLength = 4096 RenewalValidityPeriod = Years RenewalValidityPeriodUnits = 20 CRLPeriod = days
CRLPeriodUnits = 180
CRLDeltaPeriodUnits = 0
CRLDeltaPeriod = days

; Makes the CDP and AIA pointer for the root CA cert blank [CRLDistributionPoint]
Empty = True

[AuthorityInformationAccess] Empty = True

; NCCoE DANE DNSSEC Building Block

[Version]
Signature= "$Windows NT$"

; Configures CA to allow only a single tier of CAs below it [BasicConstraintsExtension]
PathLength = 1

; Allows all issuance policies, sets HTTP pointer for CPS [PolicyStatementExtension]
Policies = AllIssuancePolicy, LegalPolicy Critical = 0

[AllIssuancePolicy] OID = 2.5.29.32.0

[LegalPolicy] OID = 1.1.1.1.1
Notice = "http://pki.ms1.dnslab.dnsops.gov/CPS.htm" URL = "http://pki.ms1.dnslab.dnsops.gov/CPS.htm"

; Sets key renewal and CRL publication parameters [Certsrv_Server]
RenewalKeyLength = 4096 RenewalValidityPeriod = Years RenewalValidityPeriodUnits = 20 CRLPeriod = days
CRLPeriodUnits = 7
CRLDeltaPeriodUnits = 0 CRLDeltaPeriod = days

; Makes the CDP and AIA pointer for the root CA cert blank [CRLDistributionPoint]
Empty = True

[AuthorityInformationAccess] Empty = True
Server Manager -> Manage -> Add Roles and Features.
Installation type -> Role-based or feature-based installation.
Server Selection -> local server.
Server Roles -> Select Active Directory Certificate Services, accept the Features to be added with the installation of ADCS.
On the Features selection menu click Next.
Click Install.
Once installation is complete click Close.
G.3.1.1 Configure Root CA
Run post install configuration wizard, click on Configure Active Directory Certificate Services link:

Select Role Services to configure -> select Certification Authority.
Setup Type = Standalone CA.
CA Type = Root CA.
Private Key = Create a new private key.
Cryptography:
- Cryptographic provider -> RSA#Microsoft Software Key Storage Provider
- Hashing Algorithm = SHA256
- Key Length 2048
CA Name = EV1-Root
Once completed, run the post install script.
:: NCCoE DANE DNSSEC Building Block

:: Declares configuration NC
certutil -setreg CA\DSConfigDN CN=Configuration,DC=ms1,DC=dnslab,DC=dnsops,DC=gov

:: Defines CRL publication intervals certutil -setreg CA\CRLPeriodUnits 7 certutil -setreg CA\CRLPeriod "Days" certutil -setreg CA\CRLDeltaPeriodUnits 0 certutil -setreg CA\CRLDeltaPeriod "Days"

:: Specifies CDP attributes
certutil -setreg CA\CRLPublicationURLs "65:%windir%\system32\CertSrv\CertEnroll\%%3%%8%%9.crl\n6:http://pki.ms1.dnslab.dnsops.gov/
%%3%%8%%9.crl\n14:ldap:///CN=%%7%%8,CN=%%2,CN=CDP,CN=Public Key Services,CN=Services,%%6%%10\n"

:: Specifies AIA attributes
certutil -setreg CA\CACertPublicationURLs "1:%windir%\system32\CertSrv\CertEnroll\%%7.crt\n2:http://pki.ms1.dnslab.dnsops.gov/
%%7.crt\n3:ldap:///CN=%%7,CN=AIA,CN=Public Key Services,CN=Services,%%6%%11\n"

:: Enables auditing all events for the CA certutil -setreg CA\AuditFilter 127

:: Sets validity period for issued certificates certutil -setreg CA\ValidityPeriodUnits 10 certutil -setreg CA\ValidityPeriod "Years"

:: Restarts Certificate Services  net stop certsvc & net start certsvc

:: Republishes the CRL; sometimes this gets an access denied (error 5) because the service is not ready after restart, in this case, manually execute
certutil -crl
G.3.1.2 Enable Certificate Services Auto Enrollment within the Active Directory Domain
Log on to the domain controller EV1-DC1.MS1.DNSLAB.DNSOPS.GOV.
Start Group Policy Management console (gpmc.msc).
Navigate to the Default Domain Policy.
Within the Default Domain Policy go to Computer Configuration -> Policies -> Windows Settings -> Security Settings -> Public Key Policies
Select the Certificate Services Client - Certificate Enrollment Policy setting.
Set to Enabled, ensure the default Active Directory Enrollment Policy is selected and click OK.

Select Certificate Services Client - Auto-Enrollment setting.
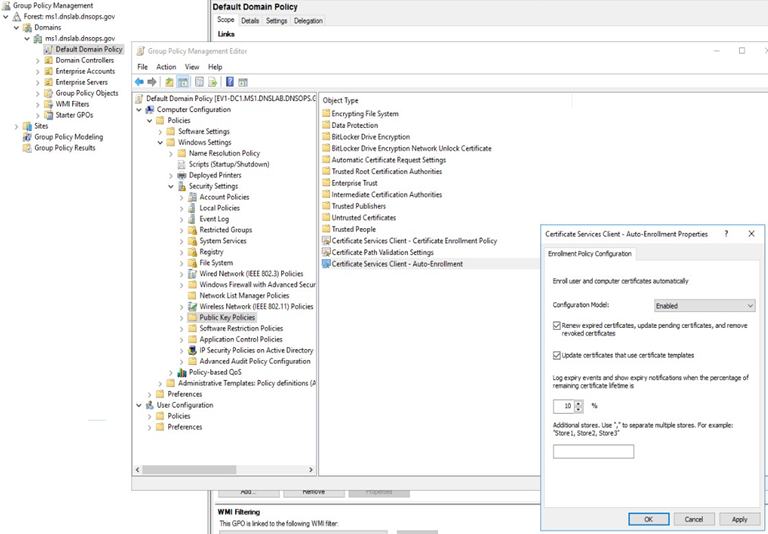
Set Configuration Model to Enabled.
Enable Renew Expired Certificates and Update certificates that use certificate templates radio buttons.
G.3.2 Issuing a CA Installation
Start administrative command prompt as an Enterprise Administrator.
Publish the EV1-Root CA certificate to Active Directory for dissemination to all systems within the MS1.DNSLAB.DNSOPS.GOV Active Directory domain. From an administrative command prompt, type certutil -dspublish -f ev1-root.crt rootca.
From the administrative command prompt, type certutil -pulse followed by gpupdate / force.
Copy CAPolicy.inf to the c:\windows directory.
; NCCoE DANE DNSSEC Building Block [Version]
Signature= "$Windows NT$"

; Allows all issuance policies, sets HTTP pointer for CPS [PolicyStatementExtension]
Policies = AllIssuancePolicy, LegalPolicy Critical = 0

[AllIssuancePolicy] OID = 2.5.29.32.0

[LegalPolicy] OID = 1.1.1.1.1
Notice = "http://pki.ms1.dnslab.dnsops.gov/cps.htm" URL = "http://pki.ms1.dnslab.dnsops.gov/CPS.htm"

; Sets key renewal and CRL publication parameters [certsrv_server]
renewalkeylength = 2048
RenewalValidityPeriodUnits = 10 RenewalValidityPeriod = years CRLPeriod = hours CRLPeriodUnits = 36 CRLDeltaPeriod = hours CRLDeltaPeriodUnits = 0
Server Manager -> Manage -> Add Roles and Features.
Installation type -> Role-based or feature-based installation.
Server Selection -> local server.
Server Roles -> Select Active Directory Certificate Services, accept the Features to be added with the installation of ADCS.
Features = Certification Authority and Certification Authority Web Enrollment (this will add the required IIS features).
On the Features selection menu click Next.
Click Install.
Once installation is complete click Close.
Run the Post-Deployment configuration for the ADCS role.
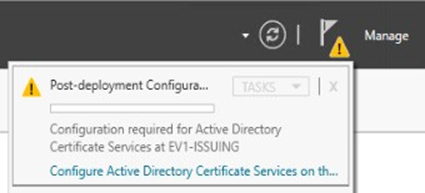
Select both Certification Authority and Certification Authority Web Enrollment.
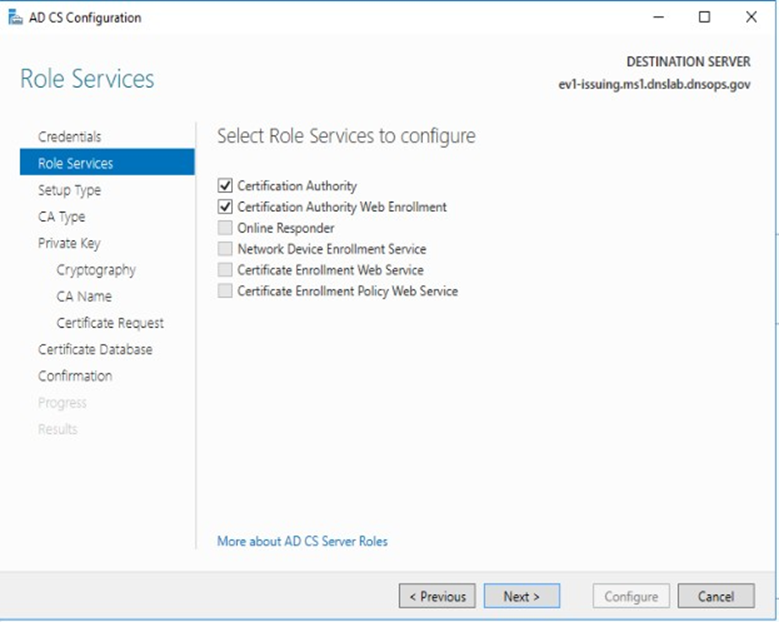
Setup Type = Enterprise CA
CA Type = Subordinate CA
Create new key
CA Name = EV1-Issuing
- Private Key = Create a new private key
- Cryptography:
- Cryptographic provider -> RSA#Microsoft Software Key Storage Provider
- Hashing Algorithm = SHA256
- Key Length 2048
Save the request file to the c:\ drive.
Copy request file to root ca.
On Root CA, issue certificate.
Import ev1-issuing.ca into the Certification Authority.
Create a CNAME record for PKI.MS1.DNSLAB.DNSOPS.GOV to point to ev1-issuing.ms1.dnslab.dnsops.gov.

Open Internet Information Service Manager.
Go to the Default Web Site.
Bindings: edit the existing default HTTP binding and add pki.ms1.dnslab.dnsops.gov.
Click on the Filter requests -> Select Allow File name Extension and add .crl, .crt and .cer.
From an administrative command prompt type iisreset.
On the Issuing CA run the post install script.
:: NCCoE DANE DNSSEC Building Block

:: Declares configuration NC
certutil -setreg CA\DSConfigDN CN=Configuration,DC=MS1,DC=DNSLAB,DC=DNSOPS,DC=GOV

:: Defines CRL publication intervals certutil -setreg CA\CRLPeriodUnits 3 certutil -setreg CA\CRLPeriod "days" certutil -setreg CA\CRLDeltaPeriodUnits 0 certutil -setreg CA\CRLDeltaPeriod "Hours"

:: Specifies CDP attributes
certutil -setreg CA\CRLPublicationURLs "65:%windir%\system32\CertSrv\CertEnroll\%%3%%8%%9.crl\n6:http://pki.ms1.dnslab.dnsops.gov/
%%3%%8%%9.crl\n79:ldap:///CN=%%7%%8,CN=%%2,CN=CDP,CN=Public Key Services,CN=Services,%%6%%10\n"

:: Specifies AIA attributes

certutil -setreg CA\CACertPublicationURLs "1:%windir%\system32\CertSrv\CertEnroll\%%7.crt\n2:http://pki.ms1.dnslab.dnsops.gov/
%%7.crt\n3:ldap:///CN=%%7,CN=AIA,CN=Public Key Services,CN=Services,%%6%%11\n"

:: Enables auditing all events for the CA certutil -setreg CA\AuditFilter 127

:: Sets maximum validity period for issued certificates certutil -setreg CA\ValidityPeriodUnits 5
certutil -setreg CA\ValidityPeriod "Years"

:: Restarts Certificate Services  net stop certsvc & net start certsvc

:: Republishes the CRL; sometimes this gets an access denied (error 5) because the service is not ready after restart, in this case, manually execute
certutil -CRL
G.4 Microsoft Domain Name Services: DNS Domain Server
Active Directory Domain Services installation installs and configures the ms1.dnslab.dnsops.gov Forward lookup zone. It is recommended to create a Reverse lookup zone for the subnets used.

Create a conditional forwarder for the other name spaces:
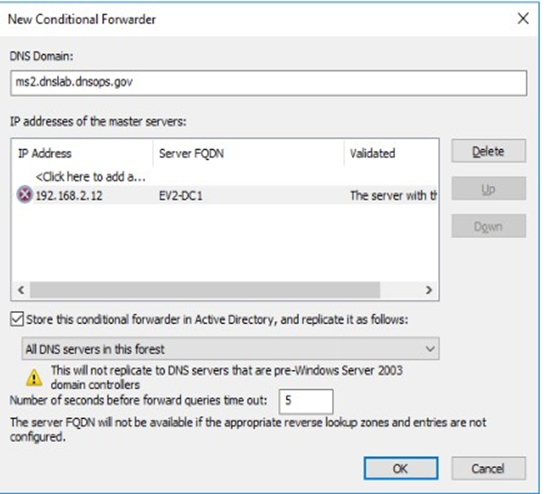
Create forwarded to dnslab.dnsops.gov.

G.5 Microsoft Exchange
Exchange 2016 was installed on a Windows Server 2012R2 Standard (Server with a GUI). Exchange 2016 is currently not supported on Windows Server 2016 Technical Preview 2016 https://technet.microsoft.com/en-us/library/aa996719(v=exchg.160).aspx.
Exchange 2016 prerequisites can be found here: https://technet.microsoft.com/en-us/library/bb691354(v=exchg.160).aspx.
Download for .Net 4.5.2: https://www.microsoft.com/en-us/download/details.aspx?id=42642.
Install the Remote Tools Administration Pack using the following powershell command:
Install-WindowsFeature RSAT-ADDS.Install Exchange 2016 prerequisites with the following powershell command:
Install-WindowsFeature AS-HTTP-Activation, Desktop-Experience, NET-
Framework-45-Features, RPC-over-HTTP-proxy, RSAT-Clustering, RSAT-
Clustering-CmdInterface, RSAT-Clustering-Mgmt,
RSAT-Clustering-PowerShell, Web-Mgmt-Console, WAS-Process-Model,
Web-Asp-Net45, Web-Basic-Auth, Web- Client-Auth, Web-Digest-Auth,
Web-Dir-Browsing, Web-Dyn-Compression, Web- Http-Errors,
Web-Http-Logging, Web-Http-Redirect, Web-Http-Tracing, Web-
ISAPI-Ext, Web-ISAPI-Filter, Web-Lgcy-Mgmt-Console, Web-Metabase,
Web-Mgmt- Console, Web-Mgmt-Service, Web-Net-Ext45,
Web-Request-Monitor, Web-Server, Web-Stat-Compression,
Web-Static-Content, Web-Windows-Auth, Web-WMI,
Windows-Identity-Foundation
Perform Active Directory Schema update following the Technet article, “Prepare Active Directory and Domains”: https://technet.microsoft.com/en-us/library/bb125224(v=exchg.160).aspx.
Install the Mailbox role.
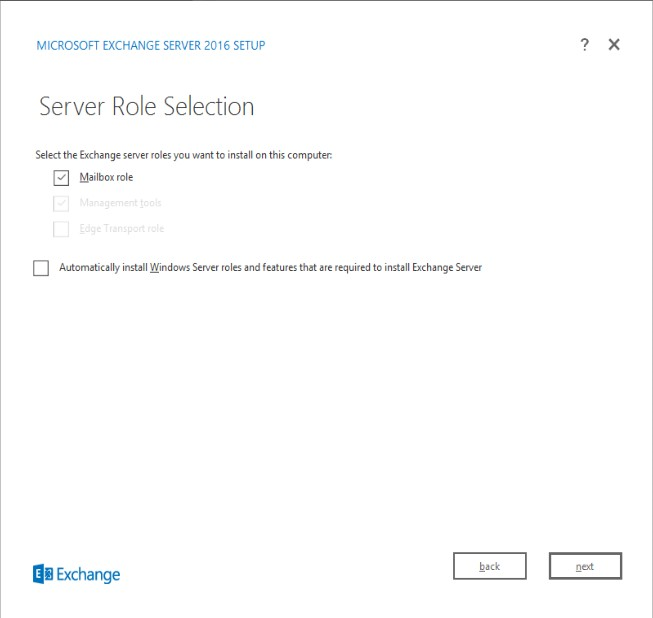
Once the installation is completed go to the Exchange Admin console: https://ev1-exch.ms1.dnslab.dnsops.gov/ECP.
Create an Internet send connector following this Technet article: https://technet.microsoft.com/en-us/library/jj657457(v=exchg.160).aspx.
Create an SSL certificate for the Exchange services.
On the Issuing CA (ev1-issuing), open Certification Authority -> Certificate Templates.
Right click -> Manage.
Right click on the Web Server template and select duplicate.
Compatibility = Windows Server Technical Preview

General -> Template Display Name MS1 Web Server
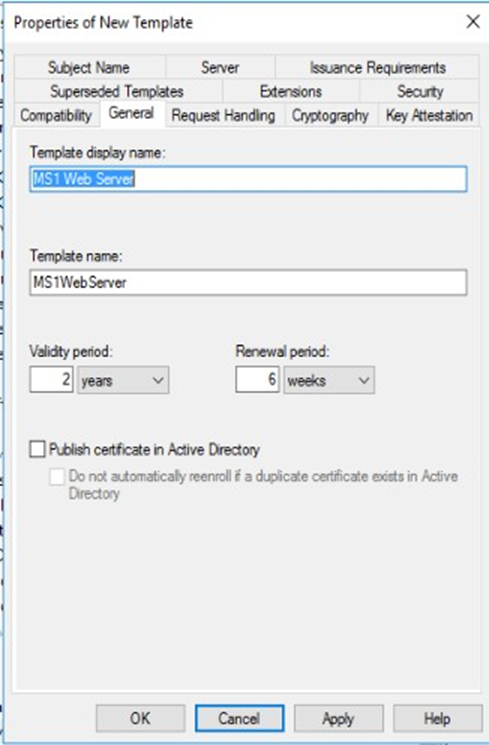
Security -> Domain Computers allowed to Enroll for certificate
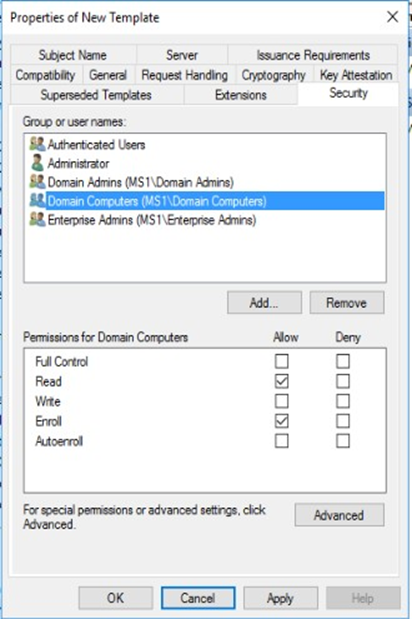
Subject Name -> Supply in Request

Click OK to save the new MS1 Web Server certificate template.
Back in the Certification Authority snap-in, right click on Certificate Templates -> Certificate to Issue, then select the MS1 Web Server certificate template.
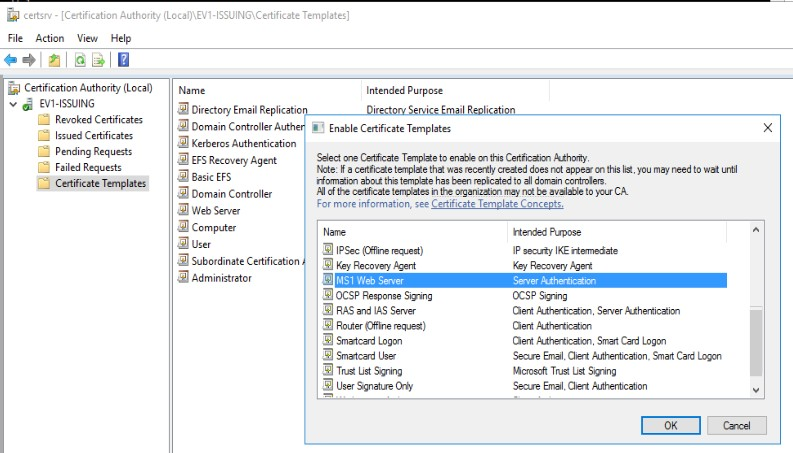
On the Exchange server (ev1-exch), log on as an administrator and type certlm.msc.
Go to Personal -> Certificates -> right click -> request new certificate.
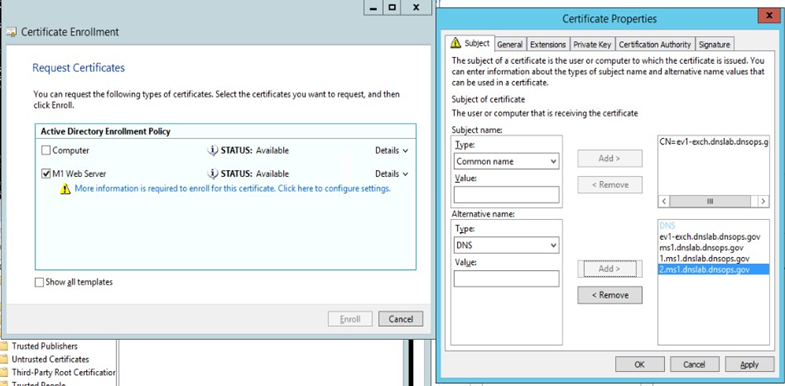
Subject Name: Common Name = ev1-exch.ms1.dnslab.dnsops.gov
Alternative Name: DNS = ev1-exch.ms1.dnslab.dnsops.gov, ms1.dnslab.dnsops.gov, 1.ms1.dnslab.dnsops.gov, 2.ms1.dnslab.dnsops.gov
Click OK and then select enroll.
Use this certificate to protect the Exchange services.
Within the Exchange Admin console (https://ev1-exch.ms1.dnslab.dnsops.gov/ECP), select Server -> Certificates, then change all services to use the issued SSL certificate.

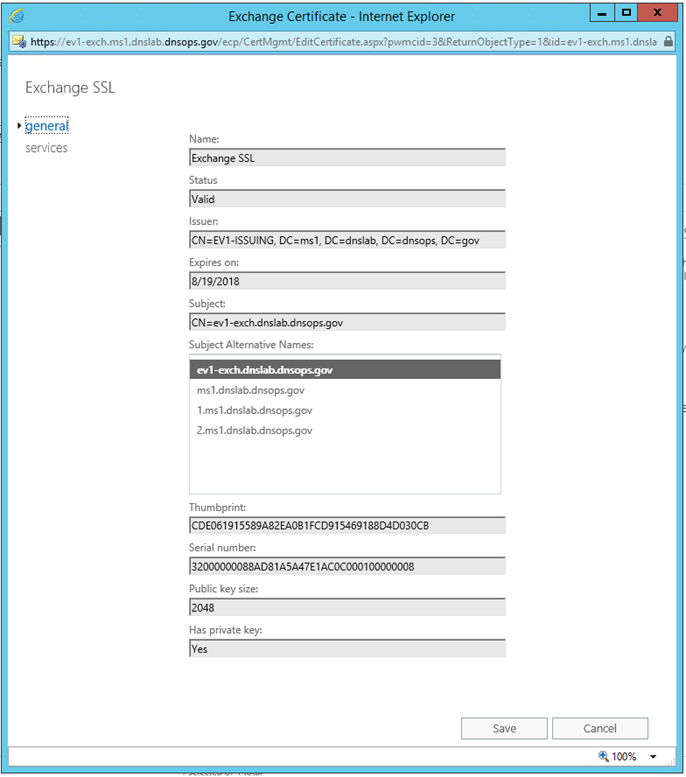
Select all the services except for Unified Messaging.
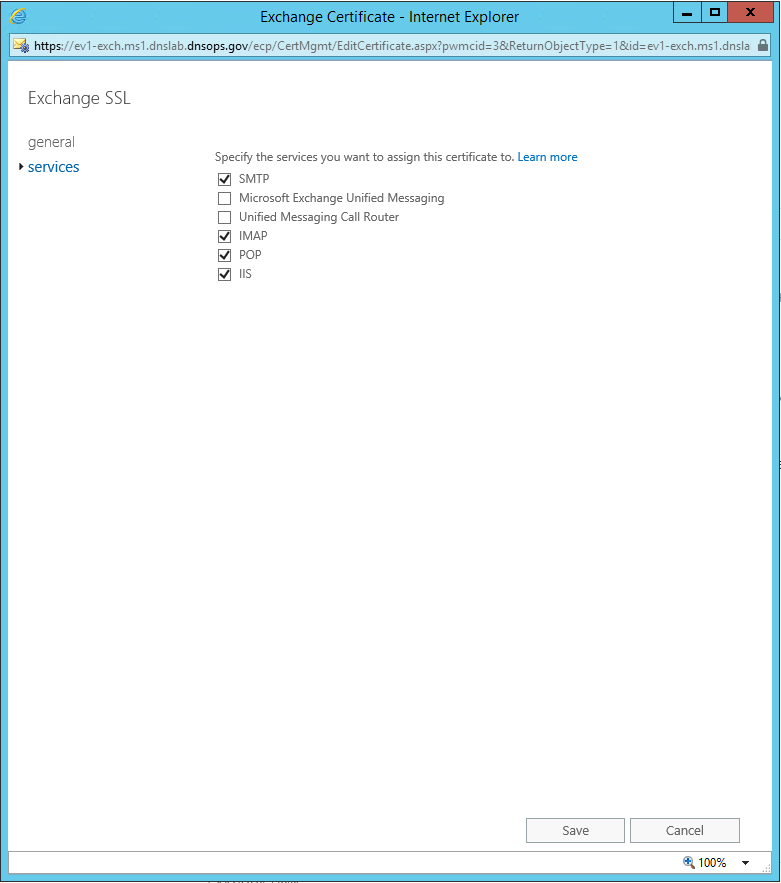
G.5.1 Generate the TLS DNS Record
Sign the ms1.dnslab.dnsops.gov zone by following the Technet article for enabling DNSSEC https://technet.microsoft.com/en-us/library/hh831411.aspx.
Export the Exchange SSL certificate to a .cer file. Find the certificate on the Issuing CA (ev1-issuing) within the Issued Certificates group.
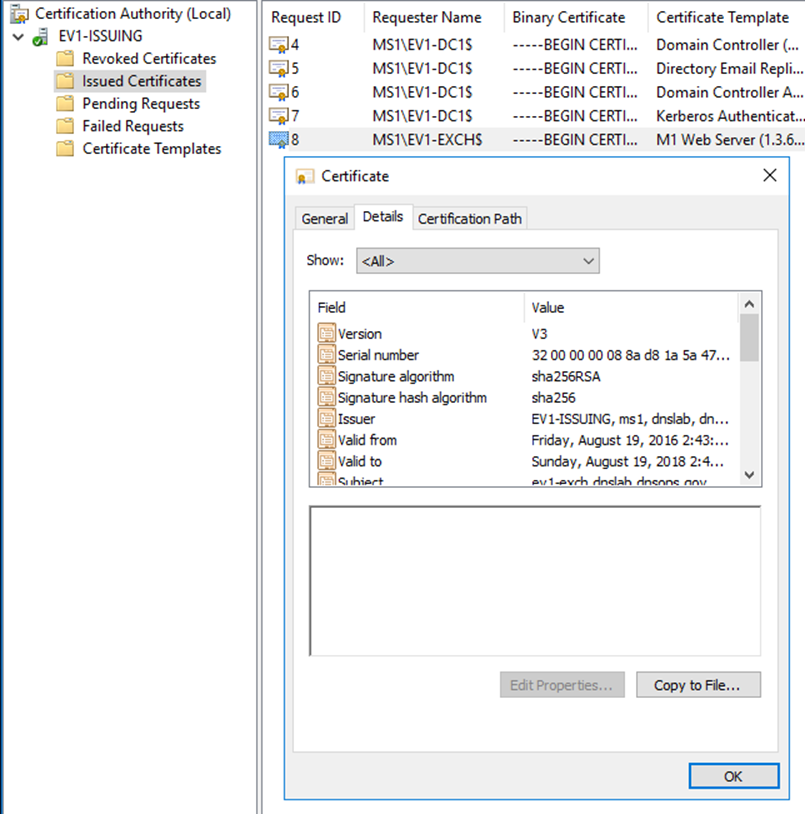
Click on the Details tab and select Copy to File. Save as a base64 (.cer) file.

Go to https://www.huque.com/bin/gen_tlsa. Open the exported certificate into notepad, then copy and paste into the Enter/paste PEM format X.509 certificate here field.
Fill in the name space specific information.

Select Generate and the TLSA record string is presented back.
_443._tcp.ms1.dnslab.dnsops.gov. IN TLSA 3 1 1 25d645a7bd304ae552c629ca5e7061a70f921afc4dd49c1ea0c8f22de6595be7
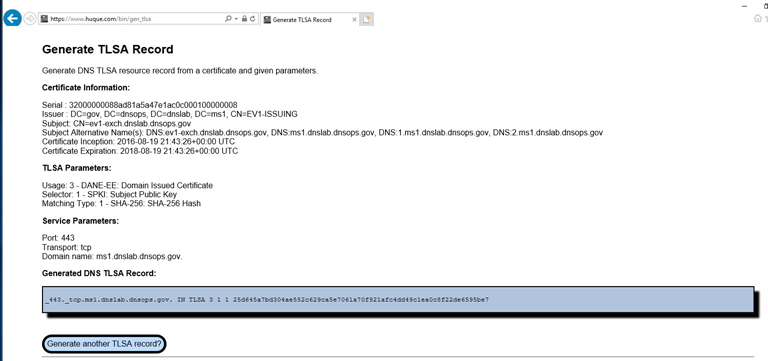
To register this TLSA record within Windows Server 2016 Active Directory Domain Name Services, issue the following powershell command on the Domain Controller as Administrator:
add-dnsserverresourcerecord -TLSA -CertificateAssociationData "25d645a7bd304ae552c629ca5e7061a70f921afc4dd49c1ea0c8f22de6595be7" - CertificateUsage DomainIssuedCertificate -MatchingType Sha256Hash -Selector FullCertificate -ZoneName ms1.dnslab.dnsops.gov -Name _25._tcp.ev1- exch.ms1.dnslab.dnsops.gov.
To get the zone output, issue the following powershell command:
Resolve-DnsName ev1-dc1.ms1.dnslab.dnsops.gov -type soa -server ev1-dc1 - DnssecOk
G.5.2 Issue S/MIME Certificates and Configure Outlook
To issue an S/MIME Digital Signature certificate to the user, go to the Issuing CA (ev1-issuingca).
Open the Certification Authority snap-in, right click on Certificate Templates and select Manage.
Find the Exchange Signature Only certificate template, right click and select duplicate.
Set Compatibility to Windows Server 2012 R2.
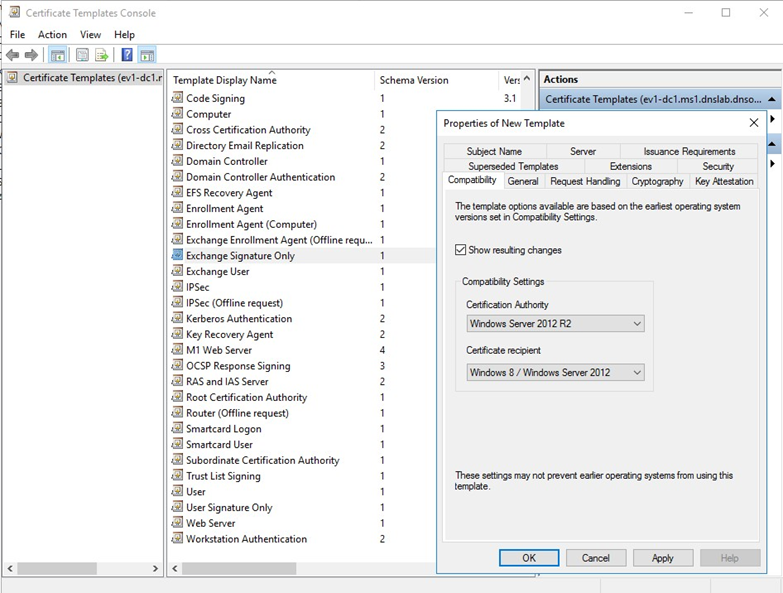
Within the General tab, provide a name for the new template.

In the Cryptography tab select Request can use any provider available on the subject’s computer.
In the Security tab, select Authenticated Users from Group or user names, and allow Read and Enroll.

In the Subject Name tab, select Build for this Active Directory information -> Email name (note: make sure the mail attribute on the recipient’s Active Directory object is populated with the correct email address)

On the Windows 10 workstation, log on as the user that will receive the S/MIME Digital Signature certificate. Start certmgr.msc -> Personal -> right click: all tasks -> request new certificate.
Select the Active Directory Enrollment Policy -> select the certificate template that was just created and follow the prompts.
Once completed, the S/MIME digital signature certificate will be in the user’s Personal -> Certificate store and can be used for S/MIME digital signature within Outlook.
To configure Outlook to use the new S/MIME certificate:
Open Outlook 2016.
Click on File, and then Options.
In the left-hand menu click on Trust Center.
Click on the Trust Center Settings box.

Click Email Security in the left-hand menu.
Click the Settings button within the Encrypted Email section.
Enter a name within the Security Settings Name field.
Select the Signing Certificate by clicking on the Choose button for the signing certificate, and select the Hash Algorithm.
If you have an S/MIME encryption certificate, select the Choose button for the encryption certificate and select the Encryption Algorithm.
Select the radio button Send these certificates with signed messages.

Appendix H Installation and Configuration of DNS Authority, DNS Cache, and DNS Signer at the NCCoE
The NCCoE lab contained one DNS Signer appliance, and one VM instance each of DNS Authority and DNS Cache. These systems were not subject to special configurations beyond normal network configuration. The normal installation and setup for Secure64 products is found in the documentation (online at: https://support.secure64.com/).
There are no special configuration options needed for supporting DANE aware mail servers or clients with Secure64 DNS products. DANE Resource Record types are treated as any other valid DNS RRtype.
H.1 DNS Signer
Once the DNS Signer appliance is installed and initially set up, there are no special configuration options needed when deploying DANE to support email. Once a certificate is obtained (or generated) for the SMTP server, a TLSA RR needs to be generated and added to the zone. This can be done using one of the tools or websites described in Section 3.4 above. Once the TLSA RR is generated, the zone can be manually updated by editing the zone file or updated via dynamic update. Enterprises should follow established procedure.
H.2 DNS Authority
Like DNS Signer, above, there is no difference between a standard setup of the authoritative server, and an authoritative server that hosts DANE RRtypes. Secure64 users should consult their product documentation on how to set up a DNS Authority instance.
H.3 DNS Cache
Like DNS Signer and DNS Authority, there are not additional steps in configuring a DNS Cache instance for supporting DANE. However, DANE requires the use of DNSSEC validation, so DNS Cache administrators (i.e. those that can enable the cachdnsadmin role) must enable DNSSEC validation and insure that the DNS Cache has a set of initial trust anchors.